# Onboarding for Tech Team
## Onboarding
**Quick Links:**
- [Blueprint Admin Dashboard Backend | Blueprint Wiki](https://wiki.sitblueprint.com/books/onboarding/page/backend-wiki)
### How does the Tech Team work?
### Git/Github
#### Making Your First Contribution!
This will be instructions on how to make your first contribution, with the example of adding John Doe to the list of contributors.
1. ##### Cloning the repository.
- Open a new terminal and type the `git clone` command followed by the **GitHub repository** you want to clone. In this case, it would be `git clone https://github.com/stevensblueprint/blueprint_website.git`. This should create a new folder on your computer with the name of the repository.
- Cloning the repository creates a local copy of all the code that you can edit on your computer. This **only needs to be run once** and from here, you can keep editing this local copy and updating it from the GitHub repository when needed.[](https://wiki.sitblueprint.com/uploads/images/gallery/2024-12/git-clone-command.png)
2. ##### Creating a new branch.
- Open the folder of the local repository and run the `git checkout` command followed by the **name of the branch**. When naming a branch, it's good to pick a short, descriptive name. In our case, we are adding a contributor, so we'll type `git checkout -b contributors/johnDoe`.
- Notice the `-b`? That's used to create a new branch as opposed to checking out a branch that already exists.
- Creating a new branch makes a new version of the code that is isolated from the main code. This means changes can be made without affecting the main code (in case something goes terribly, disastrously wrong).[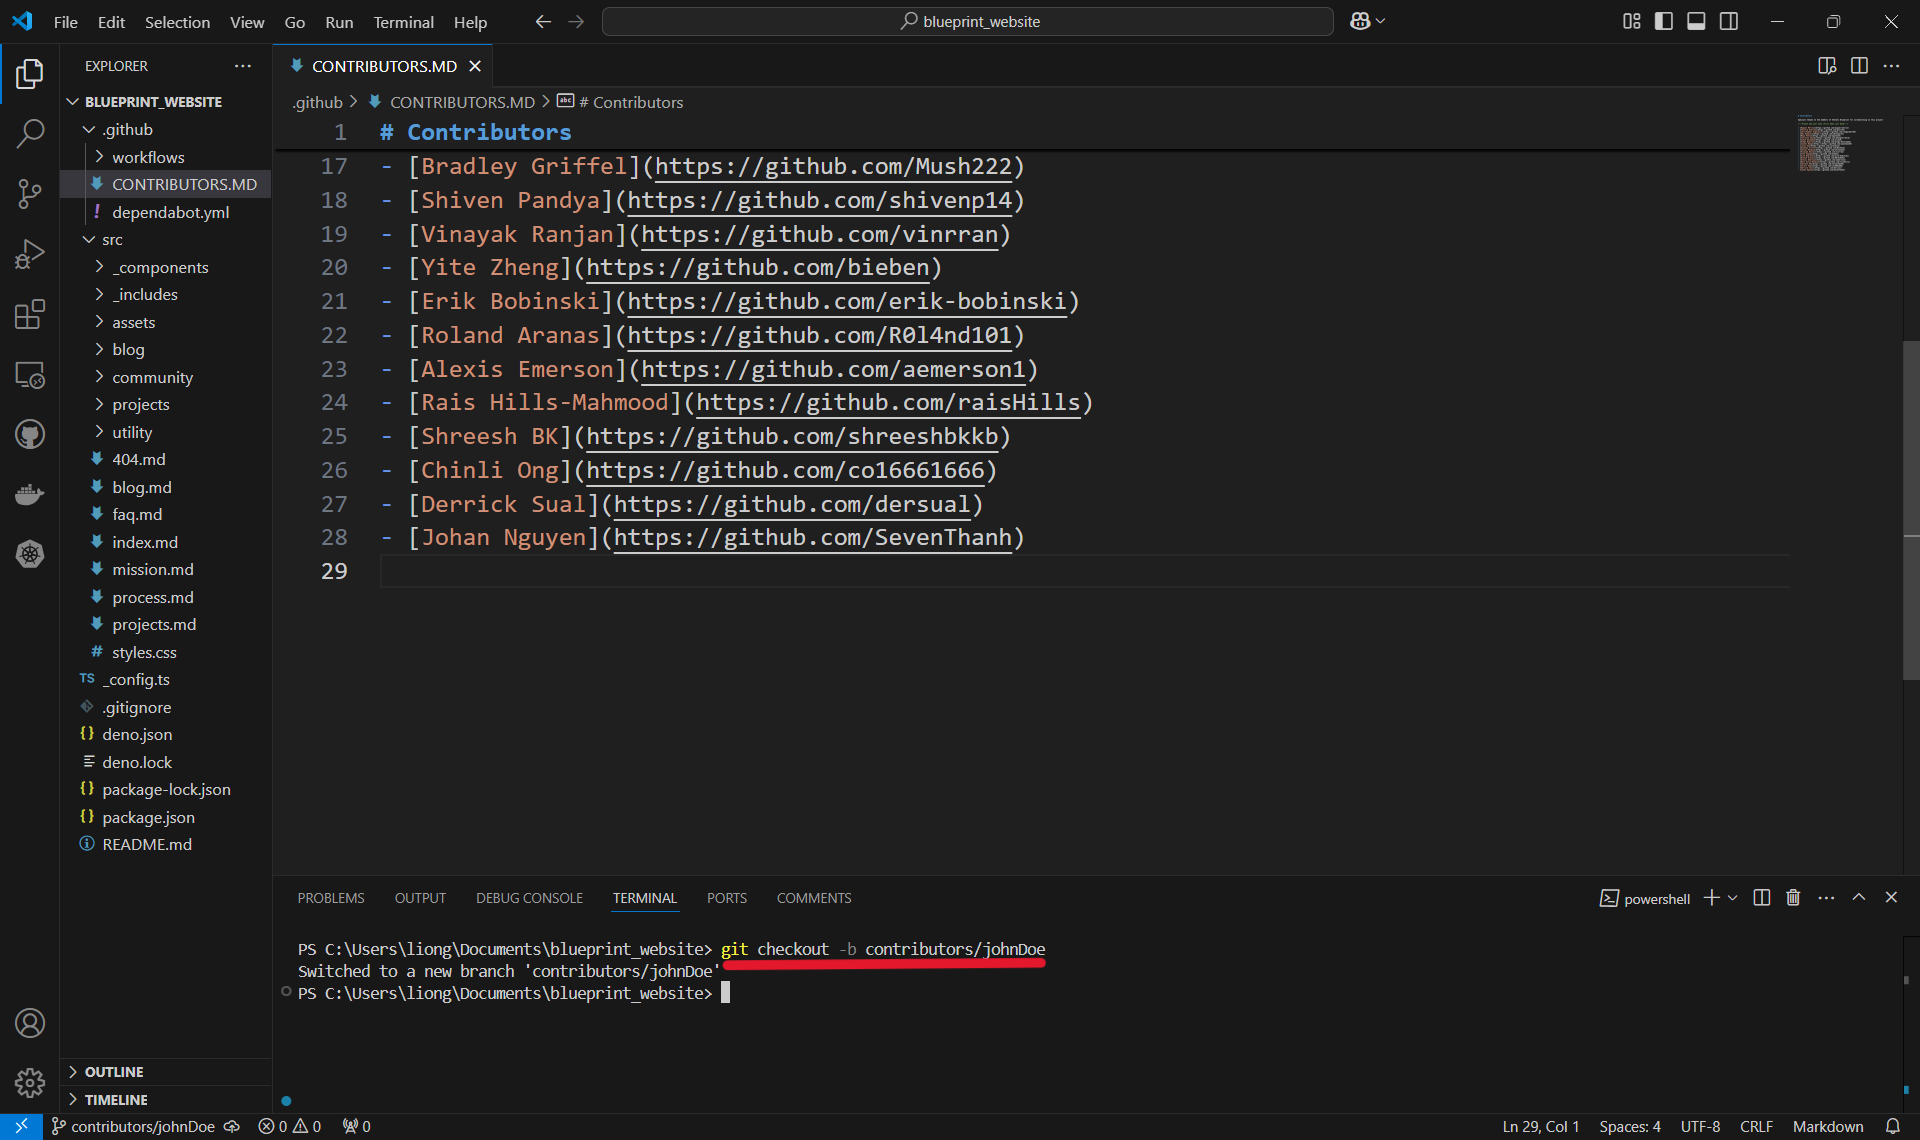](https://wiki.sitblueprint.com/uploads/images/gallery/2024-12/creating-new-branch1.png)
3. ##### Making the change!
- Open the file you want to edit and make the necessary changes. In this case, we will be adding John Doe to the list of contributors.[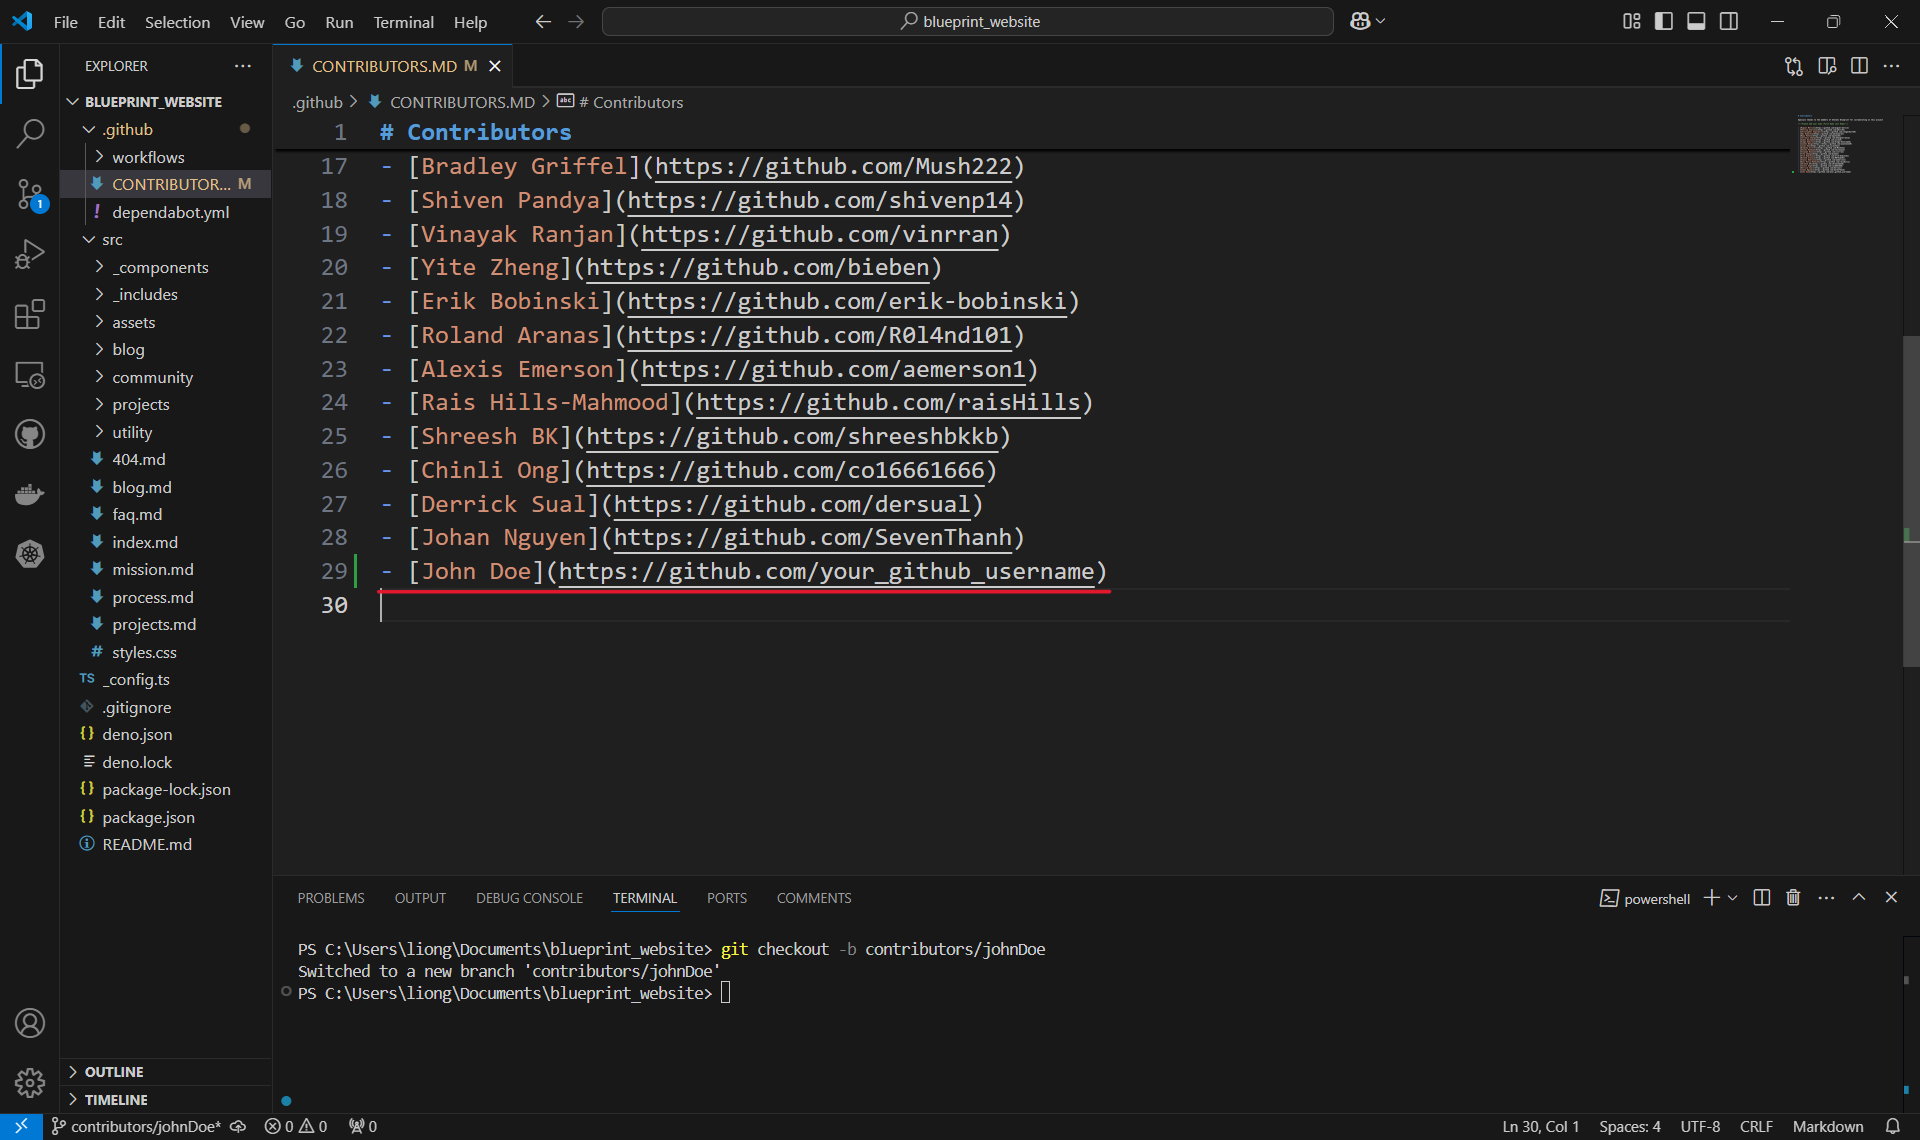](https://wiki.sitblueprint.com/uploads/images/gallery/2024-12/making-first-change.png)
- Make sure to save the file!
4. ##### Adding a file to a commit.
- Once the change is made, use the `git add` command followed by **the local file path** to the changed file, in order to include or 'stage' the change them for the next commit. Commits can be thought of as checkpoints; more on that later.
- In this case, we made changes to the `CONTRIBUTORS.MD` file in the .github folder, so our file path is `.github/CONTRIBUTORS.MD` and we type in `git add .github/CONTRIBUTORS.MD`.
- You can use `git add` multiple times to add as many files as you need.
- Another option is to use `git add .` to add all files with changes.[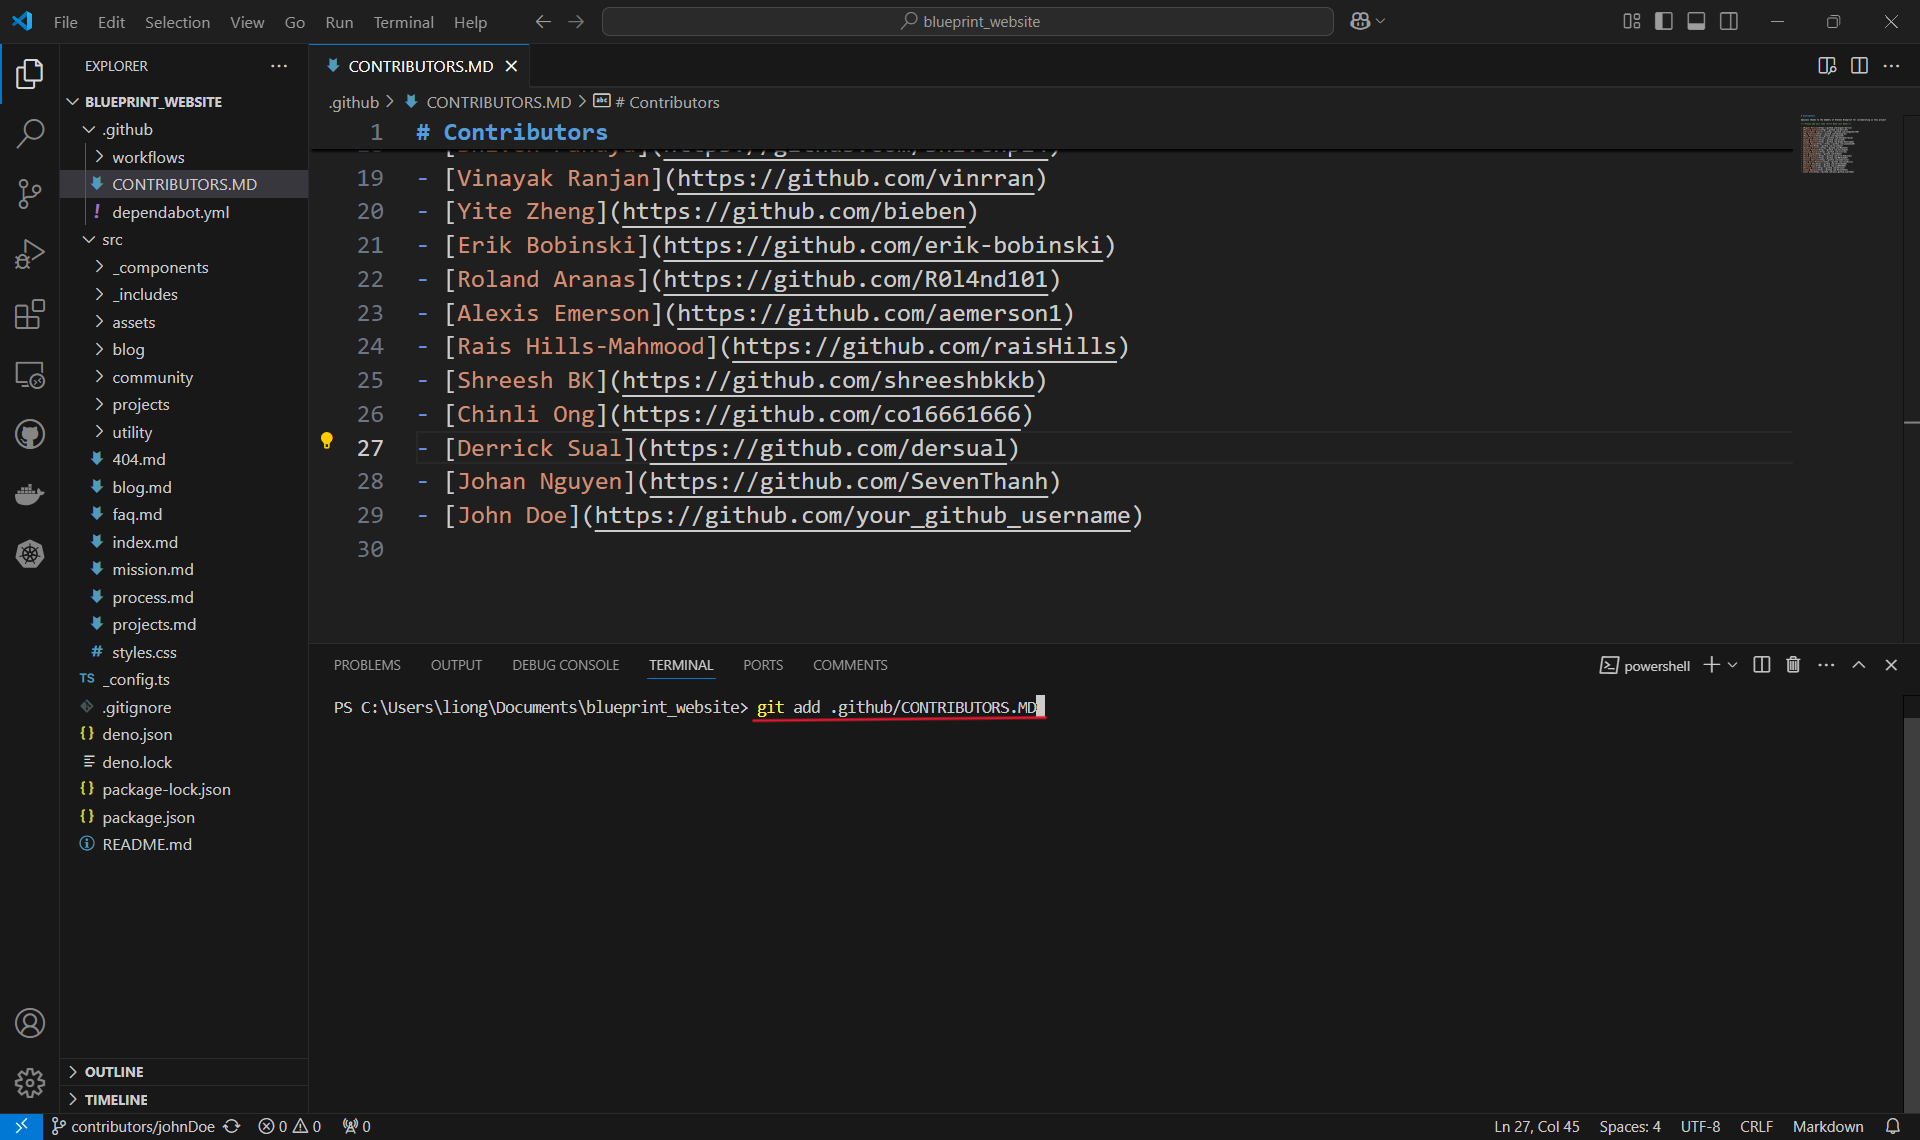](https://wiki.sitblueprint.com/uploads/images/gallery/2024-12/adding-changes-to-commit1.png)
- Note that the file path is case sensitive.
5. ##### Checking changes to be committed.
- You can use the `git status` command to check what files have been added or "staged" for a commit. In this case, it's only the one contributors file that we added.[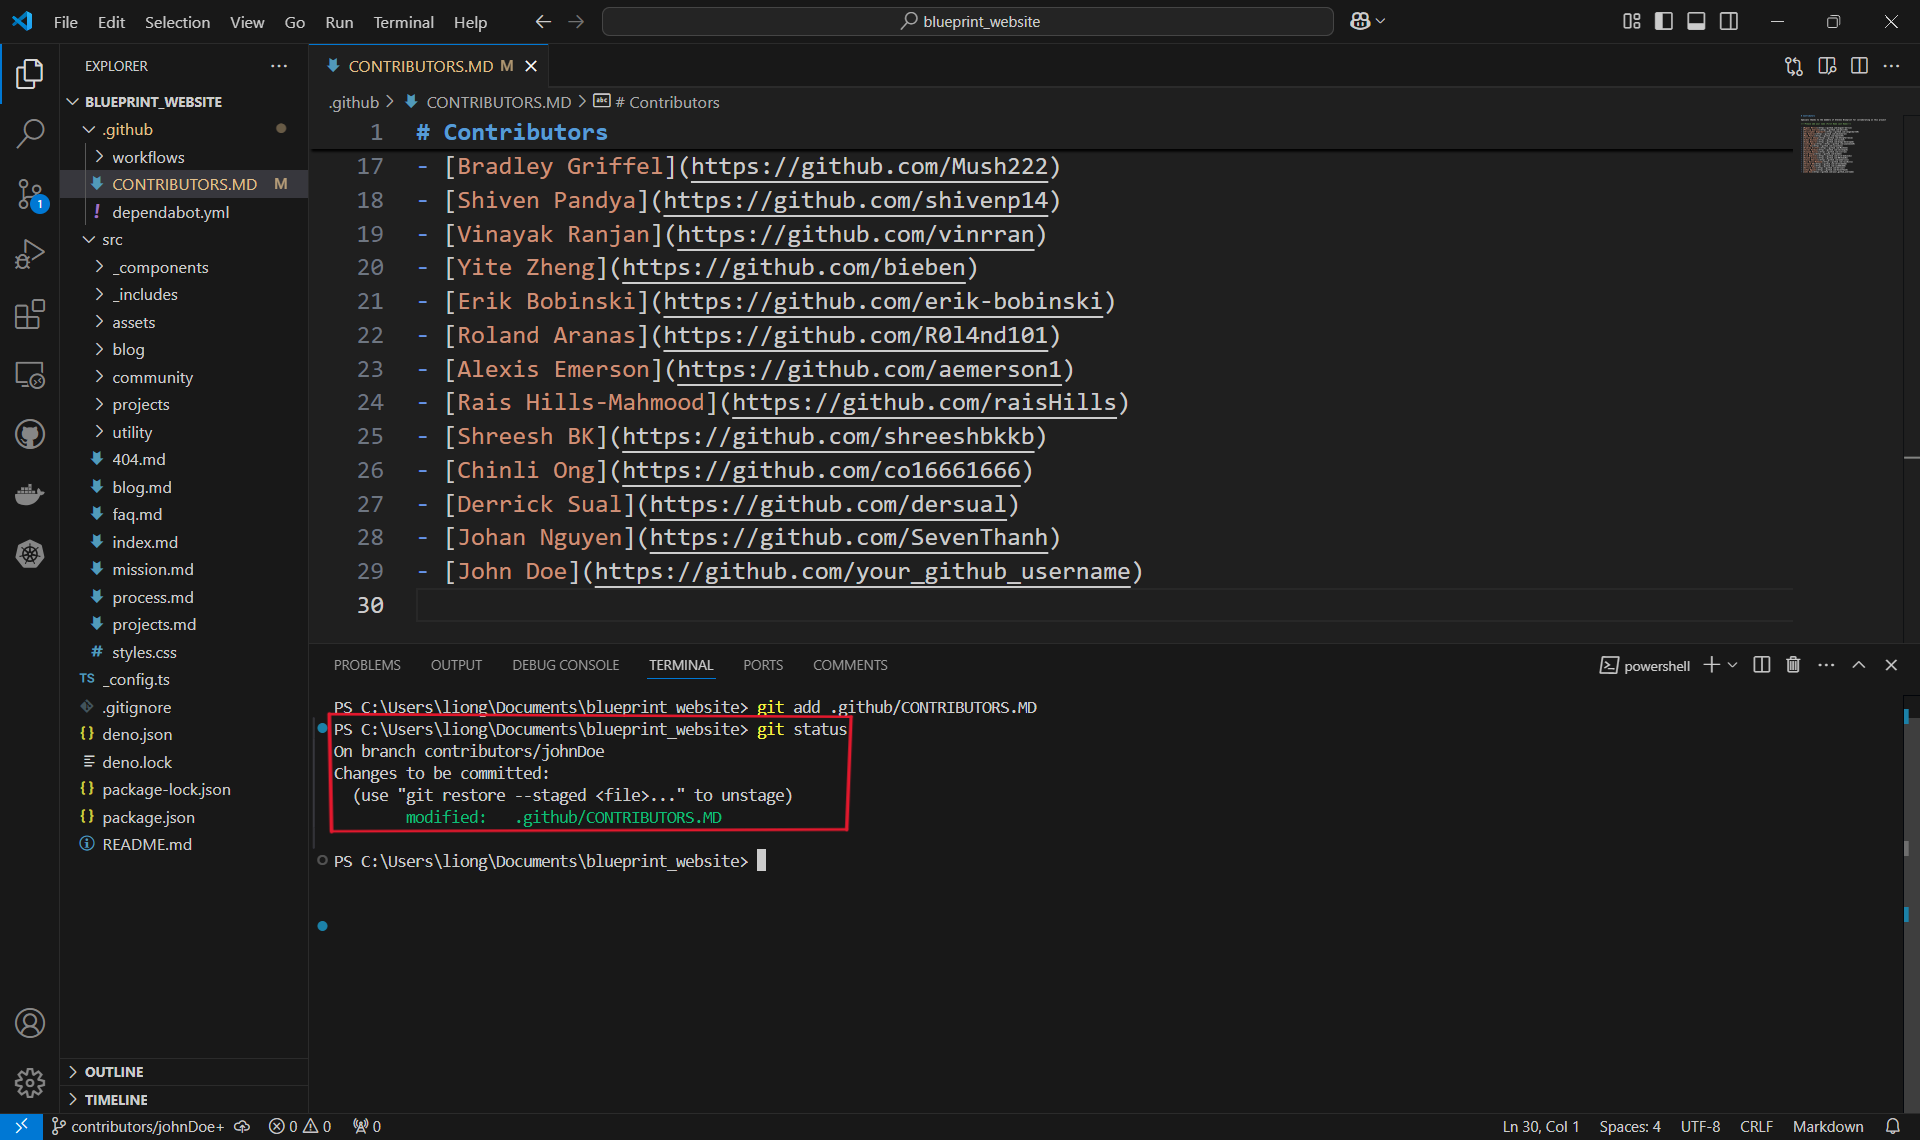](https://wiki.sitblueprint.com/uploads/images/gallery/2024-12/git-status-command.png)
- You can see here that our file is under changes to be committed and is in **green** text. Changes not staged for commit will be in **red**.
6. ##### Committing changes.
- With our changes made and staged, we can create a commit which is basically a checkpoint for our code. We can revert to this point if we make mistakes or need to look at the version of the code at this point in time.
- It is also good practice to include a commit message by using the `-m` flag to describe what changes were made. For us, we will just say that we are adding a new contributor, like so: `git commit -m "Added a new contributor!"`.
- Commit Messages: When writing a commit, it is usually good practice to follow a convention. At Blueprint, we use the Conventional Commits specification: [www.conventionalcommits.org](https://www.conventionalcommits.org)
- Most basic form: `: `, two common types are feat (feature) or fix (bug-fix)
- We can commit as often as we want, or when we feel it is necessary before making big changes.[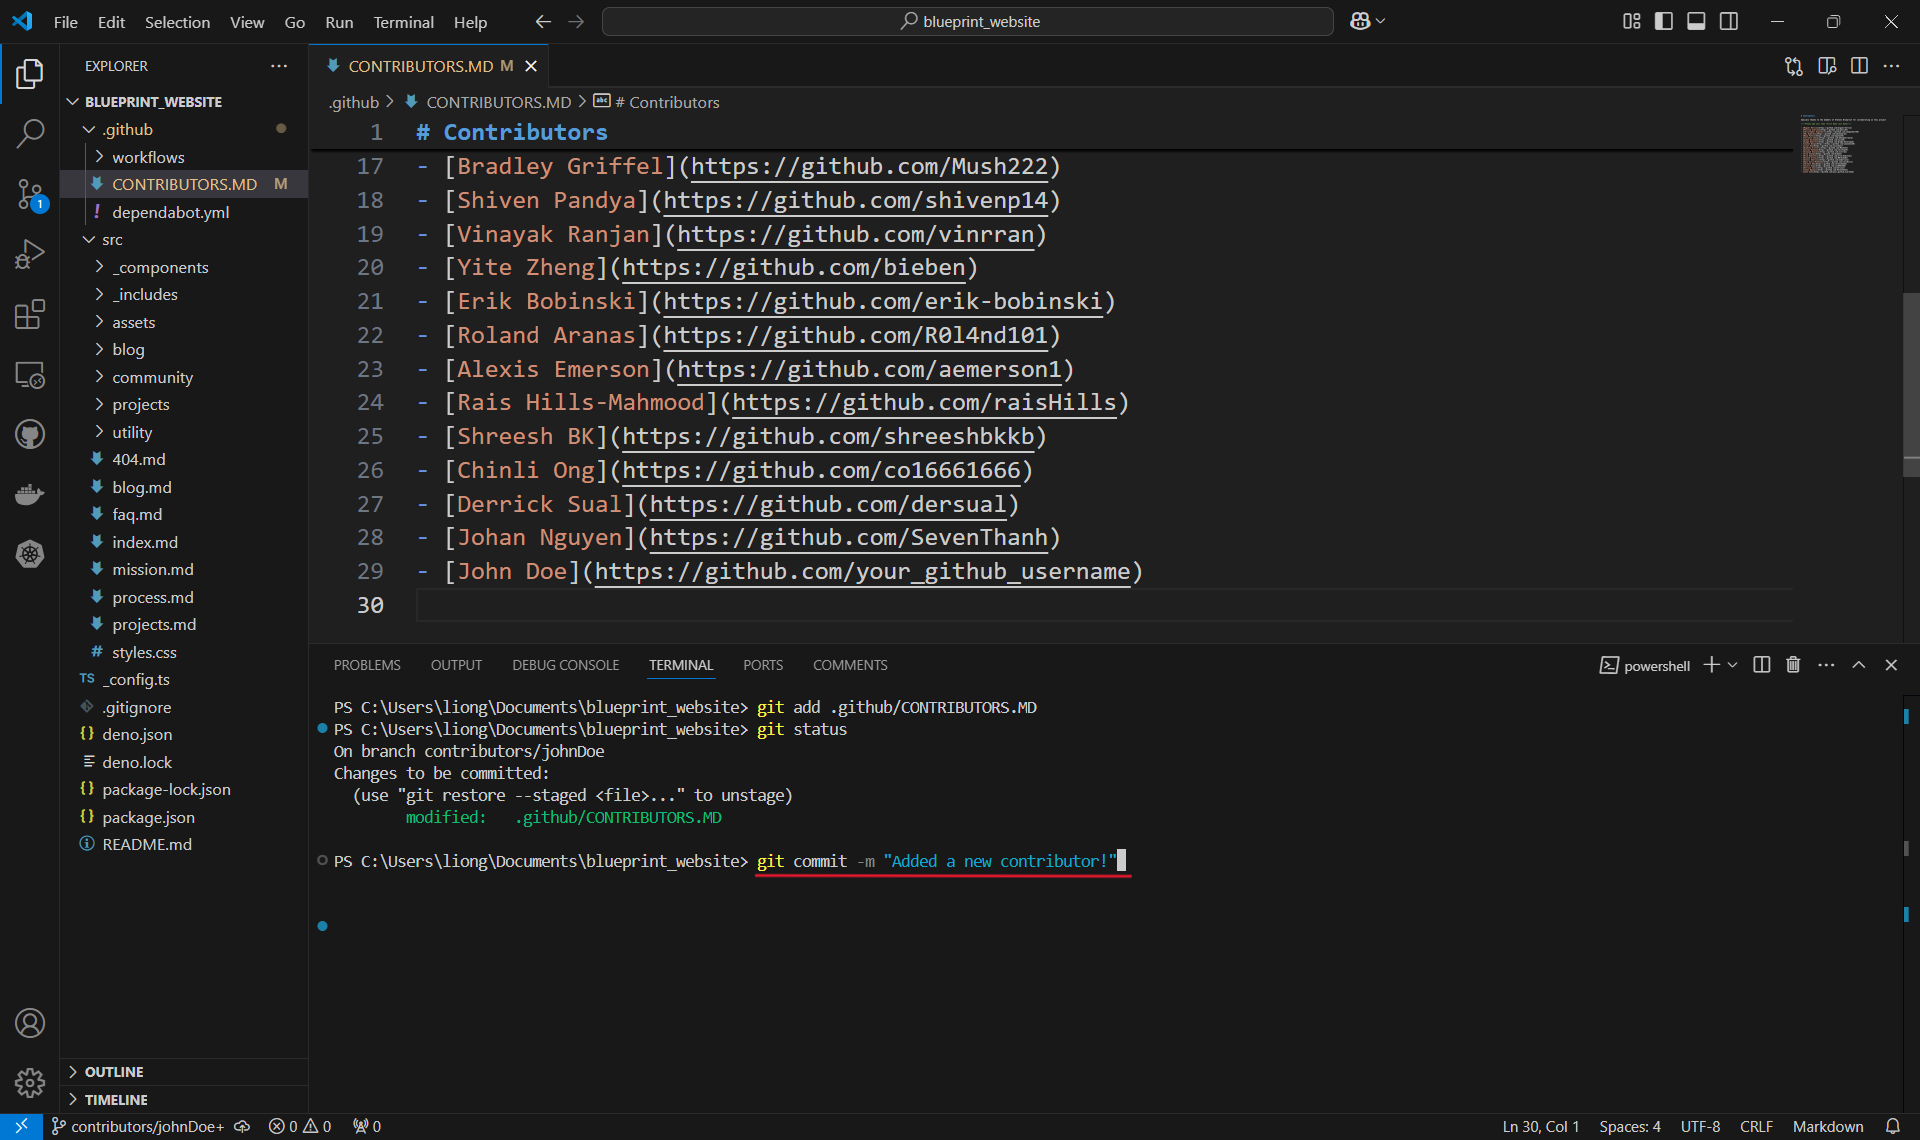](https://wiki.sitblueprint.com/uploads/images/gallery/2024-12/git-commit-command.png)
7. ##### Pushing the commit.
- In order for our changes to appear on the remote repository (the one on Github), we need to push our changes using the `git push` command. If we run it as is, however, we will encounter an error:[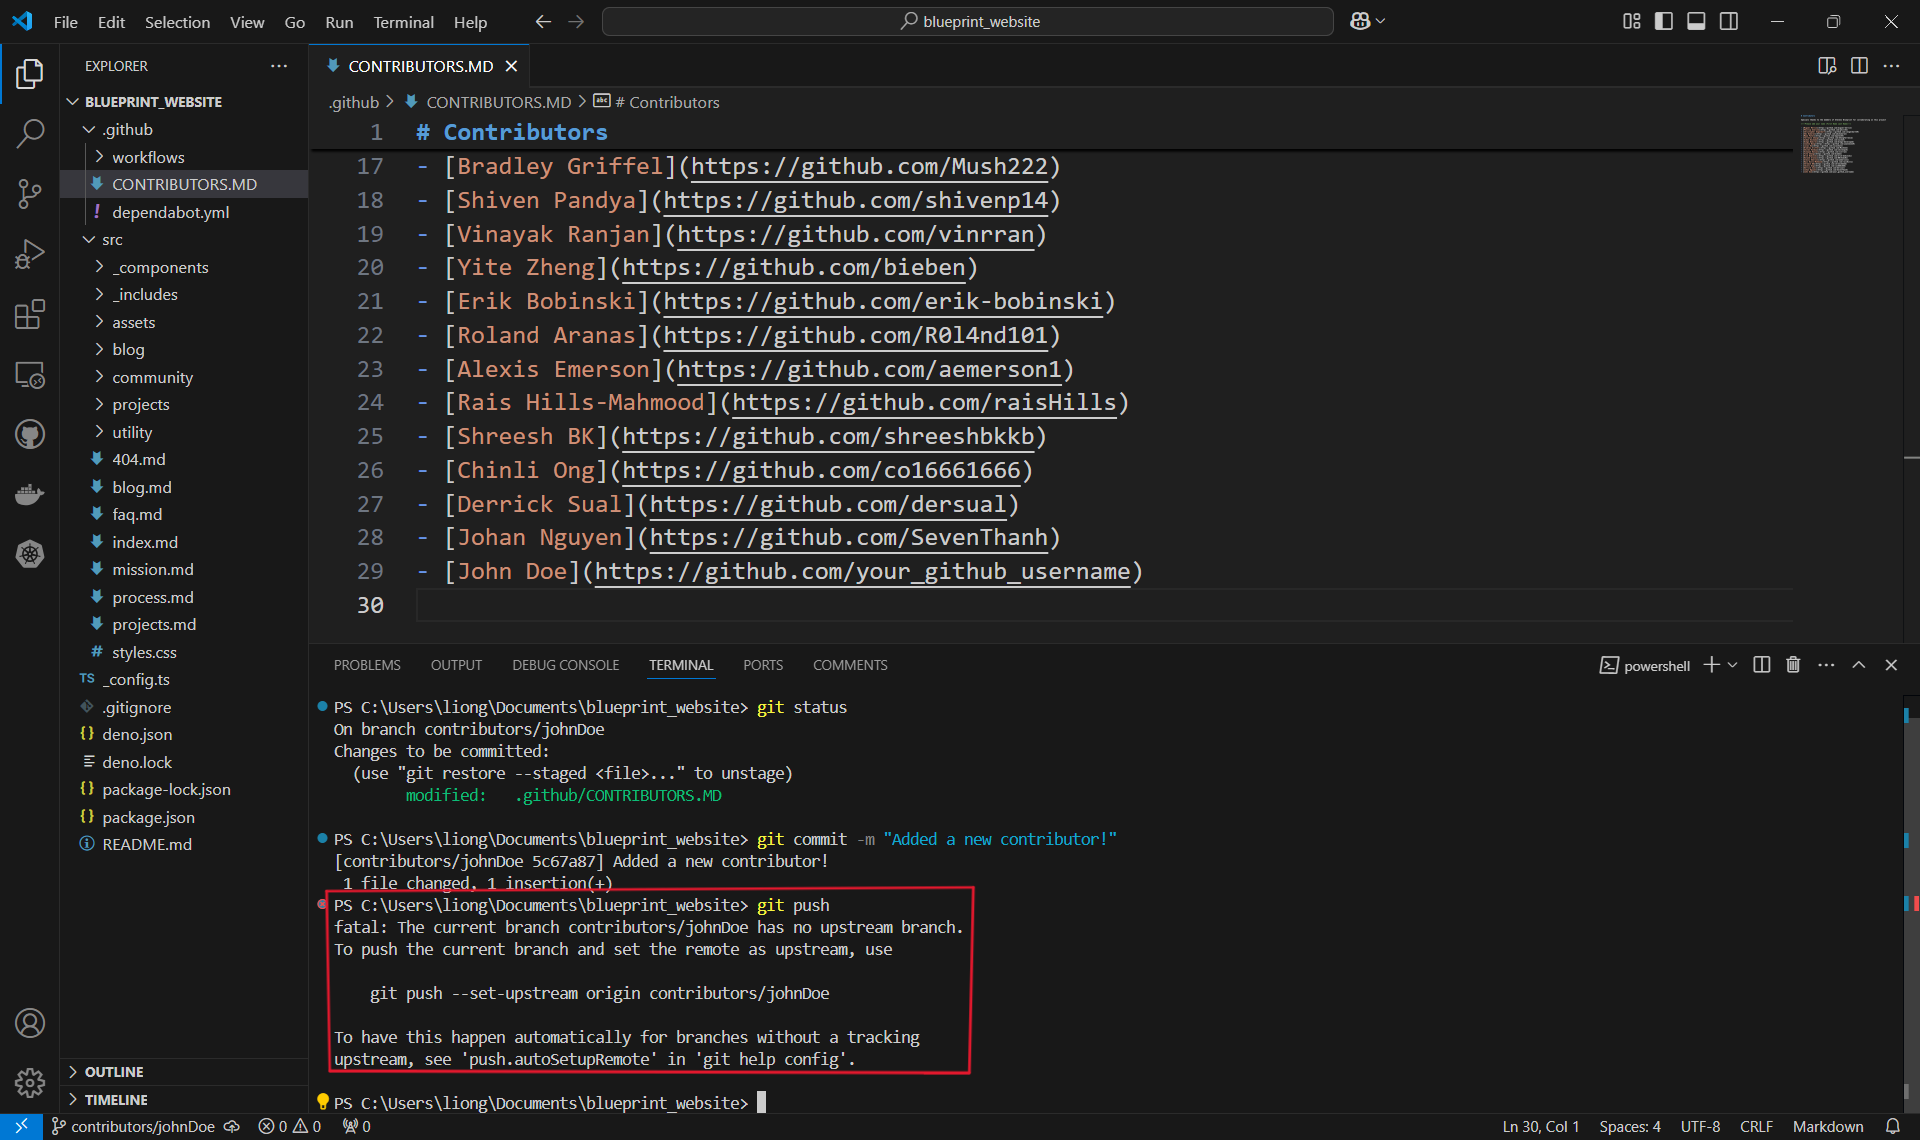](https://wiki.sitblueprint.com/uploads/images/gallery/2024-12/git-push-command-1.png)
- This is because when we create the branch contributors/johnDoe, we only created it locally and it does not exist on the Github repository. Therefore, we must run the command shown: `git push --set-upstream origin contributors/johnDoe`.[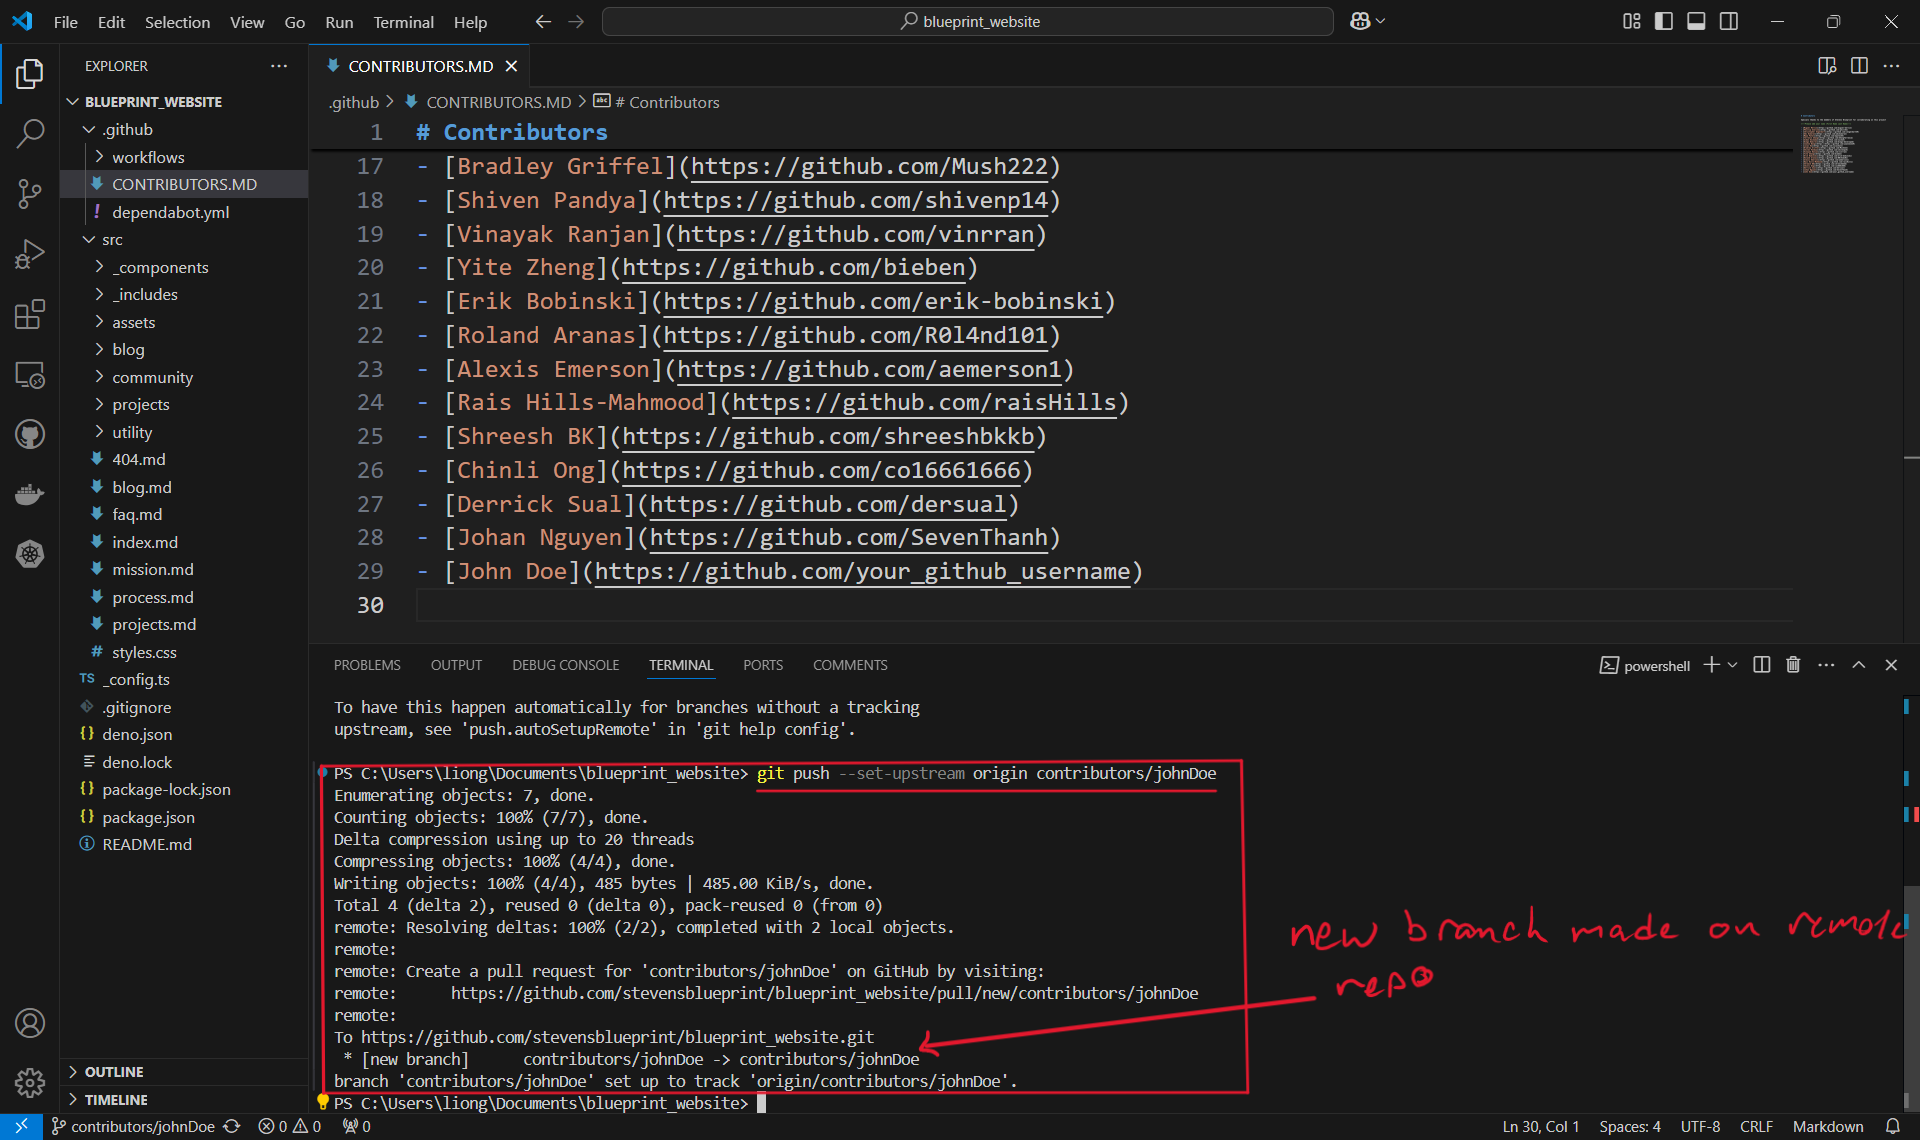](https://wiki.sitblueprint.com/uploads/images/gallery/2024-12/git-push-command-2.png)
- Once the branch is set up remotely, or if the branch already existed remotely and was not created locally, we can simply use `git push`.
8. ##### Creating a pull request.
- Once we have completed our task and pushed the changes, we can work on merging the changes back into the main code. To do this, we can create something called a pull request (PR for short) where we essentially propose the changes we made.
- Going onto Github, you will likely see a pop-up asking if you want to create a pull request for your branch. If so, press **"Compare & pull request"**.[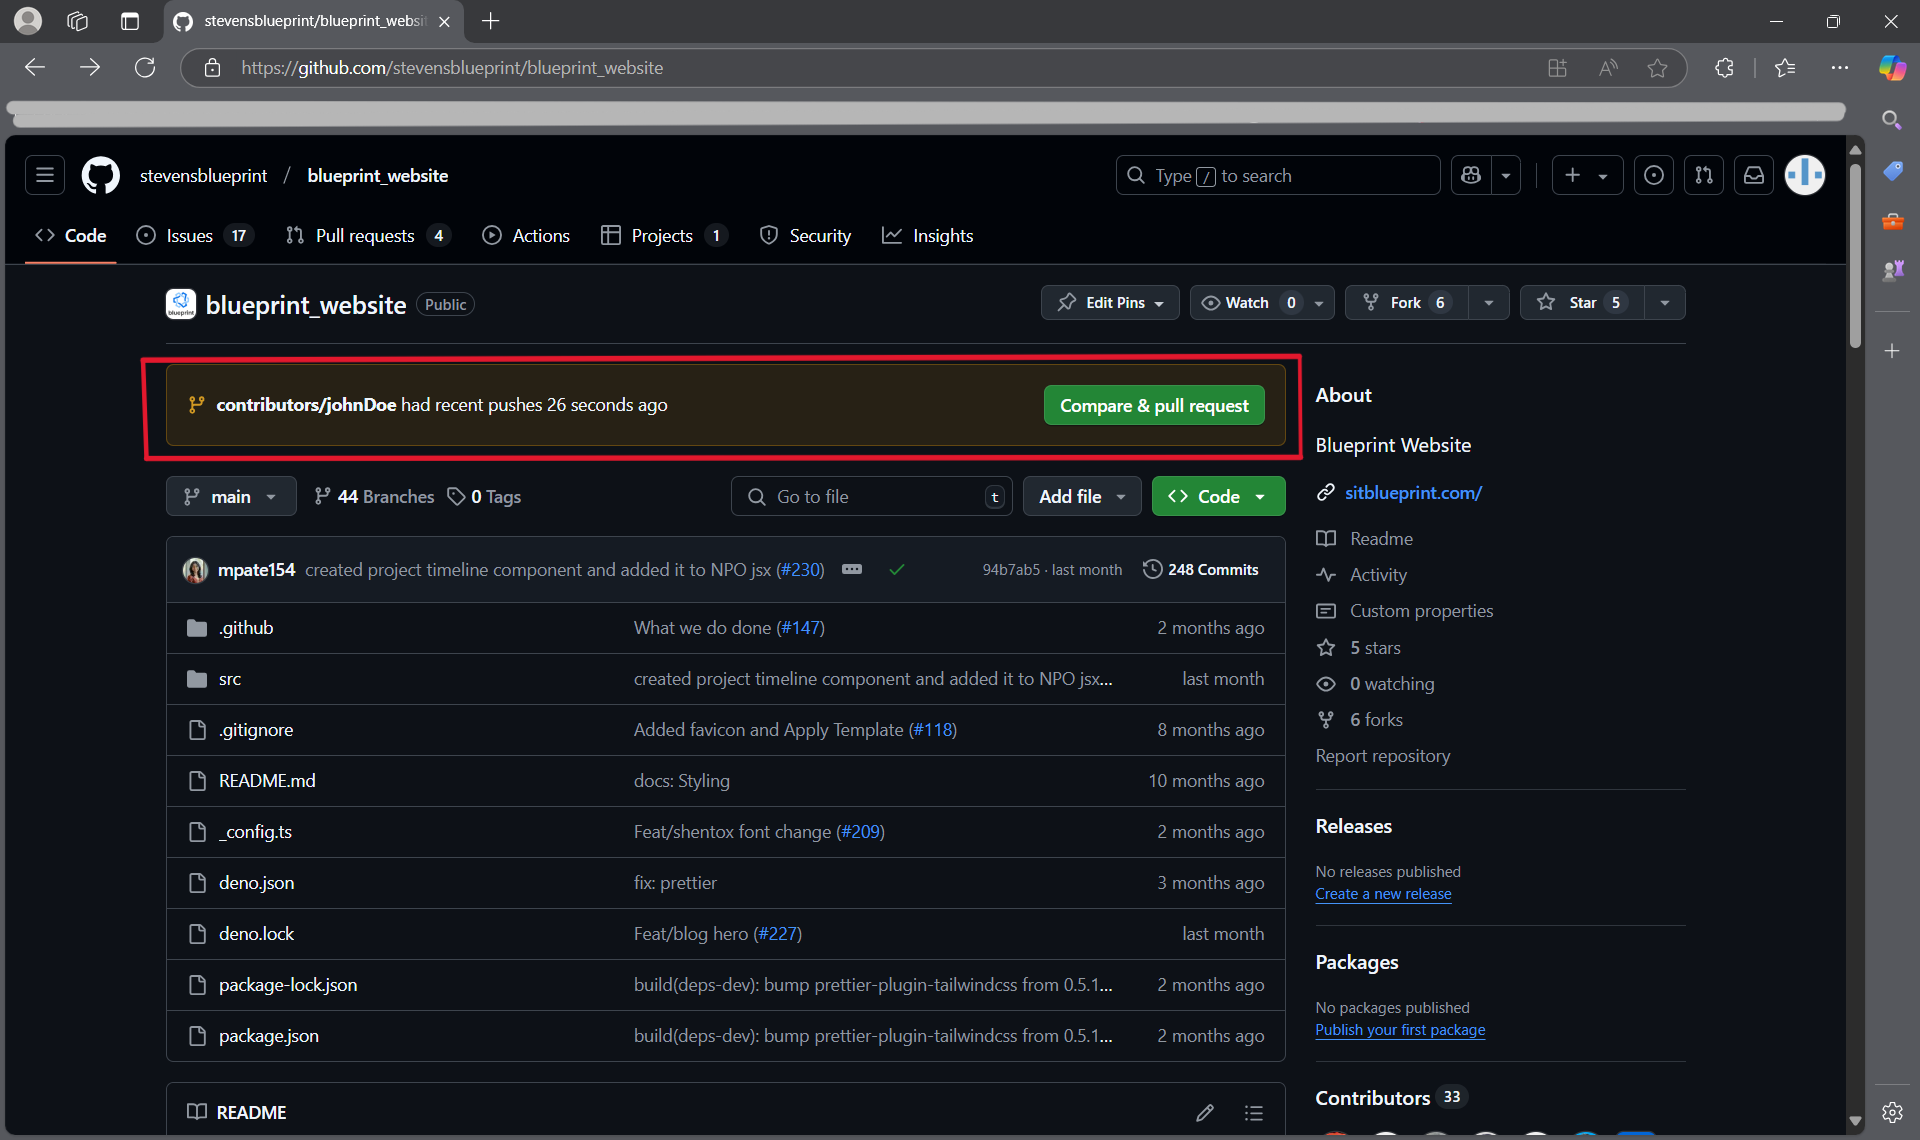](https://wiki.sitblueprint.com/uploads/images/gallery/2024-12/making-pull-request.png)
- If you don't see it, you can also create a new pull request by navigating to the **"Pull requests"** tab and selecting **"New pull request"**.[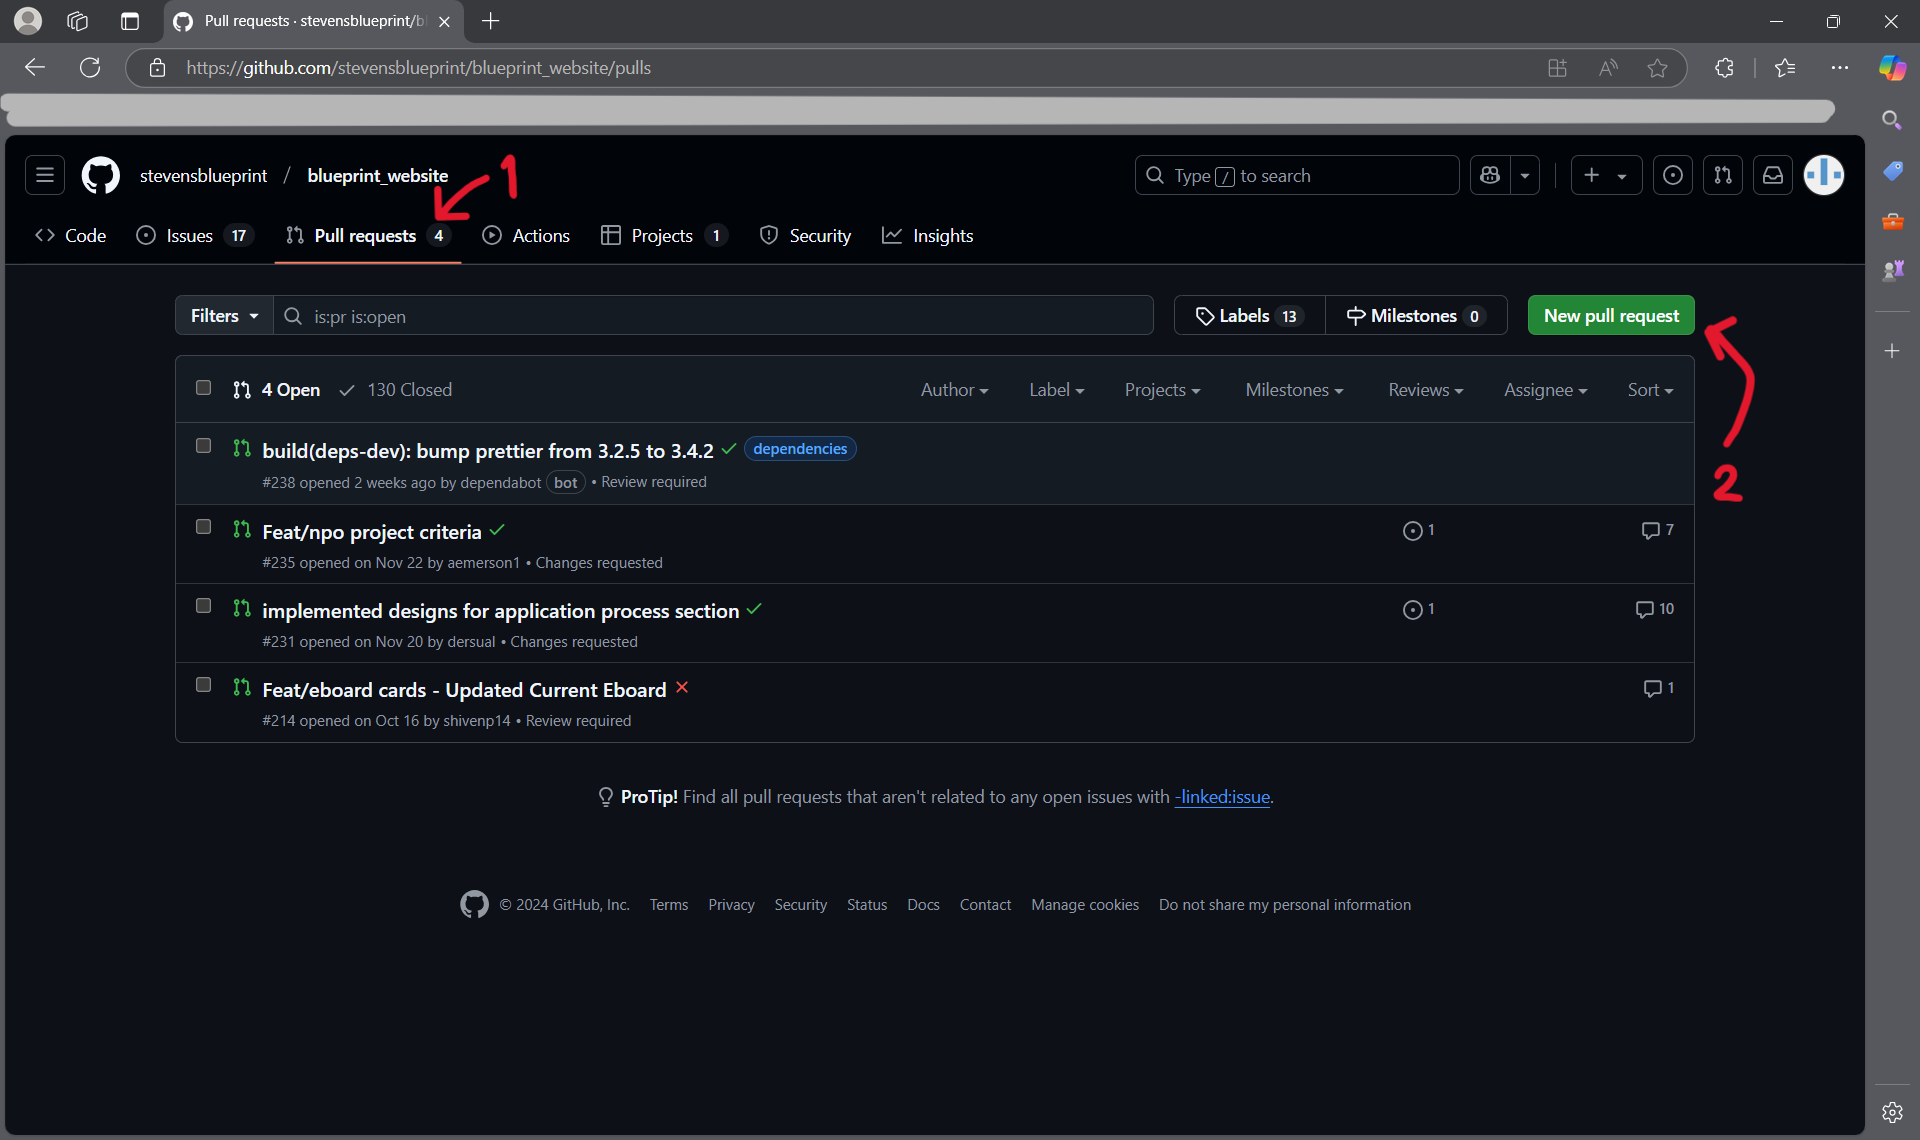](https://wiki.sitblueprint.com/uploads/images/gallery/2024-12/navigate-to-new-pr.png)
9. ##### Approvals and Merging.
- Next, you can put in details for your pull request such as a title and detailing what changes were made on your branch.[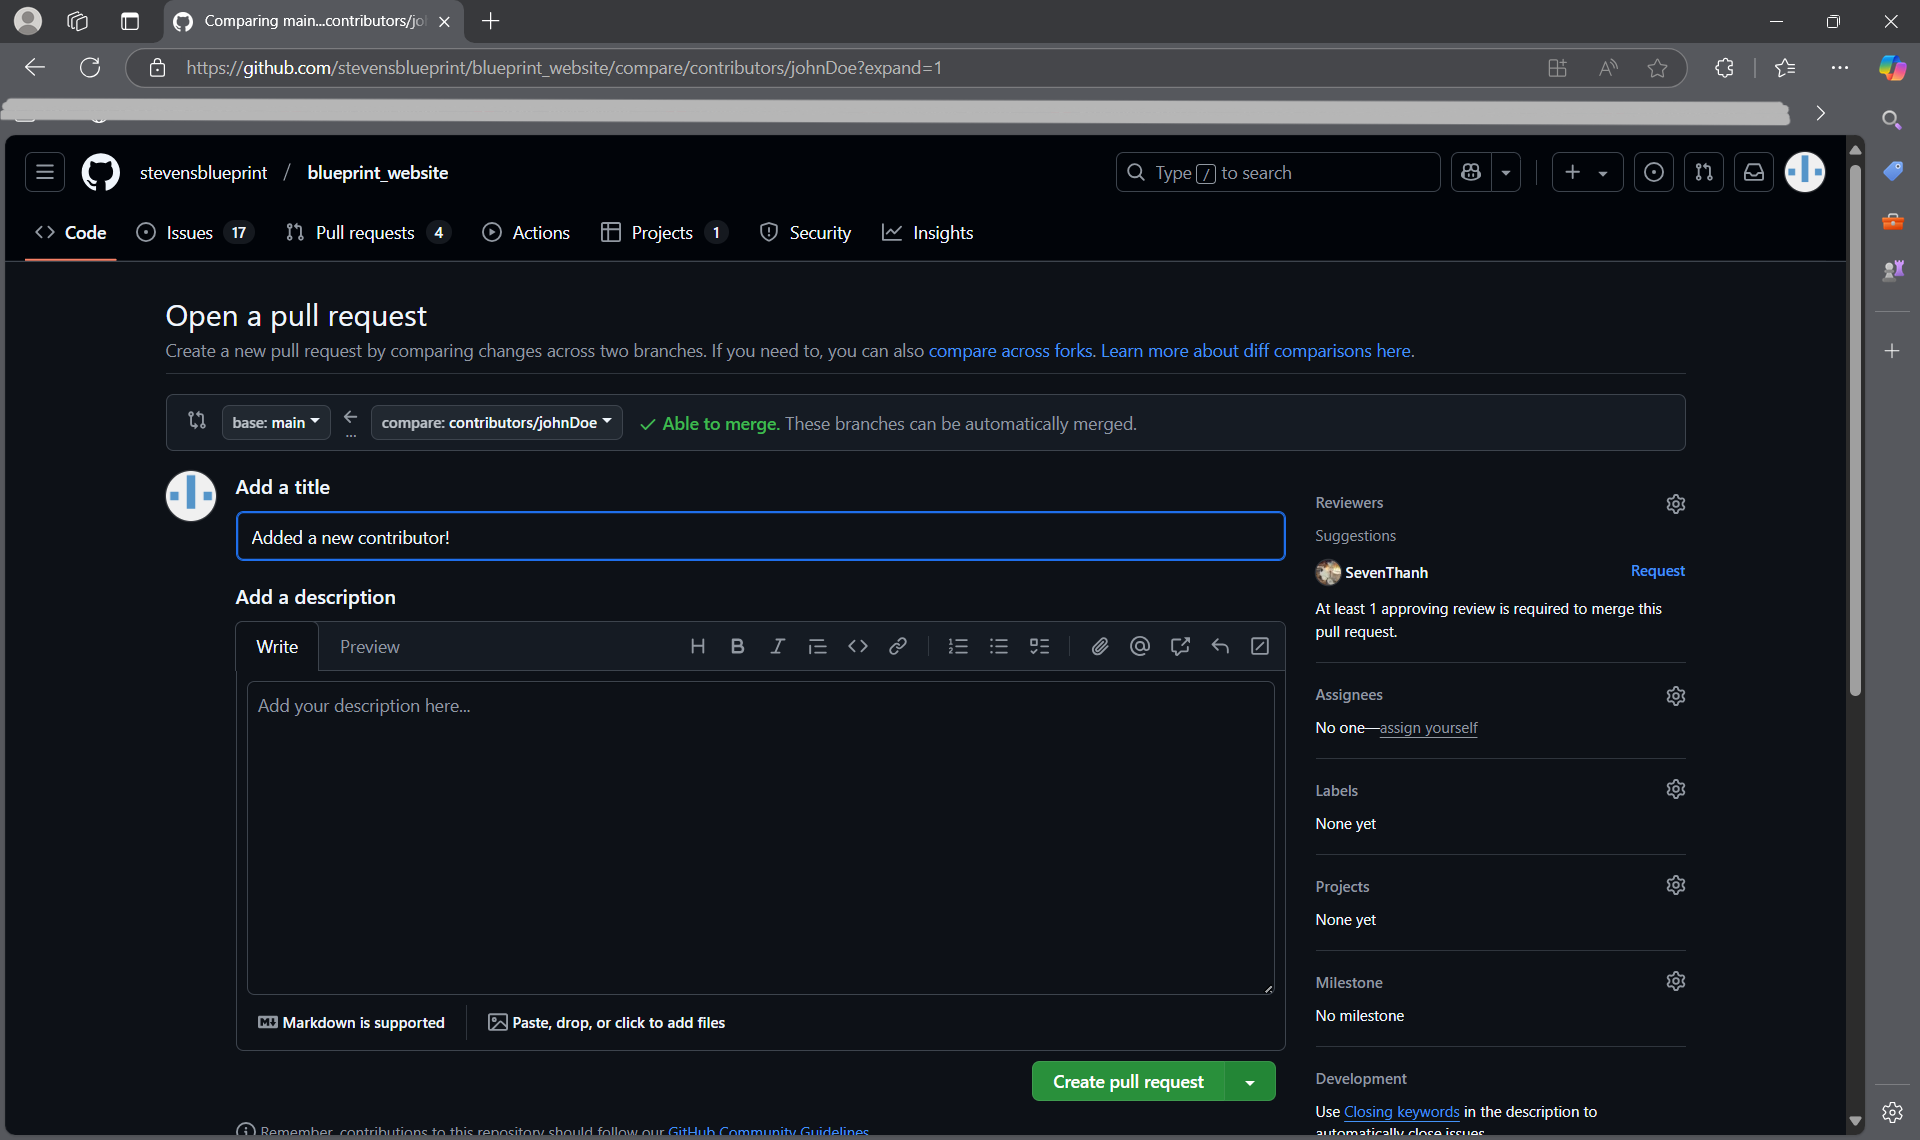](https://wiki.sitblueprint.com/uploads/images/gallery/2024-12/new-pull-request.png)
- You will also see a list of approvals, some of which are run automatically. It is also necessary for at least one person to review your pull request before you can merge it with the main branch. Once your pull request is approved, hit **"Squash and merge"**. You're done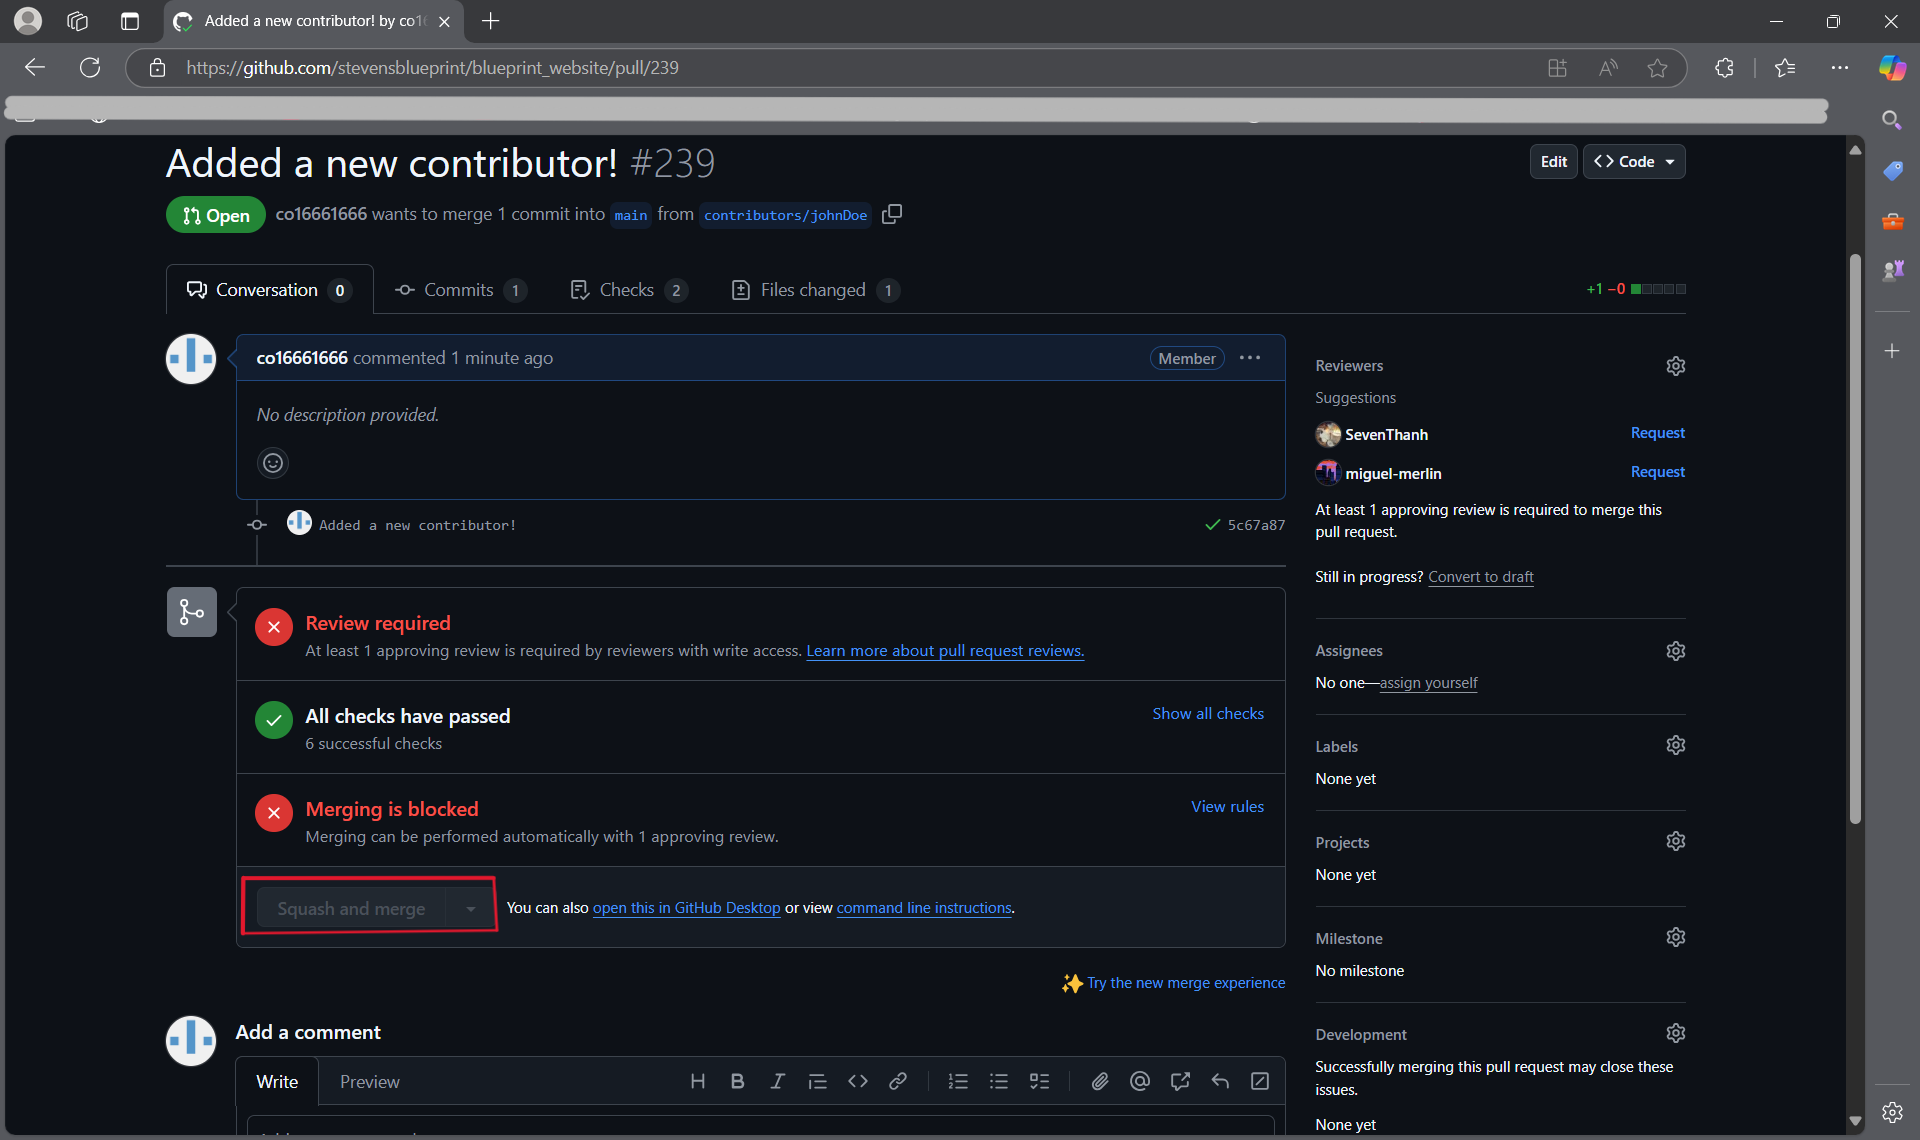](https://wiki.sitblueprint.com/uploads/images/gallery/2024-12/merging-request.png)
10. ##### What Now?
- In order to keep your local copy updated with the remote repository (on GitHub), you can run the `git pull` command. This pulls all the changes made by other people.
- Pulling changes can sometimes result in **merge conflicts** which is when the changes on the remote repository don't work well with your local version. See the Merge Conflict section below for more details.
- For each task, your process should be something like this:
- - **Step 2**, create a new branch
- Repeat **Steps 3-7** as you work on your task and make changes
- **Steps 8-9** when you complete your task
- Make revisions as needed.
11. ##### Merge Conflicts
- What is a merge conflict?
- When different versions of the code are combined, the changes don't always align well. For example, if you have a version where you changed a line of code, but the same line of code was removed in a different version, this could create a conflict.
- How to fix?
- Fixing conflicts isn't always straightforward, but here's a guide to get started on it: [https://code.visualstudio.com/docs/sourcecontrol/overview#\_merge-conflicts](https://code.visualstudio.com/docs/sourcecontrol/overview#_merge-conflicts)
#### Project Board and Tasks
Now that you know how to make changes, there's the questions of *what* to change.
##### Tasks
- If you navigate to the Issues tab on GitHub, you will be able to see what needs to be done for a specific repository. Let's take a look at the blueprint website for example:[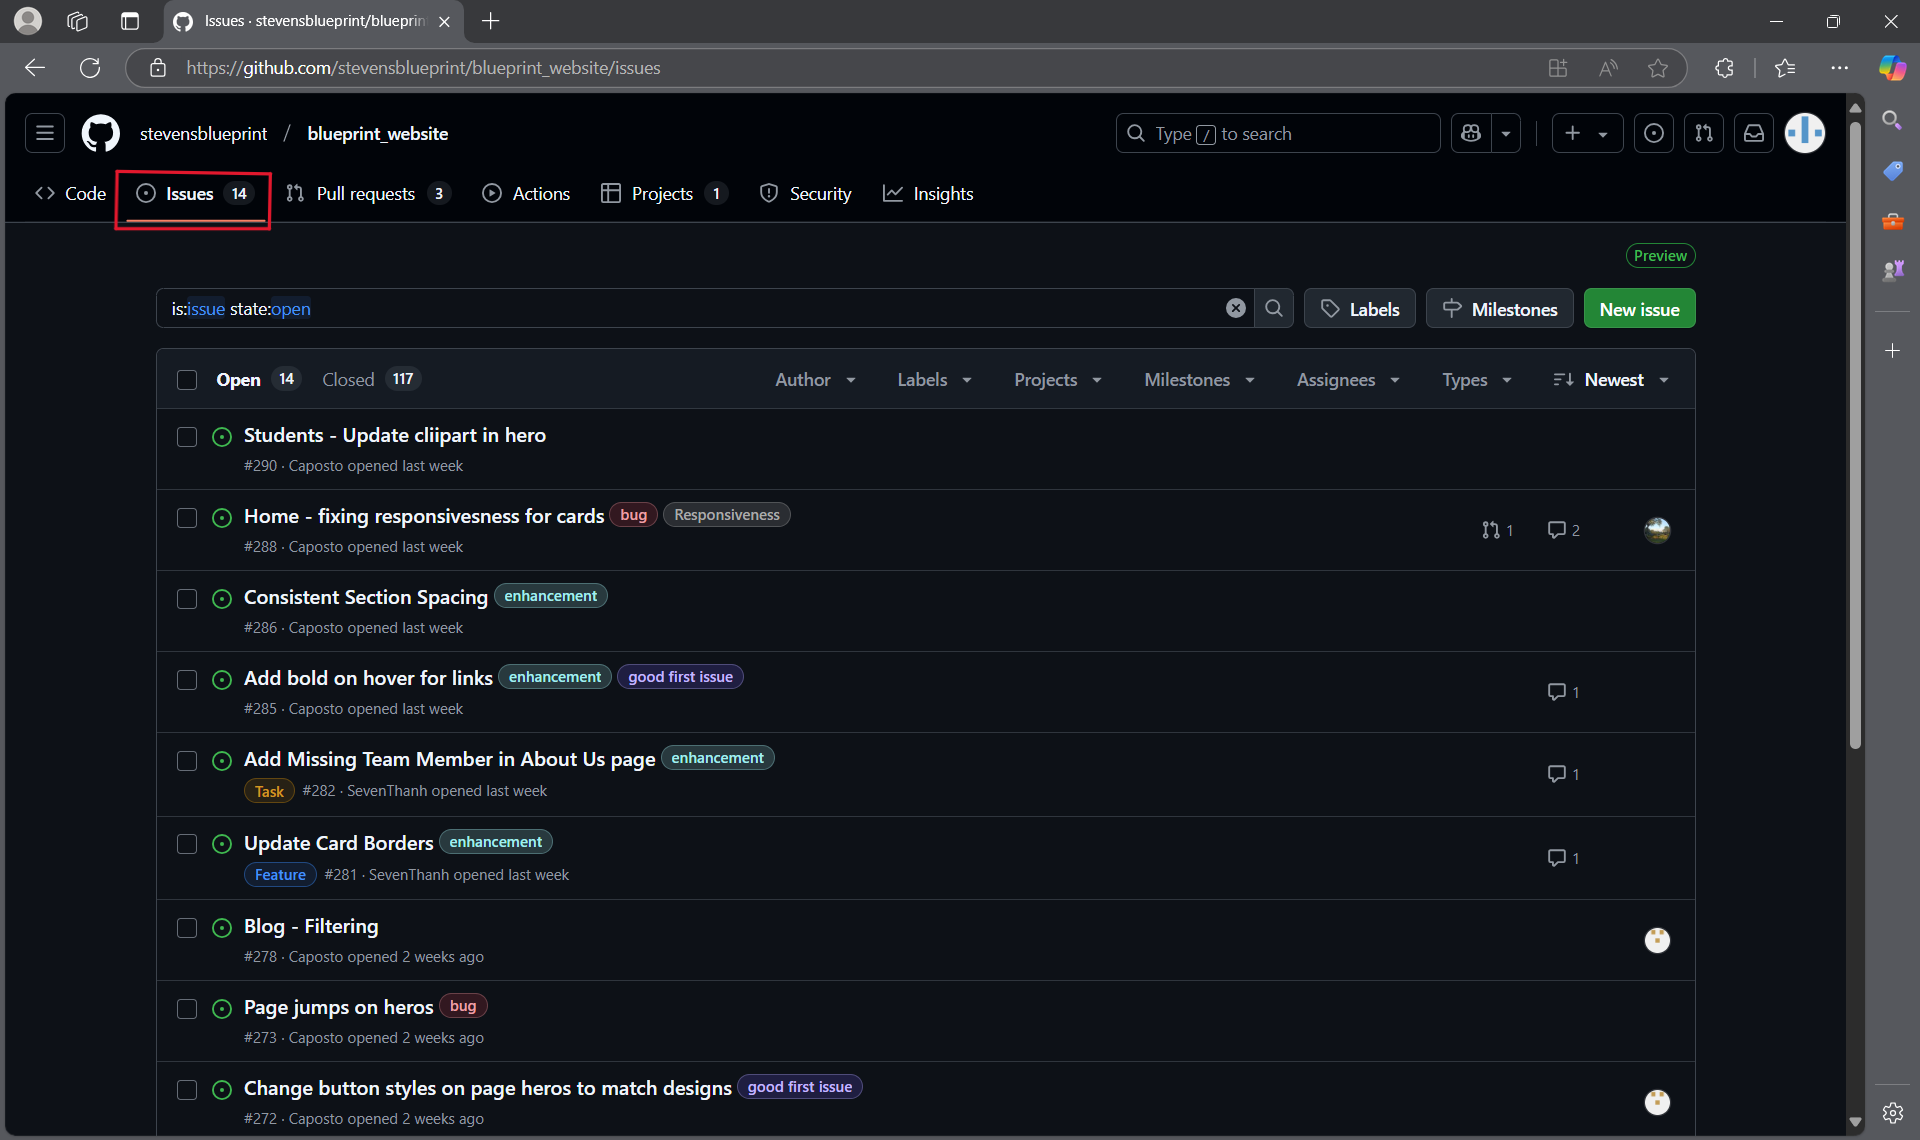](https://wiki.sitblueprint.com/uploads/images/gallery/2025-02/screenshot-2025-02-03-131218.png)
- If you click on one of the tasks, you will be able to assign it to yourself; this way, there aren't multiple people trying to fix the same thing at the same time.[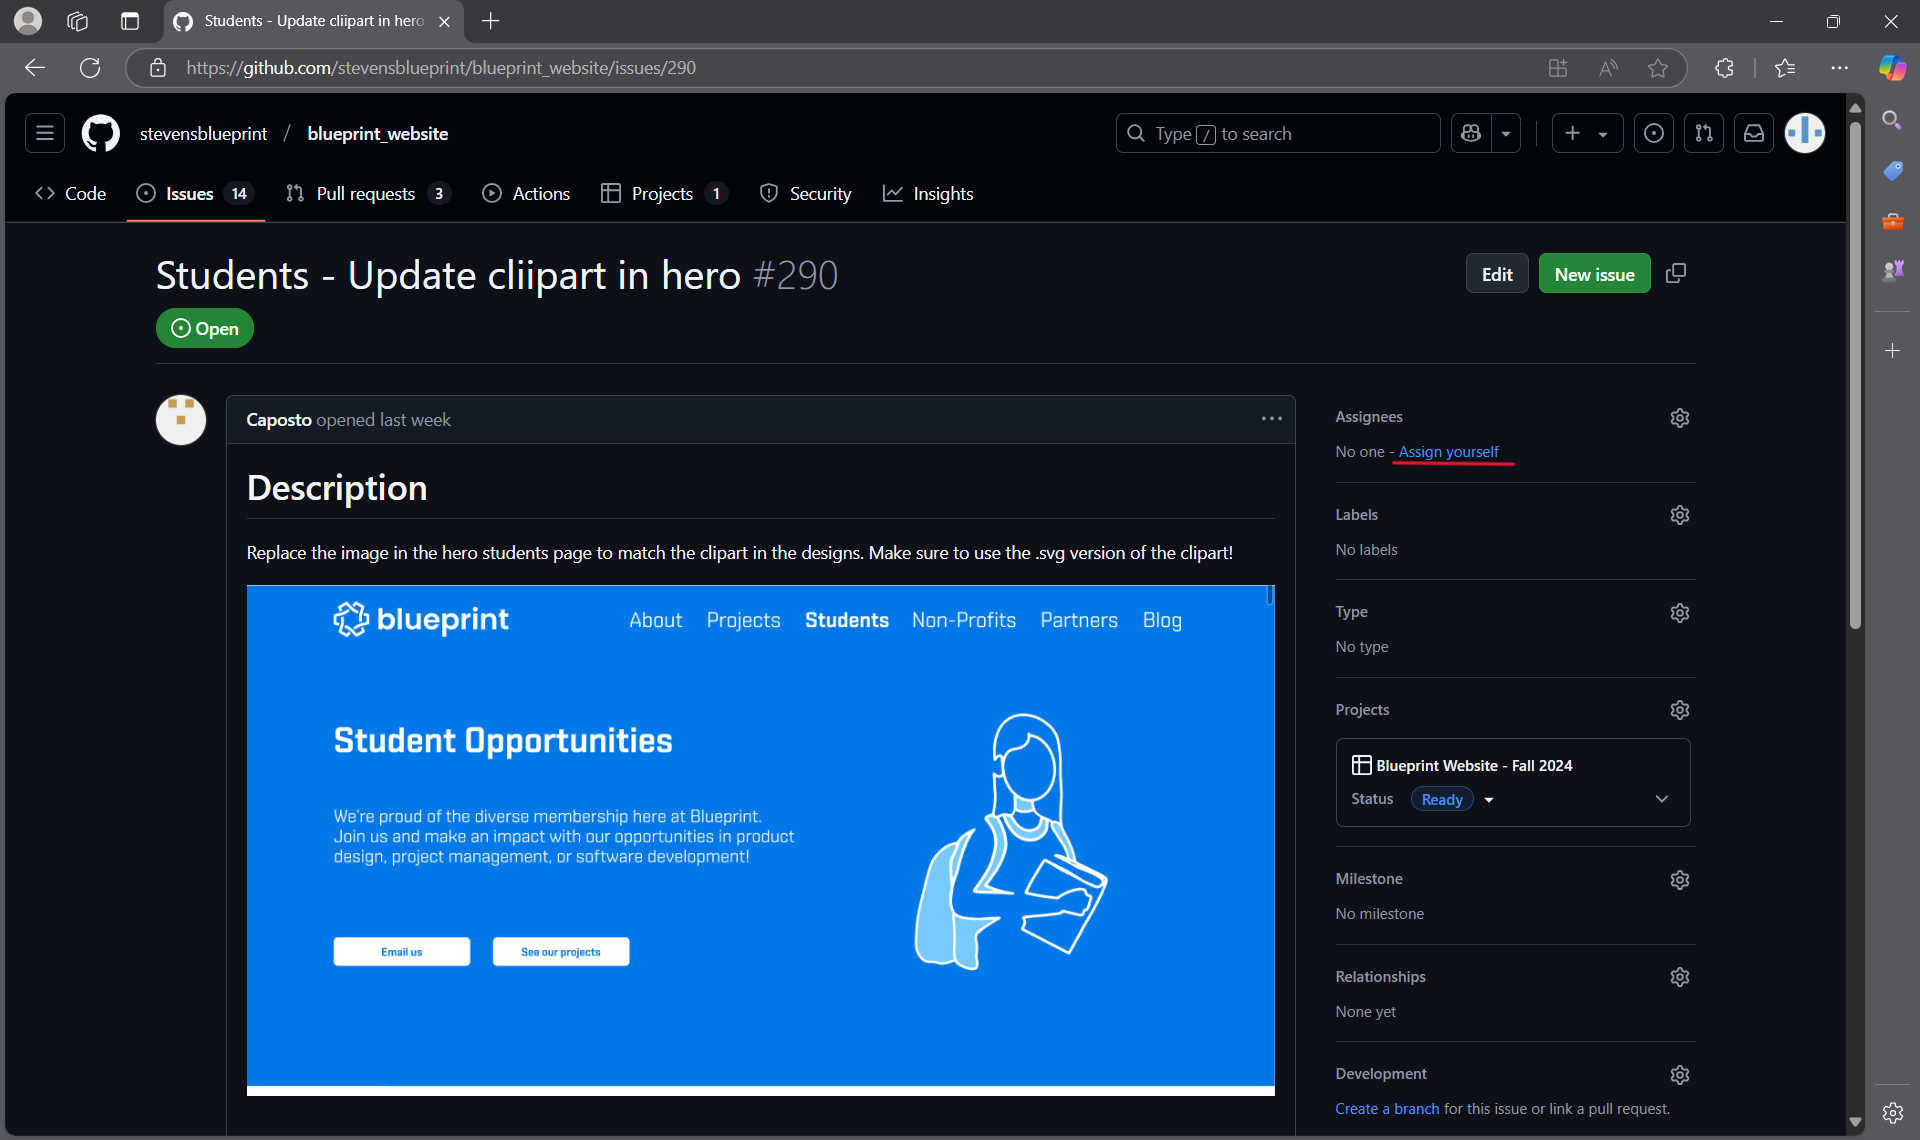](https://wiki.sitblueprint.com/uploads/images/gallery/2025-02/screenshot-2025-02-03-131236.png)
##### Project Board
- There is also the project board where you can see an organized summary of all the tasks and get a general idea of where the project is at.[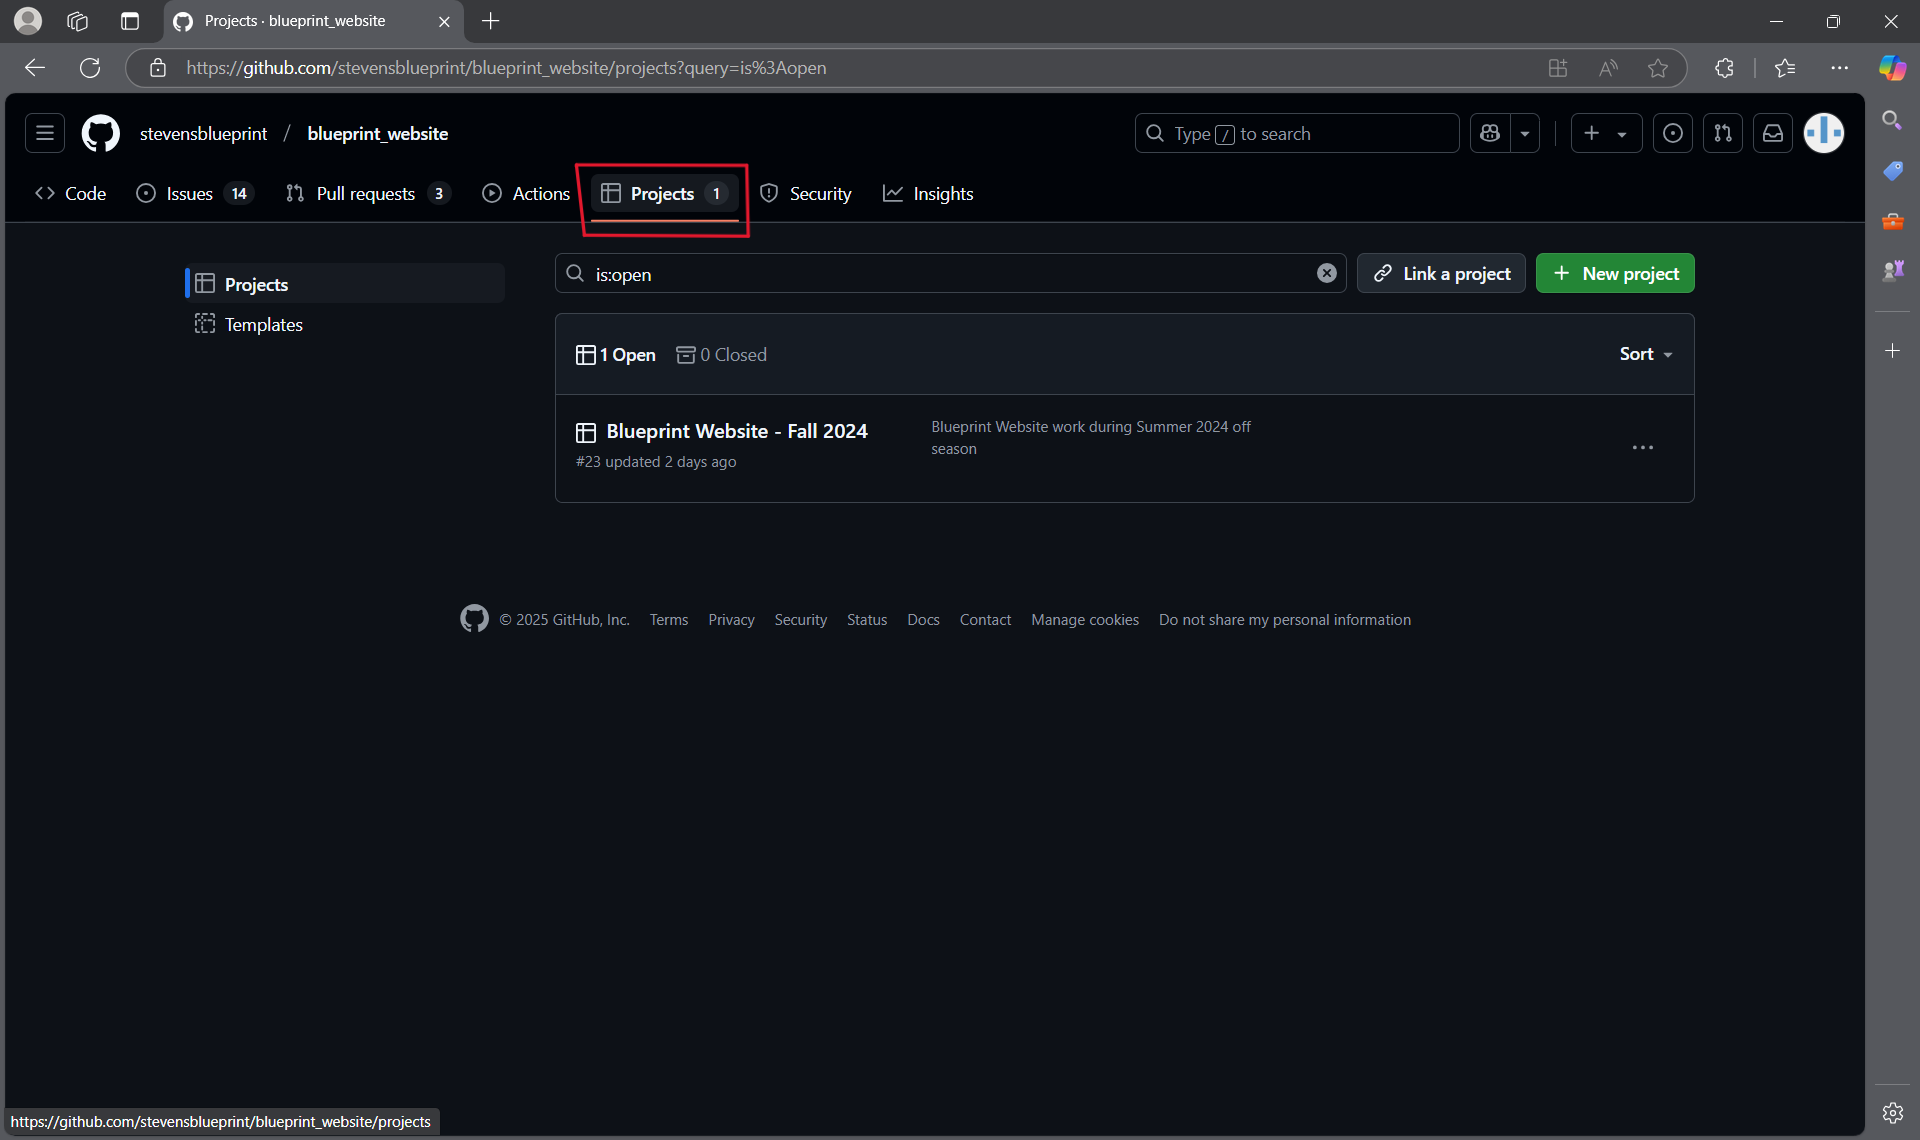](https://wiki.sitblueprint.com/uploads/images/gallery/2025-02/screenshot-2025-02-03-131252.png)
- The items in the Ready section are available to be worked on.[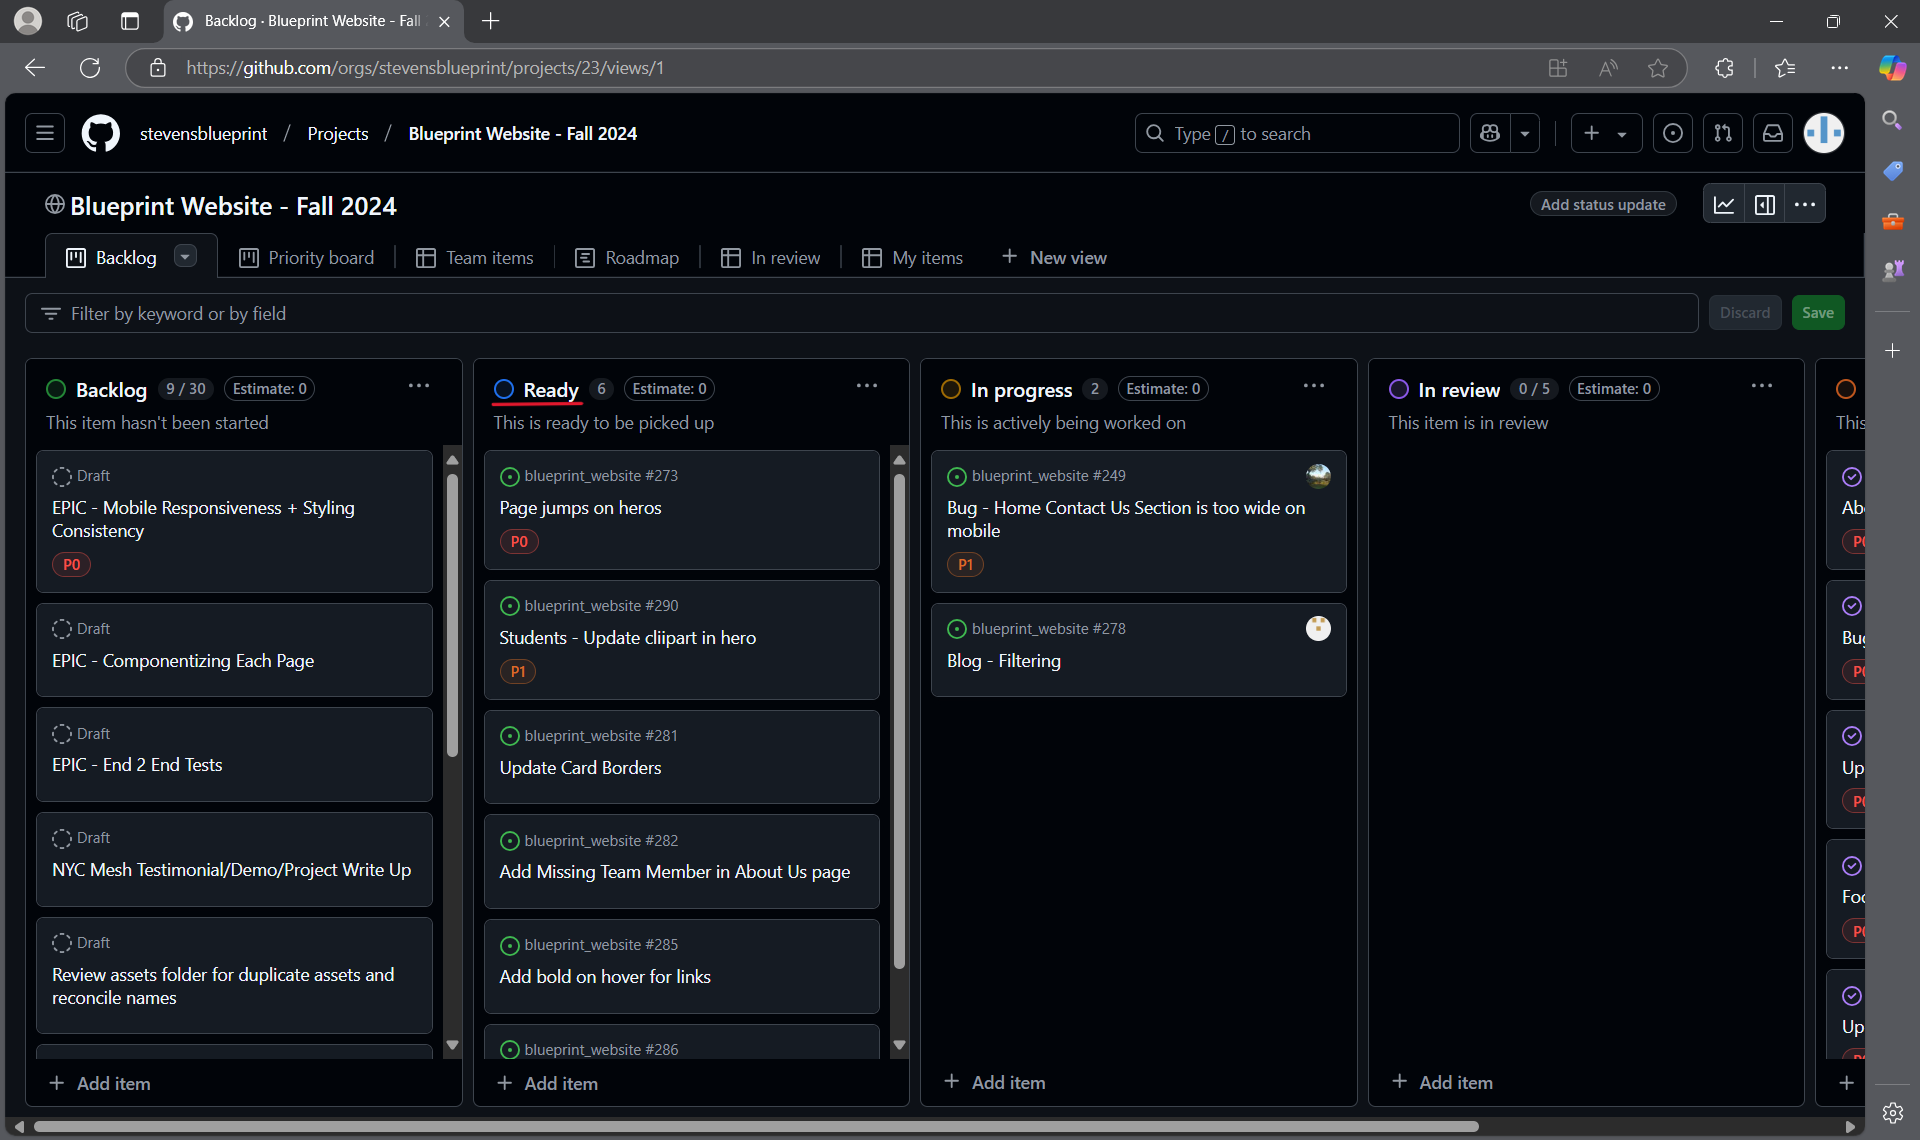](https://wiki.sitblueprint.com/uploads/images/gallery/2025-02/screenshot-2025-02-03-185931.png)
If you're ever unsure of which task to pick up or having difficulty completing a task, drop by a Tech Team meeting and ask!
#### Git/Github Quick Reference
**New to Git and Github? Checkout these resources:**
Overview of Git and Github: [https://wiki.sitblueprint.com/books/onboarding/page/contributing-to-blueprint-gitgithub](https://wiki.sitblueprint.com/books/onboarding/page/contributing-to-blueprint-gitgithub)
Full comprehensive guide/walkthrough of Git and Github: [GitHub Foundations - Training | Microsoft Learn](https://learn.microsoft.com/en-us/training/paths/github-foundations/)
If you prefer a comprehensive book: [https://git-scm.com/book/en/v2](https://git-scm.com/book/en/v2)
Or comprehensive video: [Git Tutorial for Beginners: Learn Git in 1 Hour](https://www.youtube.com/watch?v=8JJ101D3knE)
##### Git Clone
`git clone []`
- Creates local copy of the repository stored on Github
- `` the repository you want to clone
##### Git Pull
`git pull`
- Runs `git fetch` and `git merge`
- Pulls code from the remote repository (on Github) to your local repository and merges into your local repository
##### Git Checkout
`git checkout [-b ]`
- Used to switch branches
- `` to specify which branch you want to switch to
- Switches branch to `feat/carousel`
- E.g., `git checkout feat/carousel`
- `[-b]` to create a new branch
- `feat/` used for feature branches (e.g., feat/carousel)
- `bug/` used for bugs (e.g., bug/navbar-text-resizing)
- Naming conventions:
- E.g., `git checkout -b feat/carousel`
- Creates a new branch called `feat/carousel` and switches to that branch
##### Git Add
`git add []`
- Used to ‘stage’ or add contents of file to next commit
- `` path of the file to be added
- E.g., `git add myFile.txt`
- Adds all changes made to myFile to the next commit
##### Git Commit
`git commit [-m ]`
- Used to create a commit
- `-m ` message to be included with commit
- E.g., `git commit -m “changes made to formatting”`
- Creates a commit with staged changed with the message “changes made to formatting”
- Conventions for commits: [https://www.conventionalcommits.org/en/v1.0.0/](https://www.google.com/url?q=https://www.conventionalcommits.org/en/v1.0.0/&sa=D&source=docs&ust=1743480031080271&usg=AOvVaw3S3xkixUCIjsSt3Q3hW3OF)
##### Git Push
`git push`
- Used to push committed changes to remote repository on GitHub
- If it's your first time pushing to a remote repository, you will need to specify the remote with `git push -u origin name/of/branch`
##### Git Merge
`git merge []`
- Merges one or more branches into your current branch
- `` specifies which branch to merge into the one you have checked out
- Merging can also be done from the command line
- Guide for resolving merge conflicts: [https://code.visualstudio.com/docs/sourcecontrol/overview#\_merge-conflicts](https://www.google.com/url?q=https://code.visualstudio.com/docs/sourcecontrol/overview%23_merge-conflicts&sa=D&source=docs&ust=1743480031080988&usg=AOvVaw0Rxl-7IaXhcmP8GGIhI3cP)