Tech Team
- Meetings
- April 2nd Meeting Minutes
- April 4 Meeting Minutes
- April 9th Meeting Minutes
- April 11 Meeting Minutes
- Apr 16 Meeting Minutes
- April 18th Meeting Minutes
- September 10th Meeting Minutes
- Projects
- Blueprint Admin - Spring 2024
- Kudos Design Document
- Staging Environment
- Kubernetes
- Blueprint Admin Design Spec
- Kudos
- FastAPI
Meetings
Meeting minutes for each week.
April 2nd Meeting Minutes
Start 5:30 PM
End 6:10 PM
- Eric has created the attendance object and the records repository as well as the handlers
- Nicole is making progress on surveys
- Terrance has finished everything. Changed address
- Terrance is working on getting user_mangement integration testing with redis
- Terrance is also working on Dockerizing. Done with everything else
- Zuting, Thomas introduced to team
- Zuting and Thomas task pending
- Christopher E. working on issue #21 on blueprint_admin. Should be done by the end of the week. (couldn't provide update at meeting due to scheduling conflict, provided updates in DMs to ezri)
- Thomas is working on application CRUD for admin backend
- No one to work on application forms for admin backend
- Audrey can do design opportunities
- Will followup with miguel to discuses separately
April 4 Meeting Minutes
Start 7:00 PM
Attendance: Kyle Kouch, Miguel Merlin, Cameron Marotti, Christopher Engelbart, Eric Zhang, Ezri Zhu, M. Bertan Tarakcioglu, Nicole, Maya Patel, Terrence Zhang.
- Ezri:
- k8s meeting with miguel, bertan, thomas went well. They will work on the following:
- documenting existing infrastructure & process
- look into k3s
- document plans for k8s infrastructure
- document ideas for future workshops, e.g., (git, docker, etc..)
- reached out to github for enterprise
- will reach out to cs dept & SGA for funding re: servers, AI, etc..
- team 1 aad infrastructure deployed successfully, google auth working
- team c4p website deployed slightly, had an issue with mongo db and avx cpu flag, using alternative container. will finish deploying it later this week.
- Lucas:
- Added more to the PR but failed the node build test. There is a slight error regarding return types.
- Should be able to fix by tomorrow
- Christopher:
- finalized the alert and made aesthetic changes to the loading spinner. Is having issues with fetching data from the API.
- SQl script
- Eric Zhang:
- moved AttendanceService/AttendanceServiceImpl to their own repository called attendance in service repo.
- moved AttendanceRecordRepository to its own repository so its separate from users
- Deleted content of the methods.
- Miguel
- Added some features to the backend
- Wrote onboarding documents
- Need backend and user api
- Terrence
- Resolving some issues in the pull request
- Resolving some issues in the pull request
- Maya
- Saw comments and will make changes
End 7:26 PM
April 9th Meeting Minutes
Start 5:34 PM
Attendance: Kyle, Miguel, Audrey, Eric, Lucas, M. Bertan, Nicole, Sneha, Terrance, Ezri, Jason
- Christopher:
- Working on creating a SQL script for creating and populating tables.
- Audrey
- Started wireframing for blueprint admin on figma.
- Will move onto revising the design and creating mockups that will reflect the real product
- Prioritize website first, Admin second
- Ask Sahana about working together
- Lucas
- Debugging the add user button
- Eric
- Added a redirection from the read more button to the information section of the page
- Added OpenGraph tags to each file on the website, created a common OpenGraph file to be shared across all pages and in each independent page added its own unique title and URL
- Miguel
- Java backend:
- Added new class (exeptions)
- Frontend:
- Added new types of objects
- Adding the API calls
- Added some of the stops for missing pages
- Java backend:
- Nicole
- Finished the event servace repository
- Submit a pull request
- New task (Create CRUD for blog)
- Ezri
- Worked w/ jason to deploy admin backend
- Wrote some initial documents of the stag and k8s setup on the wiki
- Reached out to swics to potentially collaborate on events
- Admin backend db deployed successfully, waiting for the upstream code to read db conn url
- Created github issue #11 (seeing VM warning)
- Sneha
- Welcome email
- Submitted a pull request
- New task (change favicon to blueprint logo)
- Terrance
- Should be done with everything
- Assigned new tasks (Look into static site generator, figure out format for each members file)
- Jason
- Working with ezri on the staging environment
- postgres deployment
- Fixed error
- Need template for project descriptions
End 6:01 PM
April 11 Meeting Minutes
Start 7:04 PM
Attendance: Kyle Kouch, Miguel Merlin, Audrey Yoo, Christopher Engelbart, Eric Zhang, Ezri Zhu, Bertan Tarakcioglu, Maya Patel , Miguel Merlin, Terrence Zhang
- Christopher
- Working on the SQL script
- Audrey
- Finished the first iteration of the wireframe for the blueprint website's homepage on figma
- Ezri
- Adm dash+usermgmt cors fixed
- Preliminary debugging on admin panel for user management feature
- Miguel working on fixes
- Will work on finishing up c4p server setup and more documentation on k8s
- Will talk to eboard about turning one of the tech team meetings into a more open GBM for a bigger presence on campus
- Will work more on general tech team docs
- Bertran
- Made changes to github rules
- Maya
- Implemented changes for pr
- Miguel
- Java backend
End 7:17 PM
Apr 16 Meeting Minutes
Starting time:
Started 1730
Attendance: Ezri, Eric, Terrence, Audrey
Kyle absent due to school trip
Scribe: Ezri
Christopher Engelbart
- I finalized the script and (I think) made the necessary changes in
docker-compose.yaml. - I’ve tested the SQL script itself in a SQL environment, but haven’t with the Docker container.
- Draft PR created
Audrey
- no update
Eric
- AttendanceServiceImpl (not tested, will make PR after)
Terrence
- website: Updated project team page
- website: template for user page done
Ended 1738
April 18th Meeting Minutes
Start 7:06 PM
Attendance: Kyle, Eric, Christopher, Bertan
- Audrey
- Working on the wireframe for the homepage
- Chrisopher
- The SQL script has been merged into the backend.
- The SQL script has been merged into the backend.
End 7:08 PM
September 10th Meeting Minutes
Projects
List of projects the Tech Team has worked on
Blueprint Admin - Spring 2024
Blueprint Admin Spring 2024
We are glad that you have decided to join the Tech Team this semester. We hope this experience serves as an introduction to the world of software development. By the end of the semester, you will be able to improve your coding skills and have a greater understanding of Web/API development.
Overview of the project
To help our Project Teams develop software faster, we provide the teams with a staging environment. Here, Project Teams are able to deploy a production-ready application that will help them test new features and showcase their progress to the NPOs. We don't want anyone to have access to this staging environment. Therefore, we use a tool named SSO (Authelia).
Have you noticed that whenever you try to access Canvas or Workday, you are prompted to log in to a page? This is an SSO. It is a way for Blueprint to have a homogenous login. The SSO we use is called Authelia. The way Authelia retrieves the users with permission is through a YAML file. For example:
users:
  user1:
    disabled: false
    displayname: Blueprint User 1
    password: existingpassword
    email: user1@blueprint.com
    groups:
      - admin
      - dev
  user2:
    disabled: true
    displayname: Blueprint User 2
    password: existingpassword
    email: user2@blueprint.com
    groups:
      - admin
The main feature of our project is having a way to manage this YAML file. We need to be able to add, delete, disable, and update users in this YAML file. However, we also want to extend the functionality of our application by adding new features such as Team Management, Finances, Blog management, and Event Management.
Blueprint Admin (Frontend)
The frontend application is currently being developed with React using TypeScript. The web application should have the following pages:
- Member Management
- Application Management
- Team Management
- Budget Management
Member Management
The User Management page serves as the central hub for administrators to oversee and control user access and profiles within the system. This page allows for creating, editing, and deleting user accounts, enabling administrators to assign or revoke permissions and access levels. Key features include user search, filter options to locate users quickly, and detailed user profile views that display login history, activity logs, and personal settings. Through this interface, administrators can also reset passwords, manage roles (e.g., admin, user, guest), and set up multi-factor authentication to enhance security.
Application Management
The Application Management page is tailored to oversee and process applications submitted to the organization. This platform serves as a centralized system for administrators to review, sort, and respond to various applications efficiently. Key functionalities include viewing and assessing each application, tracking its status (e.g., received, under review, approved, rejected), and managing communications with applicants directly from the interface.
Team Management
The Team Management page focuses on facilitating team organization, collaboration, and productivity within the company or system. It provides tools for creating and managing team structures, including working groups. Administrators can assign members to teams, set roles and responsibilities, and track progress on team objectives or projects. Features may include shared calendars, task assignments, performance metrics, and communication tools to support effective teamwork. The page aims to centralize team resources and information, making it easier to manage workflows and ensure that team members are aligned with their goals and deadlines.
Budget Management
The Budget Management page provides a comprehensive way to track Blueprint's budget. Throughout the semester, we organize various events for which we need a budget. This page will help us track how much of our budget we have allocated to events and how much we have left for future events. Since we are migrating our servers to a cloud provider, we need to see if our server usage will exceed the budget.
Blueprint Admin (Backend)
User Management
Kudos Design Document
Problem
As students and developers, our lives move fast, and accomplishments for our work often goes unnoticed. Since we are tasked with executing and delivering software on top of schoolwork and other responsibilities, it is easy to feel overworked and burnt out.
The Tech Team will create a tool that facilitates interconnectivity across project teams by allowing developers to leave feedback under each other's work during sprints.
Feedback can be positive or constructive, and will always be anonymous.
Features
The app consists of two main pages.
Features for page 1, the main page:
- a 4 x 4 card layout, where each card contains the following:
- commit content headline
- author
- streak/trend info (if applicable)
- a text input box
- a sidebar that allows users to navigate team archive. It has:
- teams dropdown -> clickable sections to view the commits for each project team
- team 1
- team 2
- team 3
- archive dropdown -> clickable archives with commits and kudos from past sprints
- 3/21 sprint
- 3/14 sprint
- 3/7 sprint 1
- teams dropdown -> clickable sections to view the commits for each project team
each of these components will have filter, sort, and search functionality
Features of page 2, the admin page:
Page 2 will have admin access only.
- dashboard layout where an admin can do the following:
- start a kudos session. admins can open up the kudos board for developers to visit and interact with. the vidibility of the board changes at the admin's discretion.
- review all comments. admin can see comments on all commits (with username attached?) (identify user who made comment, but dont display content?)
- view comment analytics. admin can see how many comments a developer has made by sprint or all time.
- set timed start and end. admin can set a timer that will be displayed on the maoin page indicating when the next session will be. once a session is in progress, another timer will be dispalyed indicating when the session will close.
End-to-End User Workflow
1. General User (Developer) Experience
- Initial Access:
- The user opens the application in their web browser.
- The frontend makes an API call to the backend to fetch the latest commit data and active session status.
- The main page (4x4 card layout) is rendered, displaying commit headlines, authors, and any existing streak/trend information.
- The sidebar is populated with team and archive navigation options.
- Browsing Commits:
- The user can scroll through the 4x4 card layout to view different commits.
- They can use the sidebar to navigate to specific teams or archived sprints.
- Filtering, sorting, and searching functionalities allow them to find specific commits.
- The frontend send the filter, sort, or search parameters to the backend via API calls, and the backend returns the filtered, sorted, or searched data.
- Leaving Feedback (Kudos):
- If a kudos session is active (indicated by a timer or clear visual), the user can enter feedback in the text input box within each commit card.
- When the user submits feedback, the frontend sends a POST request to the backend API, including the commit ID, user ID (anon), and the comment content.
- The backend stores the comment in the database, associating it with the commenter, the commit, and the author.
- (If using websockets, the comment is broadcasted to other users in real-time???)
- Viewing Session Status:
- The user can see the status of the current kudos session (active, inactive, time remaining) on the main page.
- This information is fetched from the backend and updated in real time if web sockets are implemented.
2. Admin User Experience
- Accessing Admin Page:
- The admin user logs in with their credentials.
- The frontend checks the user's role and redirects them to the admin page if authorized.
- Starting/Ending a Kudos Session:
- The admin uses the dashboard to start or end a kudos session.
- The frontend sends a POST request to the backend API to update the session status in the database.
- The backend updates the database and, if using WebSockets, broadcasts the session status change to all connected users.
- Reviewing Comments:
- The admin can view all comments on the dashboard.
- The frontend sends a GET request to the backend API to retrieve all comments.
- The backend retrieves the comments from the database and returns them to the frontend, possibly with user identification (for admin review only, not public display).
- Viewing Comment Analytics:
- The admin can view comment analytics, such as the number of comments per developer and per sprint.
- The frontend sends a GET request to the backend API to retrieve the analytics data.
- The backend performs the necessary data aggregation and returns the results to the frontend.
- Setting Timed Start/End:
- The admin can set the start and end time of a kudos session.
- The frontend sends the start and end times to the backend via a POST or PUT request.
- The backend stores the times in the database and uses them to control session status and display timers on the main page.
- If web sockets are used, the time remaining will be updated in real time.
High Level Architecture
- Frontend (Client-Side):
- React/TSX UI
- handling user interactions, and displaying data.
- rendering the 4x4 card layout, sidebar navigation, and admin dashboard.
- API calls to backend db.
- React/TSX UI
- Backend (Server-Side):
- Django/Python for the APIs.
- manages data retrieval from GitHub API
- handles auth using GitHub API
- implements logic for filtering, sorting, and searching commits and comments.
- Django/Python for the APIs.
- Database???:
- MongoDB to store commit data, user information, comments, and session details.
- Real-time Communication???:
- websockets?
Outstanding Questions
should we store commit data? or just pull instances from API?
Staging Environment
The blueprint staging environment serves two primary purposes.
- Hosting the staging environments for our project teams
- Hosting the infrastructure powering blueprint internal operations
Currently the staging environment is hosted on one singular machine sponsored by EzriCloud. As Stevens IT is unable to provide us with a working cloud machine. In the future, we hope to move our infrastructure to AWS once we have a stable funding for it.
Ezri Zhu should be the primary contact for any server issues. They can be reached via their discord.
The server's NixOS configuration code is made available here https://github.com/stevensblueprint/techops/
Below are the things that is currently on stag0.nyc.sitblueprint.com
NYCMesh team staging service (deployed via docker compose)
AAD-ADMIN team staging service (deployed via docker compose)
C4P team staging service (deployed via docker compose)
Authelia SSO w/ nginx reverse proxy (deployed via NixOS configuration)
Vaultwarden password manager (deployed via NixOS configuration)
Bookstack (this wiki) (deployed via NixOS configuration)
Blueprint internal admin dashboard (deployed via docker compose)
Blueprint internal admin backend (deployed via docker compose)
Blueprint internal user management service (deployed via docker compose)
Kubernetes
For the fall 2024 semester, we are planning on launching our internal k8s platform to run the things that we're currently running on docker compose.
Although using kubernetes at our current scale is probably not the greatest idea in terms of maintainability, we are still choosing to do this so that interested tech team members can learn to operate k8s containers.
We will likely be using k3s - https://k3s.io/
Ezri Zhu will be the project owner for the k8s cluster, they can be reached via discord.
This page is currently WIP.
Blueprint Admin Design Spec
Blueprint Admin Design Spec
Problem Overview
We develop software for non-profits at no cost. To promote talent at Blueprint we run the Tech Team that serves as low commitment team where Stevens students can come and learn software engineering skills. Currently, Blueprint has around 40 active members that work on the projects with the NPOs and in the Tech Team. Software development and the usage of computing and building tools. Managing the access of said resources for every member has become unsustainable for the Blueprint e-board and Tech Lead for the project Teams. Having a centralized solution to administer Blueprint resources and manage member is necessary for the future success of the organization.
Solution Overview
To mitigate the need for a management solution, the Tech Team has started building a user/resource management solution. Most of the backend service that will power the admin has already concluded, however designs for the front-end have to be formalized.
Feature Description
The admin dashboard should provide the following features:
- Be able to log-in as an e-board, Teach Lead. Note: A single member might belong to multiple roles, so when the member logs in they should have the feature available for each of the roles they belong to.
- Once logged in, the member should have a sidebar where they can edit their information, such as name and password. A member should also have profile photo (Mostly all member will have a default profile photo, it could be the blueprint logo, or a stock user photo)
E-board functionality
Blueprint E-board members should be able to do the following:
- Send an invitation email to an interested member given the email and name of the member who wants to join
- View a table of all the members
- The displayed information of the members is the following:
- Roles (List of Strings)
- Team they belong to (List of String)
- Date joined (LocalDate)
- Active (Boolean)
- The table can be filtered by the afore mentioned columns
- The e-board member can edit each of the field of a member
- The displayed information of the members is the following:
Team Lead functionality
Blueprint Team Leads should be able to do the following:
- View a list of all the member associated to their team
- Edit the active status of a member team
- Take attendance of each of the meeting
- The Team Lead should be able to create an attendance record with some basic information such as Date and Location
- The Team Lead can only take attendance on the active members of the team
- View statistic on the attendance of the Team such as:
- Drop out rate of the team (How many people have been deactivated since the start of the project?)
- Attendance rate
Kudos
Week 1 + 2
Goals
- Learn about Kudos!
- Gain an understanding of some essential developer tools
- Install git, Node, and VSCode
- Create and clone your own repository
How will this work?
Weekly session where we will:
- Go over the session's goals
- Code together
- Get support if needed
- Recap
By the end, we will have a finshed project!
Why Kudos?
At Blueprint, recognizing the contributions of our developer members is crucial for fostering a positive and productive project team environment. This tool is specifically designed to highlight the efforts of these members and gather valuable feedback. By acknowledging their hard work, especially amidst their academic and other commitments, we aim to improve their overall project team experience and prevent potential feelings of being overworked or burnt out.
Setup
For any project, it is essential to have certain 'tools' installed...
These tools go by many names:
- libraries
- environments
- packages
- dependencies
- etc.
But they all serve one broad purpose: help developers build.
So, before we begin building our project, lets first install all of the necessary tools we'll need along the way.
Git and GitHub
A key foundation of software development is collaboration.
Across industry, developers collaborate using two essential tools: Git and GitHub
Later on, we will explore these two tools, but for now lets just install them.
Windows install
- Go to the official Git website at https://git-scm.com/downloads
- The download for Windows should begin automatically.
- Once the installer finishes downloading, run the
.exefile. - Follow the prompts in the installation wizard.
- After installation, open a new terminal and type
git --versionto verify the installation.
macOS install
- The easiest way to get Git on macOS is in the terminal.
- Open your Terminal application.
- Type
git --versionand press enter. - If Git is not installed, a pop-up will appear asking you to install the command line developer tools. Click "Install" and follow the on-screen instructions.
Now, lets create and authenticate a GitHub account.
Creating Your GitHub Account
Creating a GitHub account is a simple process.
- Go to the GitHub Website: Open your web browser and navigate to github.com.
- Sign Up: On the homepage, you'll see a sign-up form. Enter your email address, create a password, and choose a username.
- Verification: You'll likely need to solve a quick puzzle to verify you're human. After that, GitHub will send a verification code to the email address you provided. Go to your inbox, find the email, and enter the code on the GitHub site.
That's it! You now have a GitHub account.
Authenticating Your Account
Authentication proves your identity when you want to push (upload) or pull (download) code from your computer. Using your password for this is no longer supported for security reasons. Instead, you should use a Personal Access Token (PAT).
A PAT is like a long, secure password that you use only for accessing GitHub from the command line or apps.
-
Go to Your Settings:
- Click on your profile picture in the top-right corner and select Settings.
- In the left sidebar, scroll down and click on Developer settings.
- Click on Personal access tokens, then select Tokens (classic).
-
Generate a New Token:
- Click the Generate new token button.
- Set an Expiration date. For better security, don't set it to "No expiration". 90 days is fine.
- Under Select scopes, select the
reposcope.
-
Copy and Save Your Token:
- Click the Generate token button at the bottom.
- This is the only time you will see the token!!! Copy it immediately and save it in a secure place, like a password manager. If you lose it, you'll have to generate a new one.
-
Using Your PAT:
- Now, when you perform a Git operation in your terminal (like
git push) that requires authentication over HTTPS, you'll be prompted for your username and password. - Enter your GitHub username.
- When asked for your password, paste your Personal Access Token.
- Now, when you perform a Git operation in your terminal (like
You're all set! Your GitHub account is now created and authenticated for use on your computer.
Node
Like git, Node is a tool in the software development world that is a must-have.
Among many other things, it allows us to see the changes in our code live in our browser!
So as we add components of our app, we can ensure they look and function as we want them to.
Windows
- Go to the official Node.js website: https://nodejs.org/en/download
- Download correct verion.
- Run the installer and follow the on-screen instructions.
- Once the installation is complete, you can open the terminal and verify the installation by typing:
node -v
npm -v
These commands should return the version numbers for Node.js and npm, confirming a successful installation.
macOS
- The easiest way is to download the official
.pkginstaller from the Node.js website: https://nodejs.org/en/download - Choose the LTS version and run the installer after it downloads.
- Follow the installation steps. The installer will guide you through the process.
- After installation, open a new Terminal window and run the same commands as above to verify:
node -vandnpm -v.
Visual Studio Code
We will be writing all of our code using Visual Studio.
Visual Studio has a simple install. Simply use this link and follow the steps: https://code.visualstudio.com/download
Troubleshooting
Before we move on, lets address some common issues that you may run into during setup.
Checking Node Versions (Windows Users)
If you recieve an error when running the node - v and npm -v commands:
- Search 'Terminal' in your taskbar start menu.
- Hover over the Terminal Icon, then right-click.
- A menu should appear. Click on the option to 'Run as Administrator'. This should open a new terminal that indicates you are an Administrator in the title bar.
- Run this command:
Set-ExecutionPolicy RemoteSigned. - Now, try running
node - vandnpm -vonce again, and you should be able to see their versions, confirming your Node has installed correctly.
Creating a Repository
You now know the basics of git and GitHub!
The next step is to create your own repository where you'll store all of your code for the project.
On the main page of GitHub's site, you will see a green box in the top left corner that says 'New'.
Click it, and you will be redirected to a new page that looks like this:
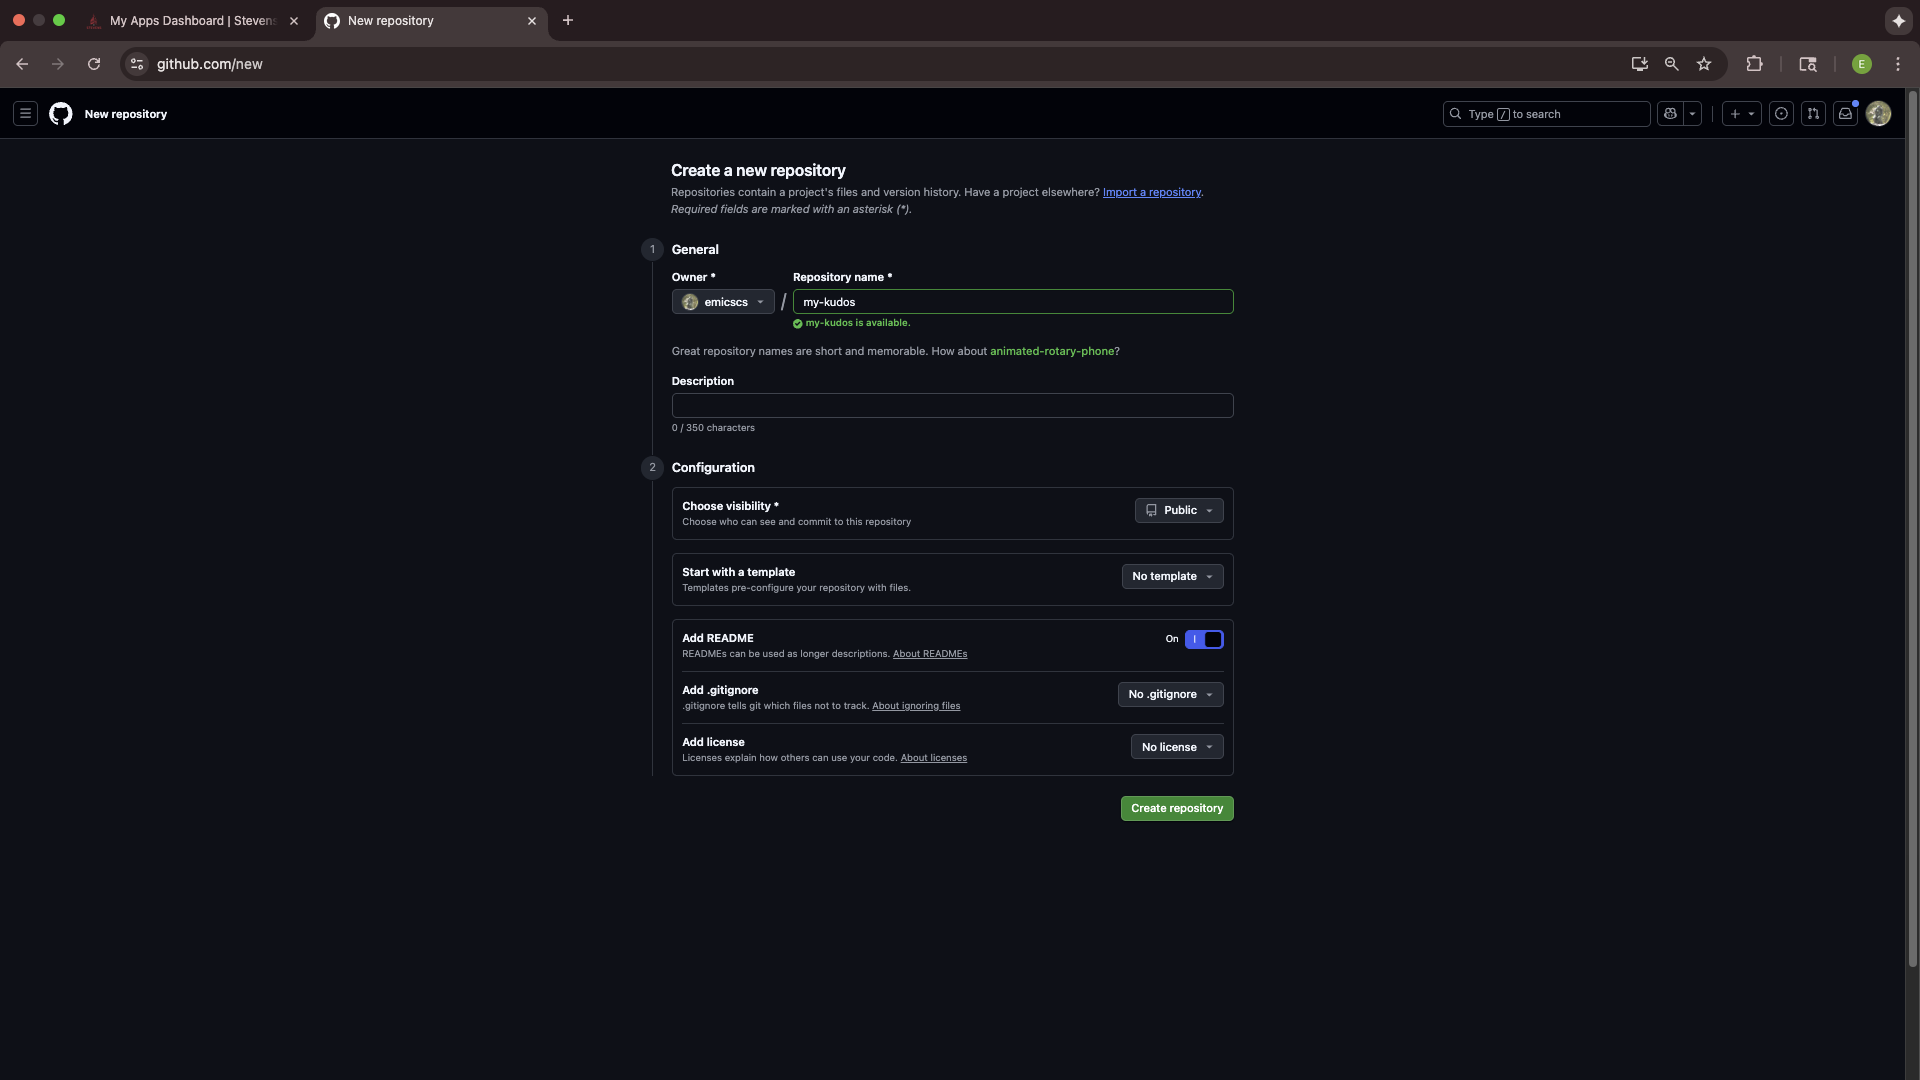
On this page, you will enter the details of your repository. In our case, this includes a specific set of options that oyu should copy from the screenshot above. Your repository name should be my-kudos, visibility should be public, and add README option shoud be toggled on.
Click create, and you will again be redirected.

This is your repo! Now, all you have to do is follow some of the steps from the prior section.
The first is cloning your repo with git clone.
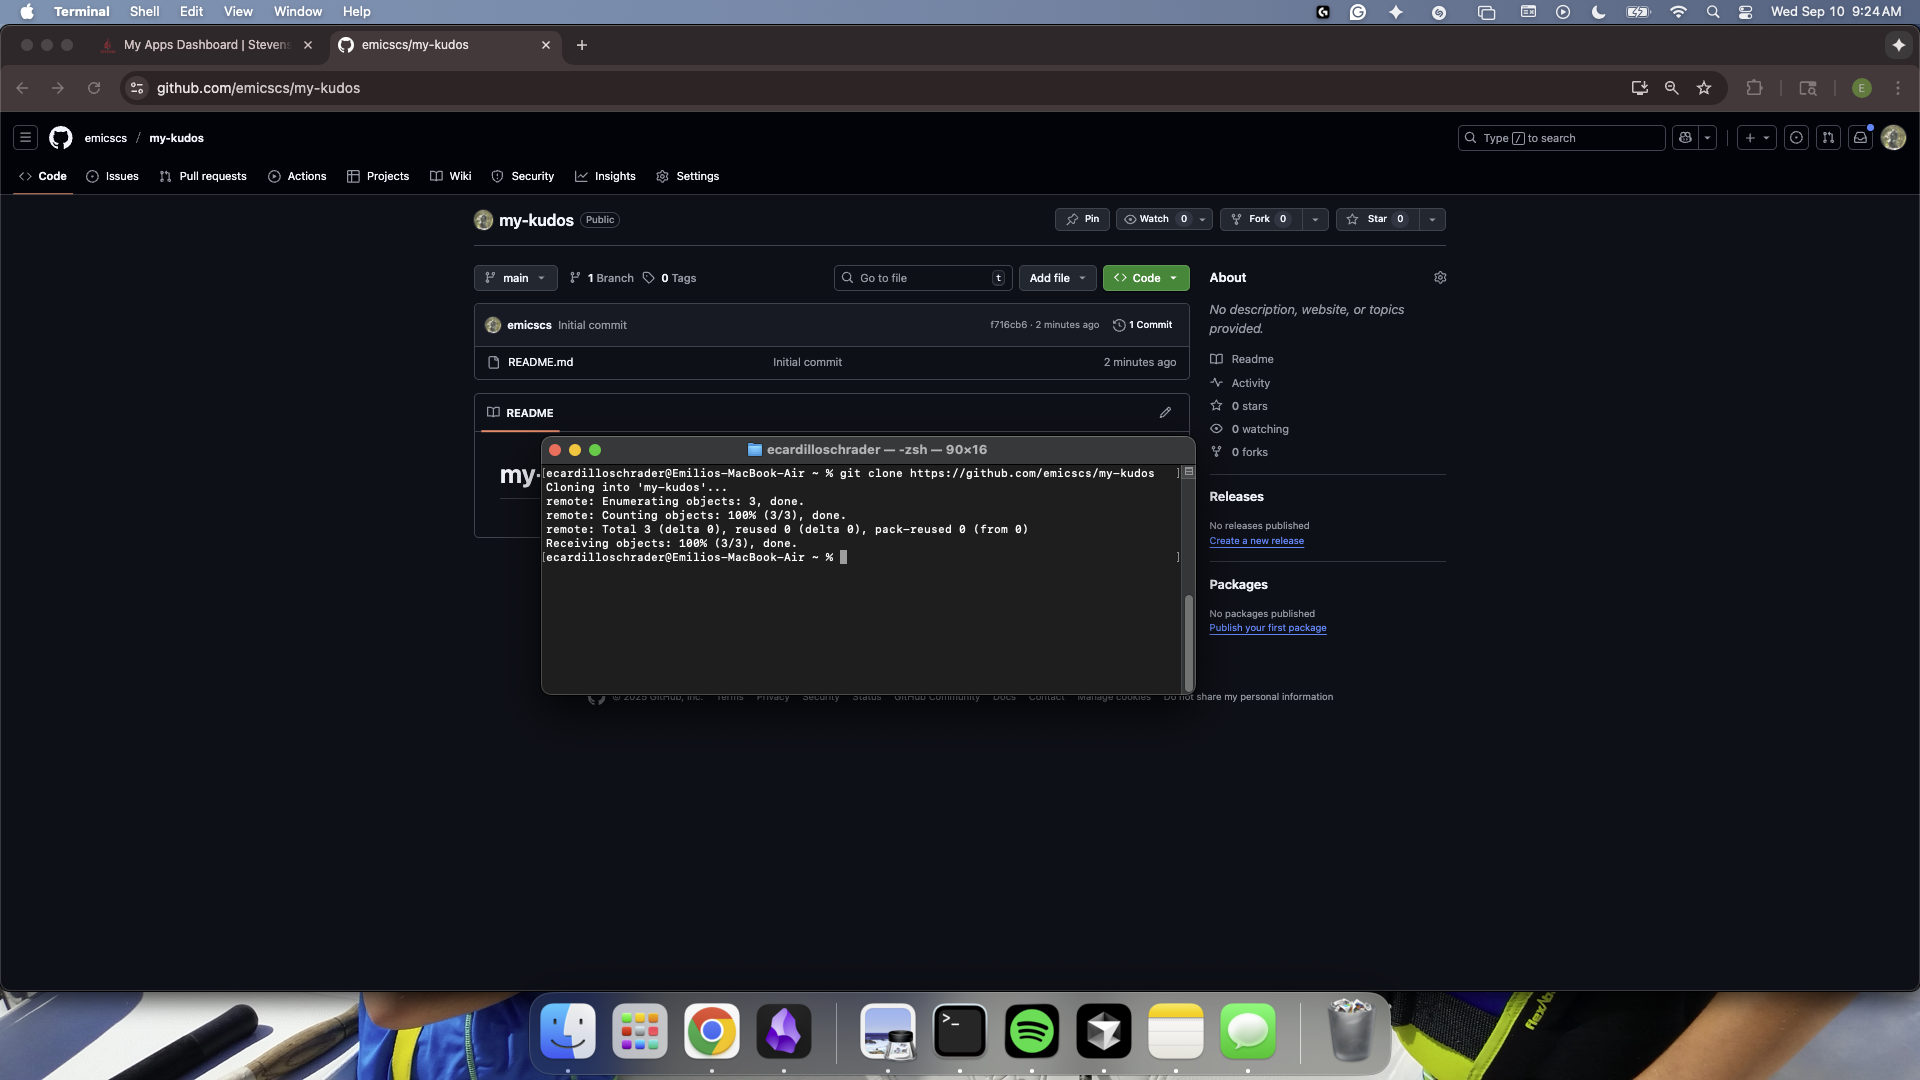
Like before, to check that the clone was successful, cd into your new directory.
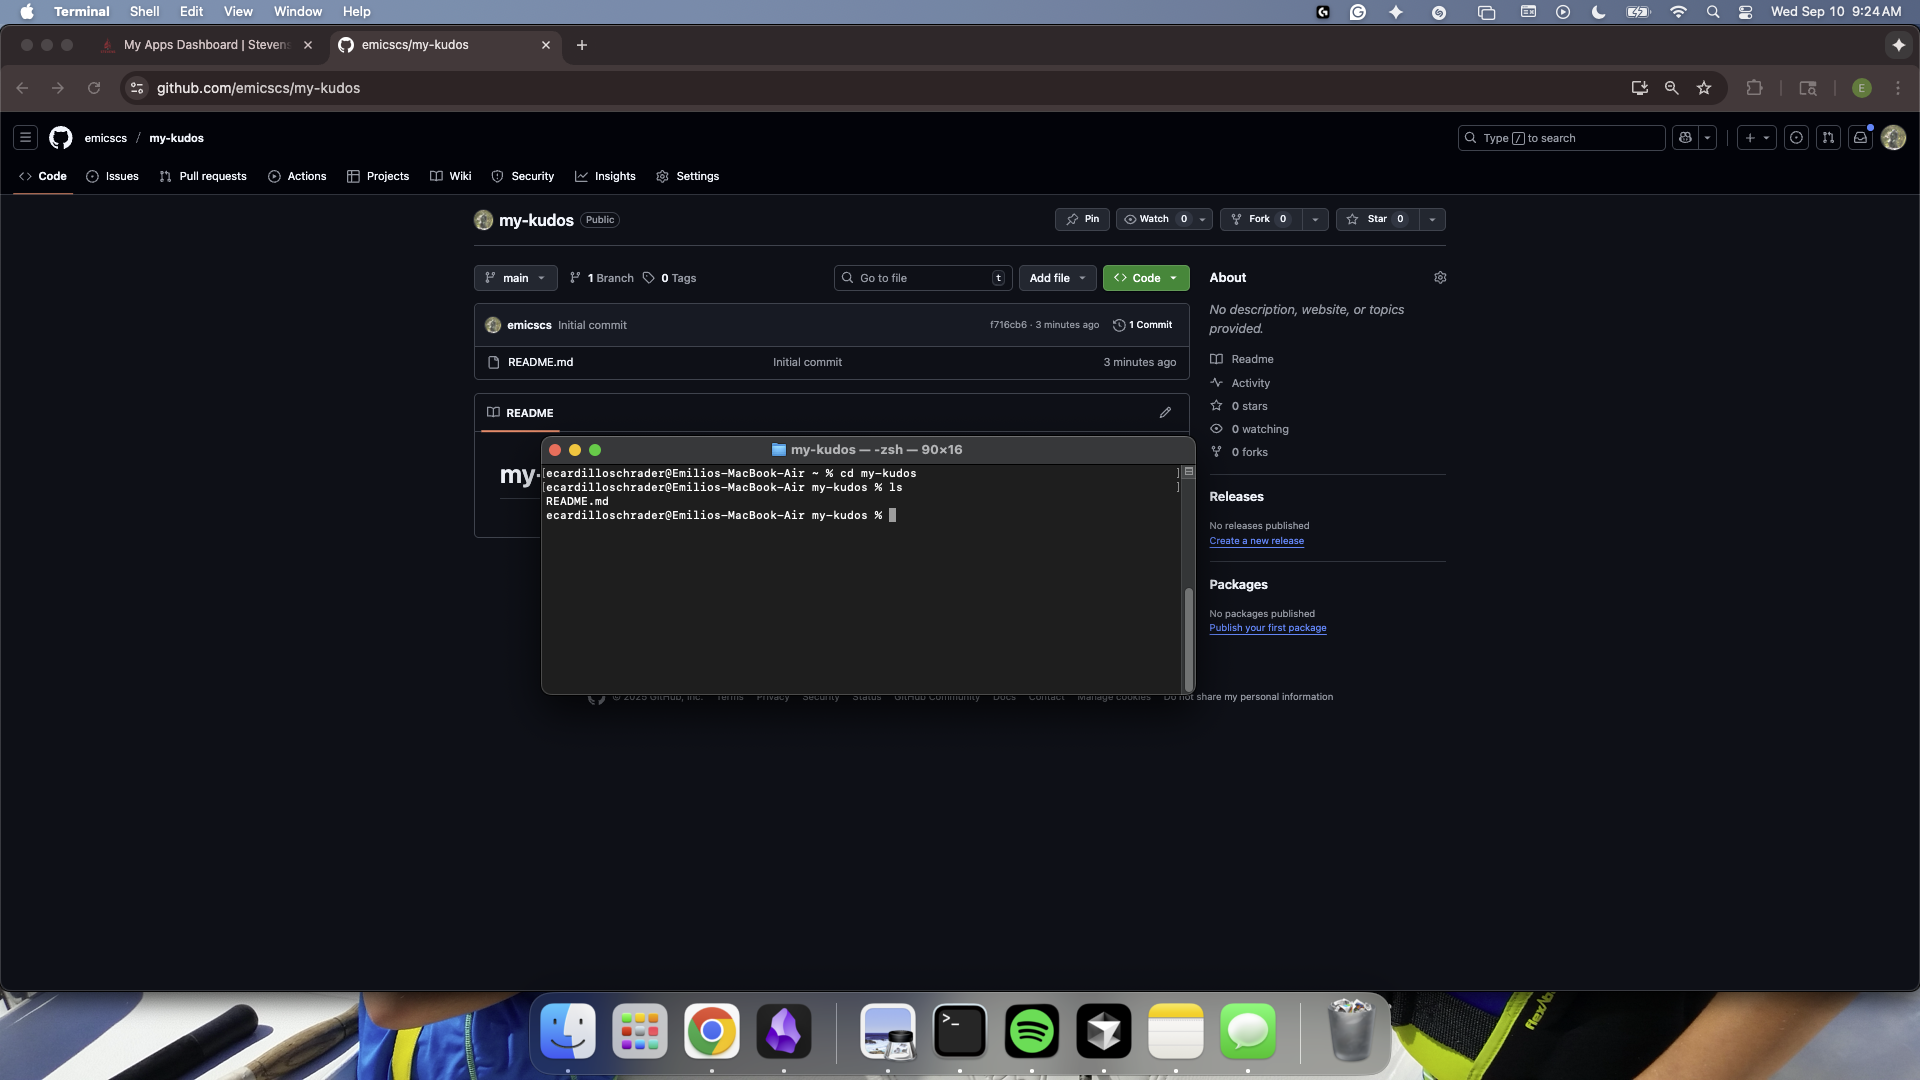
Note: In this example, I also used the ls command, which lists the contents for your directory. Since we just created our repo and initialized it with a README.md file, the only thing in our project folder should be that file - and it is.
Making a Change
As a way to test what we've done so far, lets try actually making changes to file and seeing them reflected in our repository.
Our goal will be to edit a file in our project - then upload the changes to our GitHub repo using the commands we just learned.
Editing a file
In VSCode, open your README.md file.
It should look something like this:
Lets make a simple change: add a short sentence about yourself!
It should look like something like this:
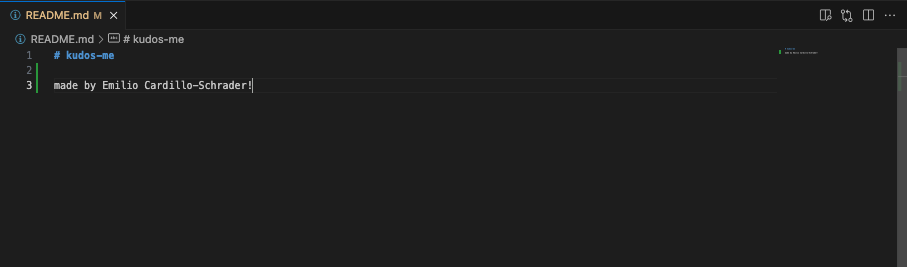
Note: Those green bars next to each of the lines we just wrote indicate that these are new (uncommitted) lines. This is good! It means that we now have code to upload (commit) to our repo!
Making a Commit
Once the change is made, use the git add command in order to include or 'stage' our changes for the next commit. Commits can be thought of as checkpoints; more on that later.
In this case, we made changes to the README.MD , so our file path is /README.MD and we type in:
git add /README.MD
Note: You can use git add to add as many files as you need, and another common option is to use git add . to add all files with changes. Also, The file path is case sensitive.
Checking Changes to be Committed
You can use the git status command to check what files have been added or "staged" for a commit to ensure you added the right things. In this case, it's only the one contributors file that we added.
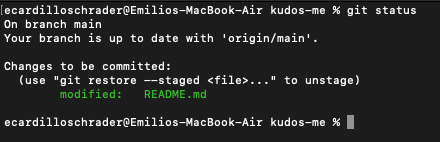
You can see here that our file is under changes to be committed and is in green text. Changes not staged for commit will be in red (if there are any).
Committing Changes
With our changes made and staged, we can create a commit which can be thought of as a checkpoint for our code. We can revert to this point if we make mistakes or need to look at the version of the code at this point in time.
It is also good practice to include a commit message by using the -m flag to describe what changes were made. For us, we will just say that we are adding a new contributor, like so:
git commit -m "Added info about me!"
Commit Messages: When writing a commit, it is usually good practice to follow a convention. At Blueprint, we use the Conventional Commits specification: www.conventionalcommits.org, but don't worry about that right now!
We can commit as often as we want, or when we feel it is necessary before making big changes.

Pushing a Commit
In order for our changes to appear on the remote repository (the one on Github, which is online), we need to push our changes using the git push command. If we run it as is, however, we will encounter an error:
It is no big deal - the reason it happens is because when we create the branch contributors/johnDoe, we only created it locally and it does not exist on the Github repository.
Therefore, we must run the command shown:
git push --set-upstream origin contributors/<your name>
Once the branch is set up remotely, or if the branch already existed remotely and was not created locally, we can simply use git push.
Seeing our Changes
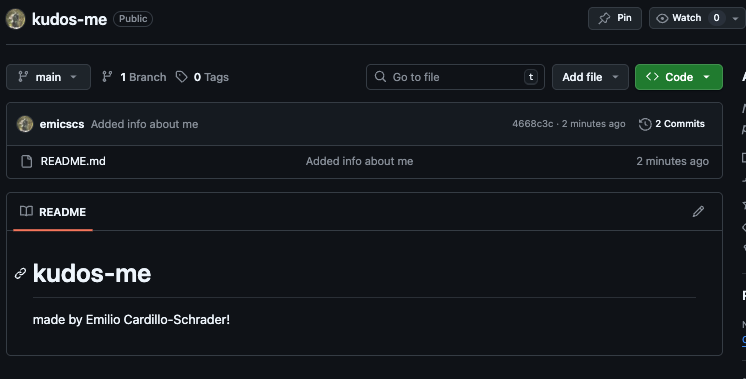
Finally, we can confirm that all of these steps were done correctly by going over to our repo on GitHub and refreshing the page.
Upon doing so, we should see any changes we made reflected on the web, like this:
Note: Another way to check is by opening VSCode again, and seeing if those green bars from earlier are still there. If not, then that means there are no new lines to stage, and your commit was successful!
Project Outcomes
At the end of our time together, I hope that you all improve on a two key areas of software development:
Technical Skills
- Development Patterns: Hooks, Context, functional components
- State Management: Complex state updates and data relationships
- User Experience Design: Responsive, accessible, intuitive interfaces
- Problem Solving: Handling edge cases and data integrity
Project Management Skills
- Incremental Development: Built feature by feature
- Requirements Analysis: Translated real needs into technical specifications
- Testing Strategy: Systematic verification of functionality
- Documentation: Clear code organization and commenting
Week 3
Goals
- Intro to CSS
- Building a demo page
- Implementing the
KudosCardcomponent
A Note About Project Versions and Installations...
I knwo we had some mix-ups and discrepencies last session when trying to create a project.
So, we need to do some cleaning to ensure there is no confusion in the future with project names, versions, etc.
Let's take a few minutes to delete all prior projects relating to Kudos (blueprint_kudos, kudos-me, etc.)
For the last time (fingers crossed) let's create a React project configured to use TypeScript.
In your root directory, run:
npx create-react-app blueprint_kudos --template typescript
After running, you may be asked a few questions. Simply respond yes to all of them.
Then, to open your project in VSCode and start your live development server, run:
cd blueprint_kudos
npm install
npm start
Part 1: CSS Basics
Last week you saw some live changes made to the browser, and hopefully gained some understanding of why we really need tools like Node and git.
This week, we will be getting hands-on with one of the main languages of our app: CSS.
What is CSS?
CSS, which stands for Cascading Style Sheets, is a style sheet language used for describing the presentation of a document written in a markup language like HTML.
Basically, it makes websites look nice.
HTML
You may have heard of HTML, but what does it actually do?
HTML is the structure of a webpage. It's like the skeleton or framework that holds everything together.
Here is some brief info about HTML before we begin diving into CSS. Feel free to check out some tutorials/videos on HTML ifn you want to learn more tha what is in these docs.
How HTML Works
<h1>This is a heading</h1>
<p>This is a paragraph</p>
<button>Click me</button>
Cheatsheet
Use this as a cheatsheet for whenever you forgot/don't know which tags to use.
-
<h1>,<h2>,<h3>- Headings (big to small) -
<p>- Paragraphs -
<div>- Container/box -
<button>- Clickable buttons -
<img>- Images -
<a>- Links
And remember: HTML is the foundation - everything else builds on top of it!
A Useful Analogy
A classic analogy that I will probably continue using throughout the next few sessions is this:
Our app is like a house...
HTML is the walls.
TypeScript is the door.
CSS is the paint.
We need all three to build a house, and in our case, this app.
But, specifically, CSS controls:
- Colors - text, backgrounds, borders
- Layout - where elements appear on the page
- Typography - fonts, sizes, spacing
- Visual effects - shadows, animations, hover effects
Let's see how this works in practice.
Classes
You may have heard of classes before... but CSS classes are slightly different.
CSS classes are reusable style definitions that you can apply to HTML elements. They're like templates for styling that you can use over and over again.
We can think of CSS classes like labels or tags that you apply to HTML elements to style them.
Imagine you have a box of different colored stickers:
- Yellow stickers for "important" items
- Red stickers for "urgent" items
- Green stickers for "completed" items
You stick these labels on different objects, and everyone knows what each color means.
CSS classes work the same way. You "stick" a class name on an HTML (wall) element, and the browser knows how to style it with CSS (paint).
Selectors
Before we can style anything, we need to tell CSS what we want to style. This is where selectors come in.
The purpose of selectors is to tell CSS which HTML elements we want to style
Let's create a simple demo TypeScript file to see this in action.
First though, let's create a directory (folder) to store our components:
CREATE: src/components
Then,
CREATE: src/components/CSSBasicsDemo.tsx
// Creating the demo component
export function CSSBasicsDemo() {
  return (
    <div className="demo-container"> {/* 1. demo-container class*/}
      <h2>CSS Basics Demo</h2>
      <div className="box-model-demo">
        <h3>Box Model</h3>
        <div className="box-example"> {/* 2. box-example class */}
          <div className="content">Content</div>
        </div>
      </div>
    </div>
  );
}
export default CSSBasicsDemo;
Now, let me add the CSS file. Notice how I'm targeting these elements using class names:
CREATE: src/components/CSSBasicsDemo.css
/* I'm targeting the demo-container class */
.demo-container {
  max-width: 800px;
  margin: 0 auto;
  padding: 20px;
}

/* I'm targeting the box-example class */
.box-example {
  width: 200px;
  height: 100px;
  padding: 20px;
  margin: 20px;
  border: 3px solid #3b82f6;
  background-color: #f8fafc;
}
See how this works? I'm using class names - those are the words after 'className=' in the HTML - to target specific elements. This is the most common way to style things in React.
Recall: src/App.tsx is the main file in any React project, because it is where the main application structure is defined, and where each component is referenced.
So, let's update ours with our new components:
import React from 'react';
import { CSSBasicsDemo } from './components/CSSBasicsDemo'; // refernces .tsx demo file
import './components/CSSBasicsDemo.css'; // refernces .css demo file

function App() {
	return <CSSBasicsDemo />;
}

export default App;
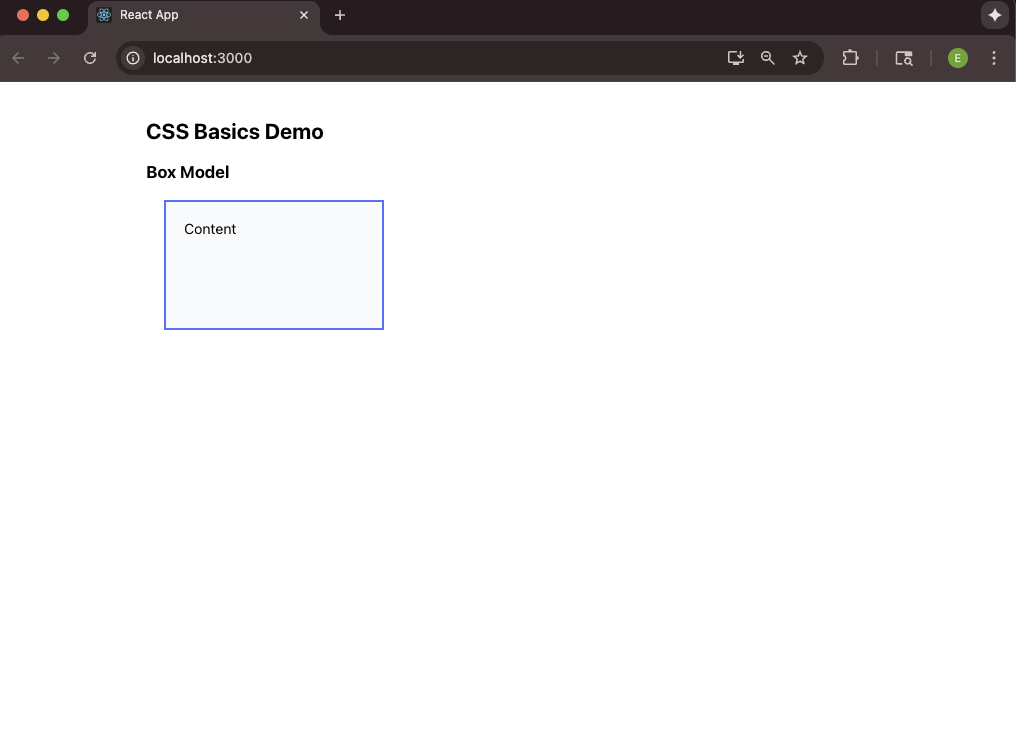
If you're seeing a page that looks like this, then you've done everything correctly so far!
The Box Model
Note: This is a VERY important section, so be sure to ask any questions if you need to. The Box Model is absolutely crucial to understand.
The Box Model describes that every single element on a webpage is a box.
To show you what I mean, let's use some developer tools (DevTools) made availible to us through Inspect Element.
To access your DevTools, right-click the object you want to examine (in our case, the blue box), and selectInspect Element from the dropdown.
You should now see a new window appear. It should look something like this:
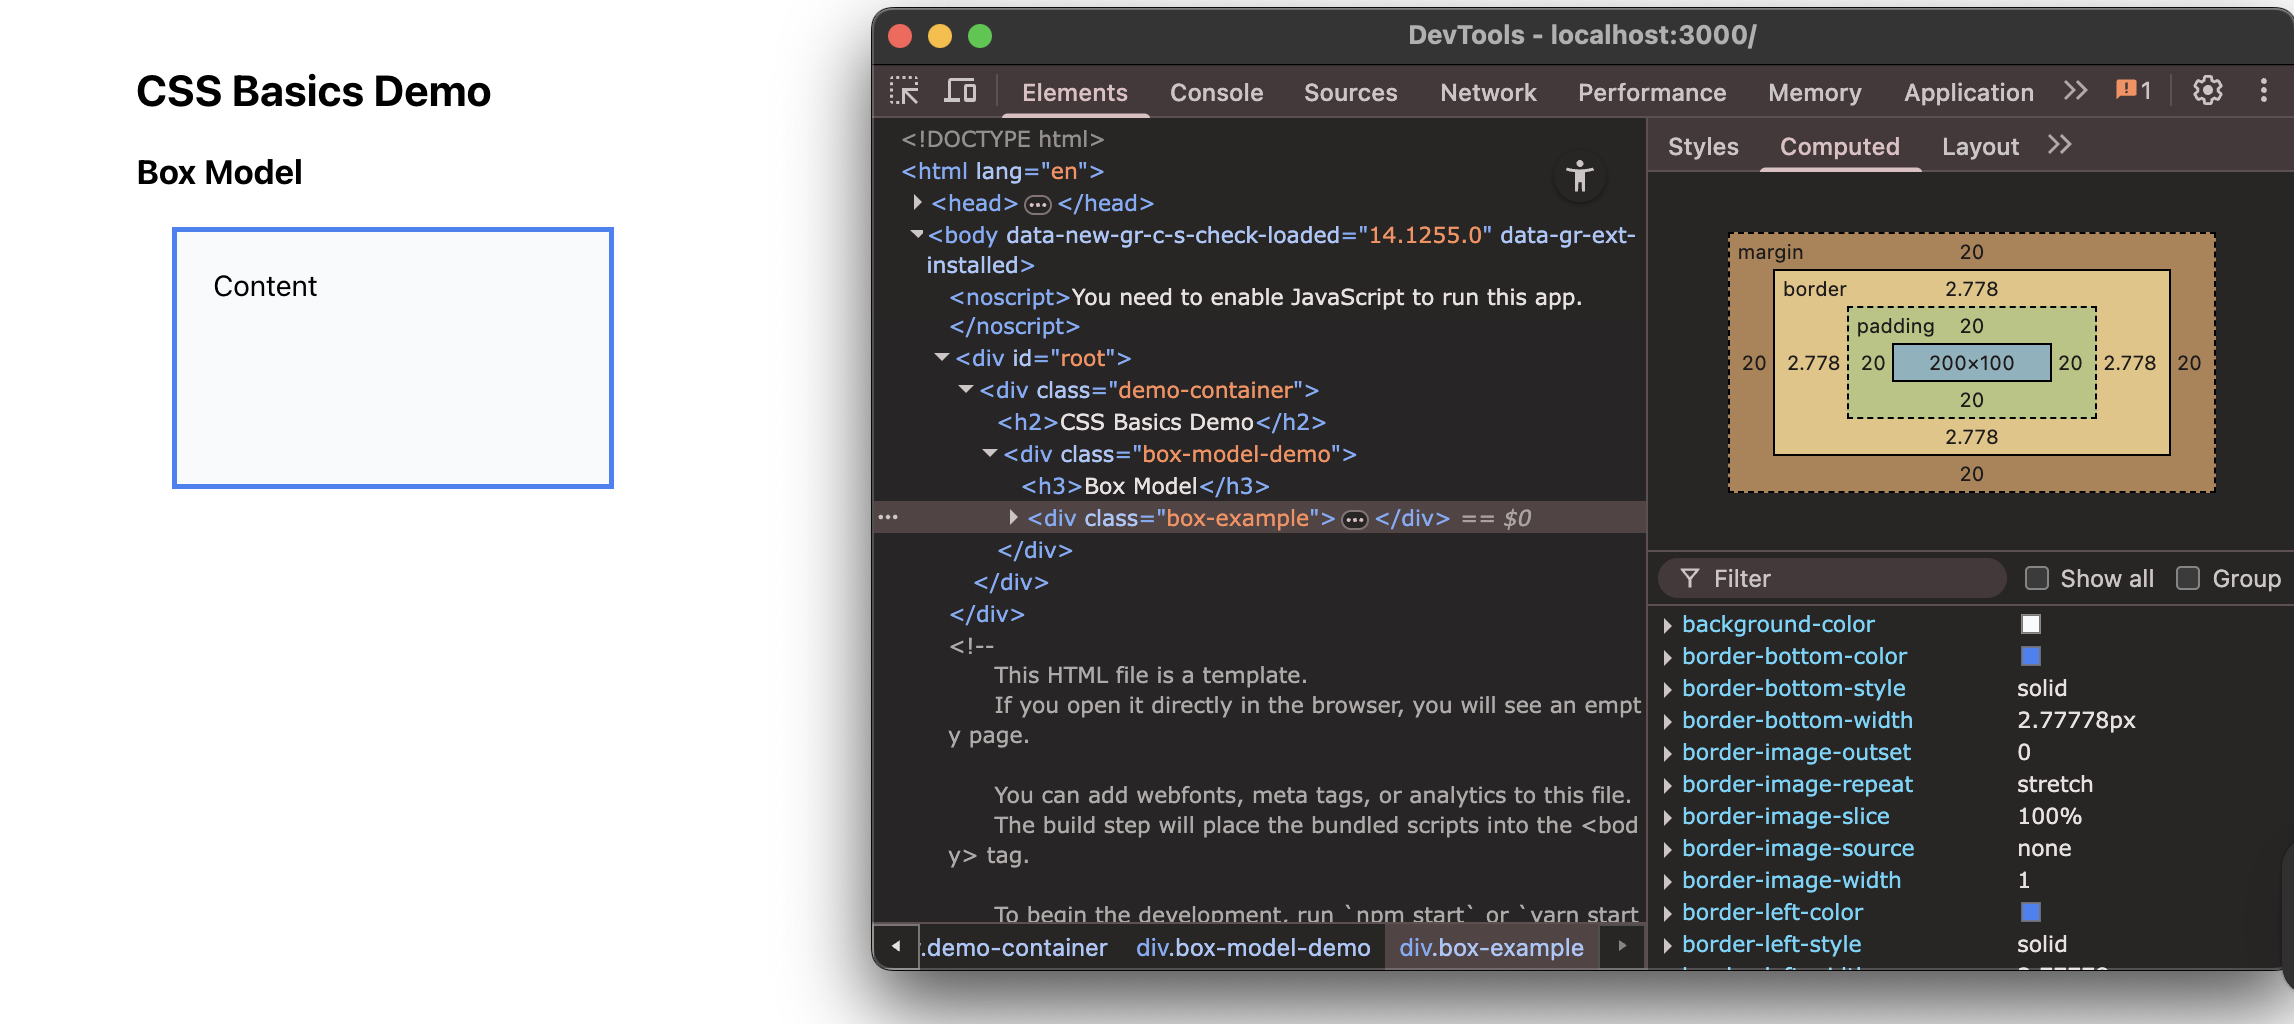
Let me break down what's happening here:
Each class is made up of properties which describe it in many ways.
In this example:
- The content is the actual text or image inside.
- Padding is the space inside the element, between the content and the border. That's the white space around the blue text.
- The border is the line around the element. That's the blue line you see.
- Margin is the space outside the element, between this element and other elements.
Let's see what heppns when we make a change to one of these properties...
First, hover over some of the <div>s so you can see exactly how your code is visualized on our webpage. Like this:
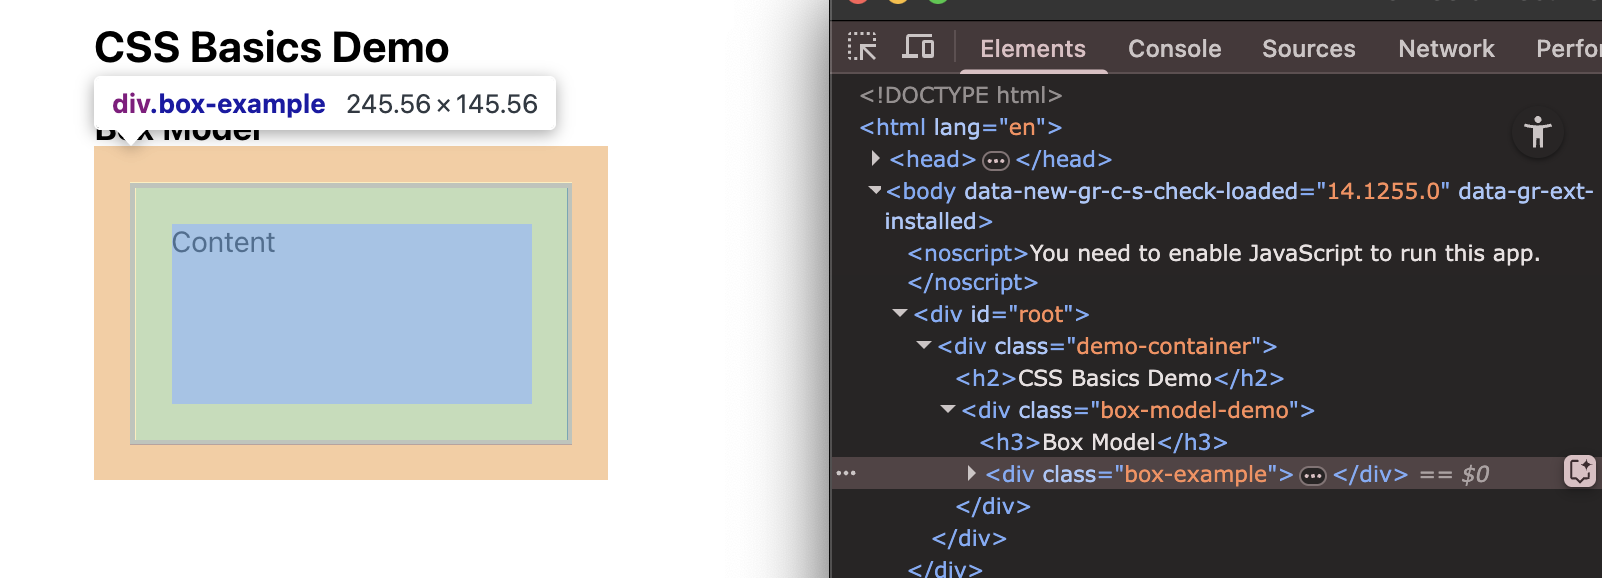
See how when my mouse is hovered over "box-example" it is highlighted on our webpage? This makes knwoing what our code does visually super clear.
We can see the properties of any element we want in the right panel that looks like this:
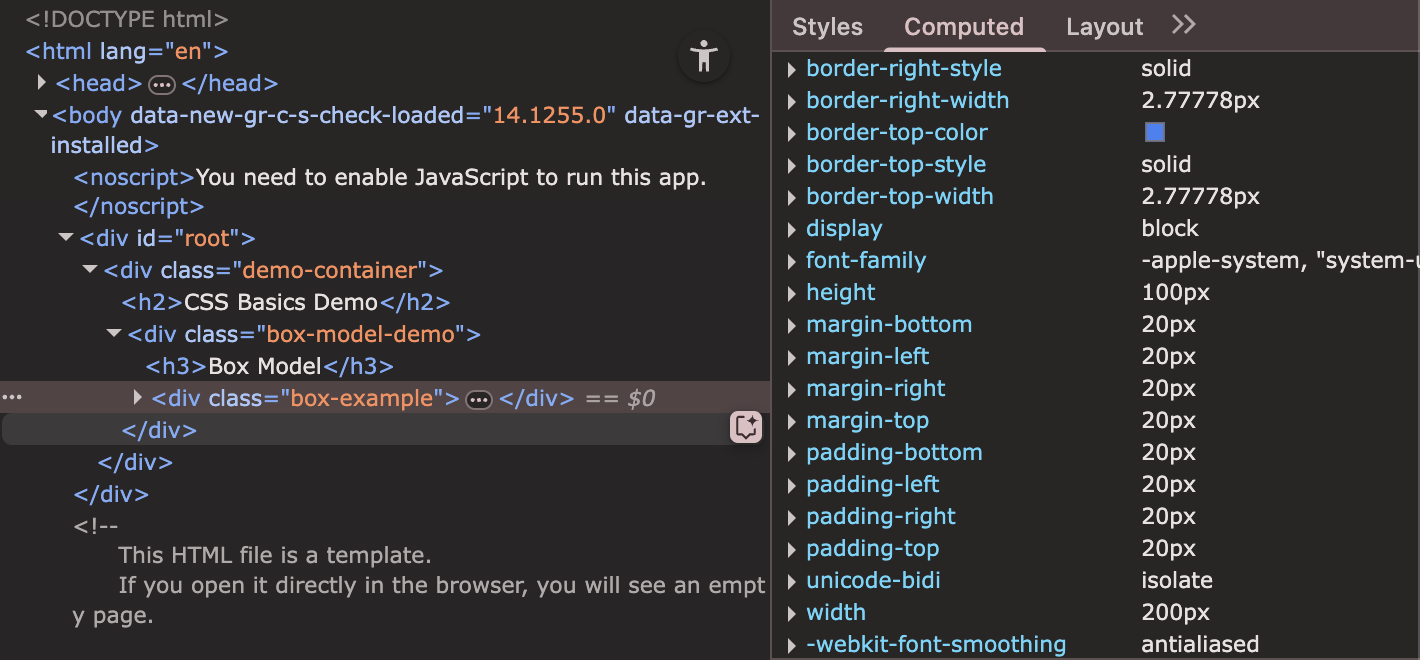
Hmm... some of those properties in the panel seem very familiar...
Remember how we gave our classes certain properties earlier in src/components/CSSBasicsDemo.css? We can now play around with their values to see their effect visually on our webpage.
Let's do some experimentation.
UPDATE: src/components/CSSBasicsDemo.css
.box-example {
  padding: 40px; /* Changed from 20px */
}
See how the content moved further from the border? That's padding.
Now let us change the margin...
.box-example {
  margin: 40px; /* Changed from 20px */
}
See how the entire box moved away from other elements? That's margin.
This is so important because when you're building layouts, you need to understand how these four things work together.
Most layout problems you'll face when first starting off come from not understanding the box model.
To close off this section, experimentsome more with the box-example properties and see the changes visually in your live server.
.demo-container {
  max-width: 800px;
  margin: 0 auto;
  padding: 20px;
}

/* Play around here and see the visual changes */
.box-example {
  width: 200px;
  height: 200px; /* 100 -> 200 */
  padding: 80px; /* 20 -> 40 -> 80 */
  margin: 60px; /* 20 -> 60 */
  border: 3px solid #3b82f6;
  background-color: #f8fafc;
}
Part 2: Building Our Kudos Card Component
Step 1: Planning Our Component
In software development, the first step is always to plan.
Since we already have an idea of what our end product looks like, and we now understand how our app is structured, we can actually do this step without any pre-existing visualization!
But, because we have an end product already, let's look back to it and create a quick list of components we will need to build.
[look at final Kudos example from Week 1]
One clear one that we should consider is the card layout - especially since it is the heart of our app.
Let's think about what this component needs:
- A recipient's name
- The kudos message
- Who gave the kudos
- When it was given
- What type it is (kudos or feedback)
This is a great example of a real-world component. It's not too simple, but not too complex either.
Let me create the basic structure first...
Step 2: Structuring the Component
Let's create a new file for our kudos card component.
Note: In React, it's common to have one component per file.
CREATE: src/components/KudosCard.tsx
import React from 'react';

interface KudosCardProps {
  recipient: string;
  message: string;
  giver: string;
  type: 'kudos' | 'feedback';
  date: string;
}

export function KudosCard({ recipient, message, giver, type, date }: KudosCardProps) {
  return (
    <div className="kudos-card">
      <div className="kudos-header">
        <h3 className="recipient-name">{recipient}</h3>
        <span className="kudos-type">{type}</span>
      </div>

      <p className="kudos-message">{message}</p>

      <div className="kudos-footer">
        <span className="giver-name">From: {giver}</span>
        <span className="kudos-date">{date}</span>
      </div>
    </div>
  );
}
Let me walk through what I'm doing here:
First, I'm defining the TypeScript interface. This tells us exactly what props this component expects. This is really helpful because if someone tries to use this component incorrectly, TypeScript will catch the error.
The component structure is semantic - I'm using meaningful HTML elements. The header contains the recipient name and type, the message is in a paragraph, and the footer has the giver and date.
Notice how I'm using className for all the styling. This is how we connect our HTML to our CSS.
Now let me add the CSS...
Step 3: Applying CSS Styles
I'm creating a separate CSS file for this component. This keeps things organized and makes the component reusable.
CREATE: src/components/KudosCard.css
/* src/components/KudosCard.css */

.kudos-card {

	/* Box Model */
	width: 100%; /* Full width of container */
	max-width: 400px; /* Maximum width */
	padding: 24px; /* Space inside the card */
	margin: 16px 0; /* Space above and below */
	border: 1px solid #e2e8f0; /* Light gray border */
	border-radius: 12px; /* Rounded corners */

	/* Layout */
	display: flex; /* Make it a flex container */
	flex-direction: column; /* Stack children vertically */
	gap: 16px; /* Space between children */

	/* Colors */
	background-color: #ffffff; /* White background */
	color: #1e293b; /* Dark gray text */

	/* Typography */
	font-family: 'Inter', -apple-system, sans-serif; /* Font family */
	font-size: 14px; /* Base font size */
	line-height: 1.5; /* Line spacing */

	/* Visual Effects */
	box-shadow: 0 2px 4px rgba(0, 0, 0, 0.05); /* Subtle shadow */
	transition: all 0.2s ease; /* Smooth transitions */
}
Let me break this down:
I'm using the box model we learned about: padding for internal space, margin for external space, border for the outline.
max-width: 400px means the card won't get wider than 400 pixels, but it can be smaller on mobile devices.
display: flex with flex-direction: column stacks the elements vertically.
gap: 16px puts consistent space between all the child elements.
I know we can really strecth our skills though, so let's keep adding props...
For the hover effect from before:
	/* ...prior code... */

.kudos-card:hover {
  transform: translateY(-2px);
  box-shadow: 0 8px 25px rgba(0, 0, 0, 0.1);
  border-color: #cbd5e1;
}
This creates a nice interactive effect. When you hover over the card, it should move up slightly and get a stronger shadow.
Now let me style the header...
	/* ...prior code... */

.kudos-header {
  display: flex;
  justify-content: space-between;
  align-items: center;
  margin-bottom: 8px;
}

.recipient-name {
  font-size: 18px;
  font-weight: 600;
  color: #0f172a;
  margin: 0;
}

.kudos-type {
  padding: 4px 12px;
  border-radius: 20px;
  font-size: 12px;
  font-weight: 500;
  text-transform: uppercase;
  letter-spacing: 0.5px;
}
The header uses flexbox to put the name on the left and the type badge on the right.
The type badge has rounded corners (border-radius: 20px) and is styled like a pill.
Let me add different colors for different types...
	/* ...prior code... */

.kudos-type.kudos {
  background-color: #dbeafe;
  color: #1e40af;
}

.kudos-type.feedback {
  background-color: #f3f4f6;
  color: #374151;
}
This uses CSS class combination. When an element has both kudos-type and kudos classes, it gets the blue styling. When it has kudos-type and feedback, it gets the gray styling.
Now let me style the message and footer...
	/* ...prior code... */

.kudos-message {
  font-size: 15px;
  line-height: 1.6;
  color: #475569;
  margin: 0;
  flex-grow: 1;
}

.kudos-footer {
  display: flex;
  justify-content: space-between;
  align-items: center;
  padding-top: 12px;
  border-top: 1px solid #f1f5f9;
  font-size: 12px;
  color: #64748b;
}
The message uses flex-grow: 1 which means it will take up all available space, pushing the footer to the bottom.
All together now...
/* src/components/KudosCard.css */

.kudos-card {

	/* Box Model */
	width: 100%; /* Full width of container */
	max-width: 400px; /* Maximum width */
	padding: 24px; /* Space inside the card */
	margin: 16px 0; /* Space above and below */
	border: 1px solid #e2e8f0; /* Light gray border */
	border-radius: 12px; /* Rounded corners */

	/* Layout */
	display: flex; /* Make it a flex container */
	flex-direction: column; /* Stack children vertically */
	gap: 16px; /* Space between children */

	/* Colors */
	background-color: #ffffff; /* White background */
	color: #1e293b; /* Dark gray text */

	/* Typography */
	font-family: 'Inter', -apple-system, sans-serif; /* Font family */
	font-size: 14px; /* Base font size */
	line-height: 1.5; /* Line spacing */

	/* Visual Effects */
	box-shadow: 0 2px 4px rgba(0, 0, 0, 0.05); /* Subtle shadow */
	transition: all 0.2s ease; /* Smooth transitions */

}

.kudos-card:hover {

	transform: translateY(-2px); /* Move up slightly on hover */
	box-shadow: 0 8px 25px rgba(0, 0, 0, 0.1); /* Stronger shadow on hover */
	border-color: #cbd5e1; /* Lighter border on hover */
}


.kudos-header {
	display: flex; /* Make it a flex container */
	justify-content: space-between; /* Space items apart */
	align-items: center; /* Center items vertically */
	margin-bottom: 8px; /* Space below header */
}

.recipient-name {
	font-size: 18px; /* Larger font size */
	font-weight: 600; /* Bold text */
	color: #0f172a; /* Very dark gray */
	margin: 0; /* Remove default margin */
}

.kudos-type {
	padding: 4px 12px; /* Space inside badge */
	border-radius: 20px; /* Pill-shaped */
	font-size: 12px; /* Small font size */
	font-weight: 500; /* Medium bold */
	text-transform: uppercase; /* All caps */
	letter-spacing: 0.5px; /* Space between letters */
}


.kudos-type.kudos {
	background-color: #dbeafe; /* Light blue background */
	color: #1e40af; /* Dark blue text */
}


.kudos-type.feedback {
	background-color: #f3f4f6; /* Light gray background */
	color: #374151; /* Dark gray text */
}


.kudos-message {
	font-size: 15px; /* Slightly larger font */
	line-height: 1.6; /* Good line spacing */
	color: #475569; /* Medium gray text */
	margin: 0; /* Remove default margin */
	flex-grow: 1; /* Take up available space */
}


.kudos-footer {
	display: flex; /* Make it a flex container */
	justify-content: space-between; /* Space items apart */
	align-items: center; /* Center items vertically */
	padding-top: 12px; /* Space above footer */
	border-top: 1px solid #f1f5f9; /* Light border on top */
	font-size: 12px; /* Small font size */
	color: #64748b; /* Light gray text */
}

.giver-name {
	font-weight: 500; /* Medium bold */
}


.kudos-date {
	color: #94a3b8; /* Very light gray */
}
Finally, let's create a demo page to show this in action...
Step 4: Creating the Demo Page
We need to update the App component to show our kudos cards...
// src/App.tsx
import React from 'react';
import { KudosCard } from './components/KudosCard';
import './components/KudosCard.css';

function App() {
  const sampleKudos = [
    {
      recipient: "Jane Smith",
      message: "Amazing work on the authentication refactor! Your clean code and thorough testing saved us so much time.",
      giver: "John Doe",
      type: "kudos" as const,
      date: "Mar 22, 2024"
    },
    {
      recipient: "Mike Johnson",
      message: "Thanks for staying late to help debug the payment integration. Your persistence really paid off!",
      giver: "Sarah Wilson",
      type: "kudos" as const,
      date: "Mar 21, 2024"
    },
    {
      recipient: "Alex Chen",
      message: "Great job presenting the technical architecture to stakeholders. You explained everything so clearly!",
      giver: "Emily Davis",
      type: "feedback" as const,
      date: "Mar 20, 2024"
    }
  ];

  return (
    <div className="app-container">
      <div className="app-content">
        <h1 className="app-title">
          - Kudos Cards Demo -
        </h1>

        <div className="cards-grid">
          {sampleKudos.map((kudos, index) => (
            <KudosCard
              key={index}
              recipient={kudos.recipient}
              message={kudos.message}
              giver={kudos.giver}
              type={kudos.type}
              date={kudos.date}
            />
          ))}
        </div>
      </div>
    </div>
  );
}

export default App;
Let me add some CSS for the app layout...
/* Add to App.css or create App.css */
.app-container {
  min-height: 100vh;
  background-color: #f8fafc;
  padding: 32px 0;
}

.app-content {
  max-width: 1200px;
  margin: 0 auto;
  padding: 0 16px;
}

.app-title {
  font-size: 48px;
  font-weight: 700;
  text-align: center;
  color: #0f172a;
  margin-bottom: 32px;
}

.cards-grid {
  display: grid;
  grid-template-columns: repeat(auto-fit, minmax(350px, 1fr));
  gap: 24px;
}

@media (max-width: 768px) {
  .cards-grid {
    grid-template-columns: 1fr;
  }
}
Look at that! We have working kudos cards!!!
Notice how they respond to hover, how the different types have different colors, how the layout is clean and structured!
Week 4
Welcome!
Goals
- Discuss TypeScript essentials and how we should structure a component
- Build the Kudos form with
KudosForm.tsx
Quick Recap
Last week we learned:
- CSS fundamentals
- How to build the KudosCard component
- How to display multiple cards using sample data
A Quick Note...
The nest few sessions (weeks) will be dedicated to implementing KudosForm and the respective cards that are created after a submission is made.
This will take some time, so I decided to split it up into a few parts (3, to be exact). Part 1 covers the TypeScript aspect (this doc), part 2 dives into CSS by having you complete a challenge (week 5), and part 3 is about implementing state, also through a challenge (week 6). Before moving ahead and reading this doc, make sure you've read week 3 as you'll need it for the challenges that lie ahead... 🤫
Good luck!
Building the Kudos Form Component
Step 1: Setting Up the KudosForm File
First, let's create a new file for our form component.
We will start with just the imports and the component shell:
CREATE: src/components/KudosForm.tsx
import { useState } from 'react';
import './KudosForm.css';

export function KudosForm() {
  return (
    <div>
      <h2>Form goes here</h2>
    </div>
  );
}
What's happening:
- We import
useStatefrom React - this is the hook we'll use for state - We import our CSS file (which we'll create next)
- We export a function component called
KudosForm - For now, it just returns a simple div with text
Step 2: Defining the Props Interface
In this step, we are going to learn about a few key React topics so be sure to ask questions if you are confused.
Currently, we know that our form needs some way to communicate with its parent component (App.tsx).
So, how can we do this? How can we connect the live state of our component - in this case, our kudos form - with its parent component?
To facilitate this communication, we use props.
Props
Props are read-only properties that are passed from a parent component to a child component.
They are a fundamental concept for passing data and configuration down the component tree and ensuring that components can talk to each other in real-time.
Interfaces
This may seem like a lot to manage - and it is - but thankfully, React makes it really easy for us to organize and manage this data. To show this, let's talk a bit about interfaces.
Interfaces are primarily used to define the structure and types that the props of a component's object must adhere to.
It is a little tricky to understand at first, but it is important to note that interfaces do not actually recieve or store this data, but rather, they enforce 'rules' that an object must follow.
An interface is basically a blueprint (hahahaha😅😐) that describes the data we want to receive from objects.
Destructuring
To make processing this data easier, we can employ a technique called destructuring.
Destructuring allows us to unpack an object's props into easy-to-use variables that we can call right in the function.
Without destructuring, our code looks like this:
//Regular Function component
function Welcome(props) {
  return <h1>Hello, {props.name} from {props.city}!</h1>;
}
See how we have to use dot-notation to retrieve information from an object? We are making it harder for ourselves than it has to be.
By destructuring objects, we can simply take their distinct variables as parameters rather than calling them from an object.
It looks like this:
// Destructuring { name, city } from the props object
function Welcome({ name, city }) {
  return <h1>Hello, {name} from {city}!</h1>;
}
Putting these ideas together...
Let's define what data it expects and what it will send eventually send back.
UPDATE: Add this interface at the top of src/components/KudosForm.tsx:
import { useState } from 'react';
import './KudosForm.css';

// Define what props this component accepts
interface KudosFormProps {
  onSubmit: (kudos: {
    recipient: string; // recipient name as a string
    message: string; // kudos message as a string
    giver: string; // kudos giver as a string
    type: 'kudos' | 'feedback'; // type (kudos or feedback)
    date: string; // date as a string
  }) => void;
}

export function KudosForm({ onSubmit }: KudosFormProps) {
  return (
    <div>
      <h2>Form goes here</h2>
    </div>
  );
}
What's happening:
-
KudosFormPropsis a TypeScript interface that defines what props our component expects -
onSubmit- when the user submits the form, we'll create a kudos object and pass it to the parent component using this function. The parent decides what to do with it (like adding it to a list). - The function accepts a kudos object with all the fields we need to track
-
type: 'kudos' | 'feedback'means type can ONLY be one of these two strings -
voidmeans the function doesn't return anything -
{ onSubmit }: KudosFormProps- we destructure the props to get the onSubmit function
Step 3: Creating the Form Structure - Header
Let's build the actual form, starting with the header and structure.
UPDATE: Replace the return statement in src/components/KudosForm.tsx:
export function KudosForm({ onSubmit }: KudosFormProps) {
  return (
    <form className="kudos-form">
      <h2 className="form-title">✨ Give Kudos</h2>
    </form>
  );
}
What's happening:
- We use
<form>instead of<div>- this is the HTML element for forms -
className="kudos-form"- this is how we attach CSS classes in React (remember: notclass, butclassName) - The emoji ✨ gives it some swag
-
form-titleis a CSS class we'll style later
Step 4: Adding the Recipient Input Field
Finally, let's add our first input field!
This will be for the main input we are handling in this program... a Kudos message!
And again, feel free to ask questions as we walk through this - it is super important.
UPDATE: Add the first form group inside the <form> in src/components/KudosForm.tsx:
export function KudosForm({ onSubmit }: KudosFormProps) {
  return (
    <form className="kudos-form">
      <h2 className="form-title">✨ Give Kudos</h2>

      <div className="form-group">
        <label htmlFor="recipient">To:</label>
        <input
          id="recipient"
          type="text"
          placeholder="Enter recipient name"
          required
        />
      </div>
    </form>
  );
}
What's happening:
-
<div className="form-group">- A container for the label and input -
<label htmlFor="recipient">- The label describes what the input is for-
htmlFor="recipient"connects this label to the input withid="recipient" - When you click the label, it focuses the input!
-
-
<input>- The actual text field-
id="recipient"- Unique identifier, connects to the label -
type="text"- Makes it a text input -
placeholder- The gray text that shows when empty -
required- HTML validation - form won't submit if empty
-
Step 5: Adding the Message Text area
Next, let's add a textarea for the kudos message.
UPDATE: Add the message field in src/components/KudosForm.tsx:
export function KudosForm({ onSubmit }: KudosFormProps) {
  return (
    <form className="kudos-form">
      <h2 className="form-title">✨ Give Kudos</h2>

      <div className="form-group">
        <label htmlFor="recipient">To:</label>
        <input
          id="recipient"
          type="text"
          placeholder="Enter recipient name"
          required
        />
      </div>

      <div className="form-group">
        <label htmlFor="message">Message:</label>
        <textarea
          id="message"
          placeholder="Write your kudos or feedback..."
          rows={4}
          required
        />
      </div>
    </form>
  );
}
What's happening:
-
<textarea>- Like an input, but for multi-line text -
rows={4}- Start with 4 visible rows (users can type more) - Notice we use
{4}with curly braces because it's a number, not a string - Same pattern: label with
htmlFor, textarea with matchingid
Step 6: Adding the Giver Input Field
Now let's add a field for who's giving the kudos.
UPDATE: Add the giver field in src/components/KudosForm.tsx:
export function KudosForm({ onSubmit }: KudosFormProps) {
  return (
    <form className="kudos-form">
      <h2 className="form-title">✨ Give Kudos</h2>

      <div className="form-group">
        <label htmlFor="recipient">To:</label>
        <input
          id="recipient"
          type="text"
          placeholder="Enter recipient name"
          required
        />
      </div>

      <div className="form-group">
        <label htmlFor="message">Message:</label>
        <textarea
          id="message"
          placeholder="Write your kudos or feedback..."
          rows={4}
          required
        />
      </div>

      <div className="form-group">
        <label htmlFor="giver">From:</label>
        <input
          id="giver"
          type="text"
          placeholder="Your name"
          required
        />
      </div>
    </form>
  );
}
What's happening:
- Same pattern as the recipient field
- This captures who is giving the kudos
- Notice the consistent structure: div wrapper, label, input
Step 7: Adding the Type Selector (Dropdown)
Let's add a dropdown to choose between "kudos" and "feedback".
UPDATE: Add the type selector in src/components/KudosForm.tsx:
export function KudosForm({ onSubmit }: KudosFormProps) {
  return (
    <form className="kudos-form">
      <h2 className="form-title">✨ Give Kudos</h2>

      <div className="form-group">
        <label htmlFor="recipient">To:</label>
        <input
          id="recipient"
          type="text"
          placeholder="Enter recipient name"
          required
        />
      </div>

      <div className="form-group">
        <label htmlFor="message">Message:</label>
        <textarea
          id="message"
          placeholder="Write your kudos or feedback..."
          rows={4}
          required
        />
      </div>

      <div className="form-group">
        <label htmlFor="giver">From:</label>
        <input
          id="giver"
          type="text"
          placeholder="Your name"
          required
        />
      </div>

      <div className="form-group">
        <label htmlFor="type">Type:</label>
        <select id="type">
          <option value="kudos">Kudos</option>
          <option value="feedback">Feedback</option>
        </select>
      </div>
    </form>
  );
}
What's happening:
-
<select>- Creates a dropdown menu -
<option value="kudos">- Each option has a value (what gets stored) and text (what user sees) - The first option (Kudos) is selected by default
- This will let users choose whether they're giving kudos or feedback through the simple logic we impleemnted a few steps ago
Step 8: Adding the Submit Button
Finally, let's add the submit button to complete our form structure.
UPDATE: Add the button at the end of the form in src/components/KudosForm.tsx:
export function KudosForm({ onSubmit }: KudosFormProps) {
  return (
    <form className="kudos-form">
      <h2 className="form-title">✨ Give Kudos</h2>

      <div className="form-group">
        <label htmlFor="recipient">To:</label>
        <input
          id="recipient"
          type="text"
          placeholder="Enter recipient name"
          required
        />
      </div>

      <div className="form-group">
        <label htmlFor="message">Message:</label>
        <textarea
          id="message"
          placeholder="Write your kudos or feedback..."
          rows={4}
          required
        />
      </div>

      <div className="form-group">
        <label htmlFor="giver">From:</label>
        <input
          id="giver"
          type="text"
          placeholder="Your name"
          required
        />
      </div>

      <div className="form-group">
        <label htmlFor="type">Type:</label>
        <select id="type">
          <option value="kudos">Kudos</option>
          <option value="feedback">Feedback</option>
        </select>
      </div>

      <button type="submit" className="submit-button">
        Send Kudos 🎉
      </button>
    </form>
  );
}
What's happening:
Step 8a: Import the Form Component
Now let's see our form structure! Even though it's not styled yet, we can display it to make sure everything is working.
UPDATE: Add imports at the top of src/App.tsx:
import { useState } from 'react';
import { KudosCard } from './components/KudosCard';
import { KudosForm } from './components/KudosForm';  // ← Add this
import './components/KudosCard.css';
import './App.css';
What's happening:
- We import the
KudosFormcomponent we just created - Now we can use
<KudosForm />in our JSX - Note: We're NOT importing the CSS yet - we'll add that after we create it
Step 8b: Create a Temporary Handler Function
Our form expects an onSubmit prop (remember the interface we created?). Let's create a temporary function to pass to it.
UPDATE: Add this inside the App function in src/App.tsx, right before the return statement:
function App() {
  const sampleKudos = [
    {
      recipient: "Jane Smith",
      message: "Amazing work on the authentication refactor! Your attention to detail made the whole team more productive.",
      giver: "John Doe",
      type: "kudos" as const,
      date: "Mar 22, 2024"
    },
    {
      recipient: "Bob Wilson",
      message: "Could improve code documentation in the API module.",
      giver: "Alice Chen",
      type: "feedback" as const,
      date: "Mar 20, 2024"
    }
  ];

  // Temporary function - we'll make this work properly later!
  const handleAddKudos = (kudos: any) => {
    console.log('New kudos submitted:', kudos);
  };

  return (
    // ... rest of code ...
  );
}
What's happening:
- We create a function called
handleAddKudosthat takes a kudos object - For now, it just logs to the console - we'll make it actually add kudos later
-
kudos: any- TypeScript typeanymeans "any type" (we'll make this properly typed later) - This function will be called when the form is submitted
Step 8c: Add the Form to the JSX
UPDATE: Add the form component in src/App.tsx:
return (
  <div className="app-container">
    <div className="app-content">
      <h1 className="app-title">🎉 Kudos Board</h1>

      {/* Add the form here! */}
      <KudosForm onSubmit={handleAddKudos} />

      <div className="cards-grid">
        {sampleKudos.map((kudos, index) => (
          <KudosCard
            key={index}
            recipient={kudos.recipient}
            message={kudos.message}
            giver={kudos.giver}
            type={kudos.type}
            date={kudos.date}
          />
        ))}
      </div>
    </div>
  </div>
);
What's happening:
-
<KudosForm onSubmit={handleAddKudos} />- We render the form component -
onSubmit={handleAddKudos}- We pass our temporary function as a prop - The form appears ABOVE the kudos cards
- The form will receive the
handleAddKudosfunction through its props
Step 8d: Check Your Browser!
Look at your browser now!
You should see your unstyled form appear above the kudos cards. It won't look pretty yet (that's coming in Part 3!), but you should see:
- The "Give Kudos" header
- The "To:" label and input field
- The "Message:" label and textarea
- The "From:" label and input field
- The "Type:" label and dropdown
- The "Send Kudos" button
- All the existing kudos cards below
Try clicking around:
- You can type in the fields
- You can select from the dropdown
- If you click the button, the form will submit (though nothing will happen yet - we haven't added the submit logic)
Don't worry that it looks plain! In the next section (Part 3), we'll make it beautiful with CSS!
Week 5
Goals
- Wrap up the
KudosForm.tsxfrom last week's session - Complete this week's challenge
Your Objective
Your goal is to style the KudosForm.tsx component by adding CSS rules to the KudosForm.css file. We've already set up all the className attributes you'll need in the component.
Your job is to target those classes and bring the app to life!
Try to create a design that is:
- Clean and readable: Users should easily understand what to do.
- Modern: Think soft shadows, rounded corners, and good spacing.
- Interactive: The form should give visual feedback when a user interacts with it (like clicking an input or hovering over the button).
Task Outline
Here's a breakdown of the elements to style:
-
The Main Container (
.kudos-form)- Make the form stand out from the background. It should look like a distinct "card." How can you give it some depth and defined edges?
-
The Title (
.form-title)- The title "Give Kudos" should be a clear and prominent header for the form. How can you make it the focal point?
-
Field Groups (
.form-group)- Currently, all the labels and inputs are squished together. Add some vertical spacing between each field group to let the form breathe.
-
Field Labels (
.form-group label)- Style the labels (
To:,Message:, etc.) so they are clear and distinct from the input fields they describe. They should sit neatly above their respective inputs.
- Style the labels (
-
Inputs, Textareas, & Selects
- Target
.form-group input,.form-group textarea, and.form-group selectall at once. - Give them a consistent look. They should have clean borders, nice internal padding, and stretch to the full width of the form.
- Target
-
The Focus State (
:focus)- This is a key part of user experience! When a user clicks into an input field, it should be visually obvious which one is active. How can you change the border or add a glow effect?
-
The Submit Button (
.submit-button)- Make it look like the primary action on the form. Think about its color, font size, and shape.
Some Hints...
Here are a few CSS properties that might help you out:
-
For the card effect: Look into
box-shadowandborder-radius. -
For spacing: Your best friends are
marginandpadding. Remember, margin is for space outside an element, and padding is for space inside. -
To make the button feel "clickable": Use
cursor: pointer;to change the mouse icon, and for the "press down" effect, check outtransform: translateY(1px);in an:activestate.
If you do get stuck, feel free to refer back to last week's session where we discussed CSS styling!
Here is an example of what your cards could look like (ignore dark mode):

Uhhh... what now?
Great job building the static components for our Kudos Board! You have a beautiful <KudosForm /> that you can type in and a stylish <KudosCard /> component ready to display data.
There's just one problem... they don't talk to each other. 😅
Next week, we will tie evrything together and get this component working with state! Get hype!
Week 6 + 7
Welcome!
Goals
- Get an intuition for how state dictates behavior in an app
- Ponder some examples/use cases
- Complete this week's challenge!
A Quick Recap...
Last week was awesome!!! Evevryone stepped up and took a leap of faith by styling a component all on your own... Kudos (😏) to you!
Big shoutout to Palak for catching the W last week!
Understanding React State
A recurring question that has been asked for the last few weeks (and rightfully so) is how the form submission works. In other words, if someone is actually using the app on the web, how is their response to the form reflected in our project.
Currently, as you may have noticed in your code, we are hardcoding cards, which obviously isn't how an actual app works.
We want our app to be able to recieve user inputs (kudos) in real-time and update our card layout accordingly.
And you guessed it, this is state!
What is State?
Remember our house analogy?
- HTML is the walls (structure)
- CSS is the paint (styling)
- TypeScript is the door (logic)
State is the furniture inside the house - it can change and move around dynamically!
State is data that can change over time in your React component. When state changes, React automatically re-renders the component to show the updated information.
In effect, this is what gives functionality and actual usefulness to your code.
Some Real-World Examples...
There are a few ways to think about state in everyday terms:
A light switch - It has two states: ON or OFF
- Current state: The light is currently ON
- Action: You flip the switch
- New state: The light is now OFF
A shopping cart - It has a list of items
- Current state: 3 items in cart
- Action: You add a new item
- New state: 4 items in cart
Our Kudos App - It will have a list of kudos cards
- Current state: 1 kudos card displayed
- Action: User submits the form
- New state: 2 kudos cards displayed
This is exactly what we're building today!
Hooks
Hooks are functions that let you "hook into" and control React states.
Since we can use hooks for each individual (functional) component, it is actually possible to write entire React applications using only functional components, which in turn HIGHLY simplifies the component model that we discussed last week.
Before we dive into how they are used in our project, let's go over some properties of hooks that will help you understand them better
General Properties
- They can only be used with functional components. You CANNOT use them in class components.
- Every time our function runs/is called, its hooks must run in the exact same order. In other words, we cant really have a hook inside of a conditional statement, since if the statement didn't run, we would have an error. This follows that we really can't have hooks nested inside of anything (loops, conditionals, functions, etc.). They must be at the top level of our function, and always called in the exact same order.
- Lastly, there are a few important types of hooks that React allows us to use. In the next section, I will go over one of these types.
The useState Hook
React gives us a special function called useState to manage state. The pattern looks like this:
const [currentValue, functionToUpdateIt] = useState(initialValue);
Think of it like this:
- currentValue - What the state is right now
- functionToUpdateIt - How to change it
- initialValue - What it starts as
Don't worry if this seems abstract - it'll make perfect sense once we start building!
Your Objective
Last week, you successfully built the static UI for our Kudos Board!
There's just one problem... they don't talk to each other. 😅
These components aren't connected yet; they don't share any data.
When you fill out the form and hit "Send Kudos," nothing happens. The form data just disappears, and no new card appears.
Your goal this week is to fix this. You need to use React's useState hook to capture the form submissions and display them as new cards.
Task Outline
Make the app fully functional. When a user fills out the KudosForm and clicks "Send Kudos," a new KudosCard should appear in the cards-grid.
To solve this, you will need to:
- Find the Right Home for State: Where does the list of all kudos need to live so that both the form (to add kudos) and the card display (to read kudos) can access it?
-
Initialize the State: In the correct component (if you cant figure which, let us know), use the
useStatehook to create a state variable that holds an array ofKudosobjects. You can start it with an empty array[]or use the example kudos from the lesson plan. -
Create an "Add" Function: In the same component where you created your state, write a function (like
handleAddKudos) that takes a newKudosobject as an argument and updates the state by adding this new object to the array. -
Pass the Function: Pass your new "add" function down to the
<KudosForm />as a prop (e.g.,onSubmit). -
Render the List: Use your state array to render the list of cards. Instead of hard-coding a
<KudosCard />, you'll need to map over your state array and return a<KudosCard />for each item.
Bonus (If ur trying to flex)
Once it's working, try implementing a "Empty State" message. Your app should show a friendly message like "No kudos yet. Be the first!" only when the kudosList array is empty.
Resources Some Hints...
This is a great resource to get you started. There is a also a really good example implementation: Managing State
- Don't forget to import
useStatefrom'react'(this is likely why your code might be not working). - Remember the
Kudosinterface from Week 4? It will help TypeScript know what your state looks like (useState<Kudos[]>(...)). -
IMPORTANT: You must never modify state directly (like using
.push()). You must always create a new array using the spread operator (...) and pass that to yoursetKudosListfunction. - When you
.map()over your array to create cards, React will need a uniquekeyprop for each<KudosCard />(if unsure/unfamiliar with what a key is or what this means, ask us!).
As always, Derrick and I are here for you!!! Just ask if you get stuck.
Week 8
Goals
Here are the goals for this week:
- Build a static
<Sidebar />component.
Recap and a Quick Note...
I know a lot of people couldn't finish implementing state during last week's session, and that is ok! The concept of state is non-trivial and much harder to implement on your own than tasks from prior weeks.
Which brings me to my note...
If you have free time, go watch a YouTube video and go back in to try again! Even better, read the documentation!
I hate to admit it, but reading documentation is something I only really started doing a few months ago, and I realize now that it is extremely useful and a high ROI for your skills as a programmer/student/human imo.
Try it out!
Now for the objective...
Your Objective
Right now, our Kudos Board is just a form and some cards on a blank page. "Real" apps have navigation, a persistent header, and a consistent layout. When you click a menu button on a mobile site, you naturally expect a sidebar to behave and feel a certain way.
Your goal this week is to build a component of that static app layout. You'll create a static <Sidebar /> (side menu) using TypeScript, and style it using CSS.
Motivation
You might be thinking, "Why are we making an individual Sidebar.tsx file? Couldn't I just dump all the HTML into App.tsx?"
Welllll yes, you couldddd, BUT you'd be setting yourself up for a massive headache later.
This idea of breaking your UI into small, self-contained pieces is one of the most important concepts in React (and web dev).
Here's some reasons why:
- DRY (Don't Repeat Yourself): This is a core programming principle. If you find yourself copying and pasting the same chunk of HTML/CSS/JS, you should probably make it a component. Why? Because if you need to change it, you only have to change it in one file, not 10.
- It's just easier 🫣...
-
Easier to Fix (Maintainability): If your sidebar has a bug, you know exactly where to look:
Sidebar.tsx. You don't have to hunt through a giant 1000-lineApp.tsxfile to find the broken<div>. -
Easier to Read (Readability): When someone else (or you, 6 months from now) looks at your
App.tsx, they won't see a wall of code. They'll see<Sidebar />,<KudosForm />and<KudosCards />. You instantly know what the page is made of. -
Easier to Grow (Scalability): Need another sidebar on a different page down the line? Just import
<Sidebar />. You can pass it a prop to change its behavior. This makes building new features way faster.
-
Easier to Fix (Maintainability): If your sidebar has a bug, you know exactly where to look:
By building a clean component today, you're building a something that you can trust, understand, and reuse anywhere, which is key to building large, complex projects.
Task Outline
Implement a responsive navigation layout. This will involve creating a <Sidebar /> component.
Your Checklist
To get this done, you'll need to:
- Create a new component file
Sidebar.tsx(and a CSS file,Sidebar.css). - Build the
<Sidebar />.- It should be a vertical bar positioned on the left side of the screen.
- Add a few placeholder links inside like "Home," "Give Kudos," and "Profile." (don't worry about them not going anywhere yet!)
- Now, go into your
.cssfiles and make it look good! InSidebar.css, style the.sidebarclass to be a vertical bar that's always visible on the left. - In your main
App.tsx, implement your component.
Some Hints...
Remember prior weeks! Our past sessions have covered the skills you need to do this, so feel free to reference them
Here's some icons for your sidebar. Simply copy this code and paste (define) at the top of your Sidebar.tsx file:
import './sidebar.css';

// --- Helper Icon Components (Replaces lucide-react) ---
// We define simple SVGs here to keep the file self-contained.

// Icon for "Home"
const HomeIcon = ({ className }: { className: string }) => (
  <svg
    className={className}
    xmlns="http://www.w3.org/2000/svg"
    viewBox="0 0 24 24"
    fill="none"
    stroke="currentColor"
    strokeWidth="2"
    strokeLinecap="round"
    strokeLinejoin="round"
  >
    <path d="m3 9 9-7 9 7v11a2 2 0 0 1-2 2H5a2 2 0 0 1-2-2z" />
    <polyline points="9 22 9 12 15 12 15 22" />
  </svg>
);

// Icon for "Give Kudos" (using a simple "gift" icon)
const KudosIcon = ({ className }: { className: string }) => (
  <svg
    className={className}
    xmlns="http://www.w3.org/2000/svg"
    viewBox="0 0 24 24"
    fill="none"
    stroke="currentColor"
    strokeWidth="2"
    strokeLinecap="round"
    strokeLinejoin="round"
  >
    <polyline points="20 12 20 22 4 22 4 12" />
    <rect x="2" y="7" width="20" height="5" />
    <line x1="12" y1="22" x2="12" y2="7" />
    <path d="M12 7H7.5a2.5 2.5 0 0 1 0-5C11 2 12 7 12 7z" />
    <path d="M12 7h4.5a2.5 2.5 0 0 0 0-5C13 2 12 7 12 7z" />
  </svg>
);

// Icon for "Profile" or "User"
const UserIcon = ({ className }: { className: string }) => (
  <svg
    className={className}
    xmlns="http://www.w3.org/2000/svg"
    viewBox="0 0 24 24"
    fill="none"
    stroke="currentColor"
    strokeWidth="2"
    strokeLinecap="round"
    strokeLinejoin="round"
  >
    <path d="M20 21v-2a4 4 0 0 0-4-4H8a4 4 0 0 0-4 4v2" />
    <circle cx="12" cy="7" r="4" />
  </svg>
);
I'm done... what's next!?
Nice! You've got a clean and modern sidebar!
Next week, we'll look into how to make those sidebar links actually go to different pages by introducing React Router!
End of Semester Challenge! (Week 9)
Goals
Here are this week's goals:
- Complete the EOS challenge!
Your Objective
Get ready for the ultimate challenge... building Kudos from scratch! 🙀
For the final session of this semester, lets leverage all of the skills and practices we've obtained from prior weeks to build Kudos as if we came up with it on our own.
In other words, your goal is to setup, build, and run a React app (namely, Kudos) all on your own!
Your Checklist
To get this done, you'll need to recall each prior week to some extent.
Let's walk through some high-level steps that you might take to do this:
- Create a react app. Not much to add here, but if you run into any errors, just remember that the command you enter in the terminal must follow a specific syntax.
- Open your project. After creating the app, you should open it in VSCode. If you remember how to do this from your terminal, awesome! If you don't, no worries, just do it via the VSCode window.
- Start a development server. In the VSCode project terminal (you can open it from the navbar), run the command to start your localhost.
- Create a folder to store your components and create the necessary component files. Create and move the files you'll need to build the form and cards in your components folder. You can decide what to name them, but remember to keep the naming consistent.
- Write the code! Remember to check past weeks if you need guidance. Also, remember to save your changes frequently with Ctrl + S / Cmd + S
Closing Remarks and an Exit Ticket
Thank you all for an amazing semester!!!!!
I had a great time learning and coding with everyone, and am even more hype for when we return in the Spring.
My last ask is that you complete this form: EOS Feedback
I designed it for a few reasons:
- To get your feedback on the sessions.
- To see where you feel like are now vs. where you were in August when we started.
- Lastly, and most importantly, to get your input on what we should do next semester!
Blueprint is still super young and this is our first time running Tech Team this way, so your thoughts and opinions will directly shape how we run it for semesters to come.
On that note, please be brutally honest and open about what you liked and didn't like, it will help us out massively.
I appreciate you all and thanks again for a great semester!
FastAPI
Week 1
Week 1
Join the github classroom assignment with the following link: https://classroom.github.com/a/KOc7f0j5
Once you join your repository will be created https://github.com/blueprint-learn/week1-techteam-sp26-{github-username}
You will get an email with access to your repo
Clone your repo
git clone https://github.com/blueprint-learn/week1-techteam-sp26-{github-username}.gitGoal for today
By the end of this class, you will understand what an API is and you will have written and run a real backend service.
Set expectations
-
This is not web dev with HTML
-
This is backend infrastructure
-
What we build today looks simple, but it’s the same pattern used by Netflix, Stripe, AWS, etc.
1. What Is an API?
Core idea
-
API = contract between a client and a server
-
You ask for data → server responds with data
Client (browser / app / script)
        |
        |  HTTP request
        v
      API Server
        |
        |  JSON response
        v
      Client
Key clarification
-
APIs don’t care who the client is
-
Browser, mobile app, another server — all the same
Examples
-
Instagram feed
-
Spotify playlists
-
Google Maps directions
2. REST & HTTP Basics
REST (high-level)
-
Everything is a resource
-
Each resource has a URL
HTTP Methods
|
Method |
Meaning |
|---|---|
|
GET |
Read data |
|
POST |
Create data |
|
PUT |
Update data |
|
DELETE |
Remove data |
HTTP Response
-
Status code (200, 404, etc.)
-
Body (usually JSON)
{
  "id": 3,
  "name": "Notebook",
  "price": 5.99
}
Important
-
JSON ≠ Python dictionary (but very similar)
3. Live Demo Setup
pip3 install -r requirements.txtMinimal app
from fastapi import FastAPI

app = FastAPI()

@app.get("/")
def root():
    return {"message": "Hello World"}
Run the app
uvicorn app.main:app --reload4. Endpoints & Path Parameters
@app.get("/items/{item_id}")
def read_item(item_id: int):
return {"item_id": item_id}- Automatic validation
- Type validation
Week 2
Getting Started
Join the github classroom assignment with the following link: https://classroom.github.com/a/Cg-MTRGE
Once you join your repository will be created https://github.com/blueprint-learn/week2-techteam-sp26-{github-username}
Once you join, GitHub Classroom will automatically create your personal repository. You will receive an email confirming access.
After receiving access:
-
Clone your repository locally
-
Install dependencies
-
Run the starter FastAPI app
This repository contains the scaffolding you will extend during this week.
git clone https://github.com/blueprint-learn/week1-techteam-sp26-{github-username}.gitRecap last week
In Week 1, we established the core foundation of APIs using FastAPI. By the end of the session, you had:
-
Built a running FastAPI server
-
Created basic endpoints
-
Used path parameters
-
Verified correctness through automated CI tests
You also saw how an API defines a contract between a client and a server, and how tests enforce that contract.
Goal for today
By the end of this week, you will understand how APIs receive structured data and how FastAPI automatically validates incoming data.
This is a major step forward: your API will no longer only return data — it will safely accept data from clients.
Big idea
Last week, the interaction pattern was:
Client asks for data → Server returns data
This week, we expand that model:
Client sends data → Server validates and accepts data
This shift introduces one of the most important responsibilities of a backend API: validating inputs at the system boundary.
1. How Data Enters an API
There are three primary ways data reaches an API endpoint. Understanding these channels is essential for designing correct APIs.
|
Type |
Where used |
Example |
|---|---|---|
|
Path |
Identify resource |
/users/3 |
|
Query |
Filter/search |
?limit=10 |
|
Body |
Send data |
POST JSON |
Each serves a different purpose:
-
Path parameters identify which resource
-
Query parameters refine how to retrieve
-
Request bodies provide new data
Path parameters
Path parameters help define a resource. They usually appear after a / . IDs are usually passed as path parameters to identify a resource.
/items/5Query parameters
Query parameters appear after a ? in the URL and are commonly used for filtering, pagination, or search controls.
Examples to test:
/items?limit=10@app.get("/items")
def list_items(limit: int = 10):
return {"limit": limit}FastAPI automatically:
-
Applies default values when missing
-
Converts types based on type hints
-
Validates incorrect input
For example, if limit is defined as an integer and a string is provided, FastAPI will reject the request before your function executes.
Key insight:
FastAPI parses query strings into typed Python values.
Request body (JSON)
Real-world APIs must accept structured data. Common examples include:
-
User signup information
-
Orders or transactions
-
Messages or posts
-
Payment details
Clients send this data as JSON in the request body.
{
  "name": "Notebook",
  "price": 5.99
}
@app.post("/items")
def create_item(item: dict):
return itemA naive implementation might accept this as a generic dictionary. However, this approach has critical problems:
-
No validation
-
No defined structure
-
No guarantees about data shape
This leads to unstable and unsafe APIs
We need a schema.
4. Pydantic Models
FastAPI uses Pydantic models to define structured request bodies.
A Pydantic model specifies:
-
Required fields
-
Types
-
Optional fields
-
Validation rules
When used in an endpoint, FastAPI:
-
Parses incoming JSON
-
Validates types and structure
-
Converts into a Python object
-
Rejects invalid requests automatically
This provides:
-
Schema definition
-
Type enforcement
-
Automatic parsing
-
Validation
The model becomes the contract for accepted data.
Why Validation Matters
Validation at the API boundary protects the system from invalid or malicious input.
Without validation, systems risk:
-
Database corruption
-
Runtime crashes
-
Security vulnerabilities
-
Inconsistent data
With validation, APIs ensure:
-
Safe inputs
-
Predictable structure
-
Stable behavior
Core principle:
Validation is defensive programming at the API boundary.
Define
from pydantic import BaseModel

class Item(BaseModel):
    name: str
    price: float
Use
@app.post("/items")
def create_item(item: Item):
    return item
Explain
-
Schema definition
-
Type enforcement
-
Automatic parsing
-
Validation
Week 3
Before we get into PostgreSQL, we need to understand why we use databases in the first place. Right now, if our apps use dictionaries to store our data. The problem is that the data disappears when the server restarts, creating a problem in the future. A database allows us to store our data permanently so it survives restarts, crashes, and can support concurrent users.
There are two categories of databases
| Relational (SQL) | Non-Relational (NoSQL) | |
| Structure | Tables with rows and columns | Similar to JSON |
| Schema | Fixed, predefined | Flexible, schema-less |
| Relationships | Tables link with keys | Handled in the app's code |
| Query Language | SQL | Varies but usually none |
| Best for | Structured data that relates to each other | Unstructured or rapidly changing data |
| Examples | PostgreSQL, MySQL | MongoDB, Redis |
What is a relational database?
A relational database organizes data into tables. Each table represents one thing (a resource, a user, an order, etc). Each row is one record and each column is an attribute of that record, with a defined data type.
| id | first_name | last_name | |
| 1 | Miguel | Merlin | mmerlin@stevens.edu |
| 2 | Nishit | Sharma | nsharma11@stevens.edu |
Because these tables are relational, that means they can be linked to each other. An orders table can reference a user table, so every order knows which user placed it.
What is PostgreSQL?
PostgreSQL is an open source Relational Database Management System (RDBMS). The RDBMS is a software layer that sits on top of your data. It enforces rules, handles queries, and manages connections.
Tables and Schema
When you create a table in PostgreSQL, you define its schema, the column names and what type of data each column holds. You do this with CREATE TABLE
CREATE TABLE users (
    id    SERIAL PRIMARY KEY,
    name  VARCHAR(100) NOT NULL,
    email VARCHAR(255)
);
You have to define this schema otherwise, PostgreSQL will reject any data that doesn't fit the schema
Data Types
Every column has a data type that constrains what values it can store:
| Type | What it stores | Example |
| INTEGER | Whole numbers | 42 |
| SERIAL | Auto-incrementing integers (use it for IDs) | 1, 2, 3, ... |
| VARCHAR(n) | Text up to n characters | "Nishit Sharma" |
| TEXT | Unlimited length text | Long descriptions |
| BOOLEAN | True/False | true |
| DATE | Calendar date | 2026-3-25 |
| NUMERIC | Decimal numbers | 19.99 |
Primary Keys and Foreign Keys
A primary key is a column that uniquely identifies every row in a table. No two rows can share the same primary key. SERIAL PRIMARY KEY makes PostgreSQL auto assign a new integer ID to each row you insert.
A foreign Key is a column in one table that references the primary key of another table. This creates the relationship between tables
CREATE TABLE orders (
    id          SERIAL PRIMARY KEY,
    user_id     INTEGER REFERENCES users(id),
    amount      NUMERIC,
    order_date  DATE
);
In this example, user_id is a foreign key, and it must match an existing id in the users table. If you try to insert an order with a user_id that doesn't exist, PostgreSQL will reject it automatically.
Basic SQL
SQL (Structured Query Language) is the language we will use. Every operation you will perform (creating tables, inserting data, and reading data) is written in SQL.
CREATE TABLE
Defines a new table and its schema:
CREATE TABLE resources (
    id            SERIAL PRIMARY KEY,
    name          VARCHAR(255) NOT NULL,
    category      VARCHAR(50),
    description   TEXT
);
NOT NULL means that the column is required, PostgreSQL won't let you insert a row without a value there.
INSERT (Create)
Adds a new row to a table:
INSERT INTO resources (name, category, description)
VALUES ('City Food Bank', 'Food', 'Free weekly groceries for families.');
SELECT (Read)
Retrieves rows from a table:
-- Get everything
SELECT * FROM resources;

-- Get specific columns
SELECT name, category FROM resources;

-- Filter with WHERE
SELECT * FROM resources WHERE category = 'Food';
UPDATE
Changes an existing row:
UPDATE resources
SET description = 'Updated description here.'
WHERE id = 1;
Make sure to include a WHERE clause on UPDATE otherwise you will update every row in the table
DELETE
Removes a row:
DELETE FROM resources WHERE id = 1;Relationships between tables
The most common relationship in web apps is one-to-many. This means that one resource can have many referrals, one user can have many orders.
-- One user
CREATE TABLE users (
    id   SERIAL PRIMARY KEY,
    name VARCHAR(100)
);

-- Many orders belonging to one user
CREATE TABLE orders (
    id       SERIAL PRIMARY KEY,
    user_id  INTEGER REFERENCES users(id),
    amount   NUMERIC
);SELECT users.name, orders.amount
FROM orders
JOIN users ON orders.user_id = users.id;This pulls the user's name from the users table and matches it to their orders using the foreign key relationship
Getting Started
Join the GitHub Classroom assignment with the following link: https://classroom.github.com/a/yW_GReTh
Once you join, your repository will be created https://github.com/blueprint-learn/week3-techteam-sp26-{github-username}
Once you join, GitHub Classroom will automatically create your personal repository. You will receive an email confirming access.
After receiving access:
-
Clone your repository locally
-
Install dependencies
-
Run the starter FastAPI app
This repository contains the scaffolding you will extend during this week.
git clone https://github.com/blueprint-learn/week3-techteam-sp26-{github-username}.gitWeek 4
What is an ORM?
Last week, we covered SQL and PostgreSQL. However, in many applications, developers don't want to write raw SQL for any usage of the database. An ORM, Object Relation Mapper, helps bridge objects and database tables by representing tables as classes and rows as objects.
Why an ORM?
An ORM gives us a code friendly way of working with data in tables with rows, columns, primary keys, and foreign keys. This is helpful because most backend applications aren't written in SQL, but it allows us to use whatever language we want, Python or Typescript, for example, while being able to use Postgres as the database.
What is SQLAlchemy?
SQLAlchemy is a Python ORM that we can import as a library. This lets us describe our database tables as a Python class and its columns as class attributes.
Models
In SQLAlchemy, a model is a Python class that represents a database table. Each model class has a __tablename__ value and attributes that define columns, such as id, name, or email
from sqlalchemy import Column, Integer, String
from sqlalchemy.orm import declarative_base

Base = declarative_base()

class Resource(Base):
    __tablename__ = "resources"

    id = Column(Integer, primary_key=True)
    name = Column(String, nullable=False)
    category = Column(String, nullable=False)
    address = Column(String)
    contact_email = Column(String)
In this example, the Resource class maps to a table named resources, and each class attribute maps to one column in that table.
Columns and Data Types
Just like in PostgreSQL, each column in a SQLAlchemy model has a type (Integer, String, etc). You can also add constraints in the model definition. For example, primary_key=True marks a column as the primary key, and nullable=False means that the column is required and should not be left empty.
Primary Keys and Foreign Keys
A primary key identifies a row in a table, and a foreign key references the primary key of another table, which we learned last week. Here is what that looks like in SQLAlchemy
from sqlalchemy import Column, Integer, String, ForeignKey, Date
from sqlalchemy.orm import declarative_base

Base = declarative_base()

class Referral(Base):
    __tablename__ = "referrals"

    id = Column(Integer, primary_key=True)
    family_name = Column(String, nullable=False)
    resource_id = Column(Integer, ForeignKey("resources.id"))
    referral_date = Column(Date)
    notes = Column(String)
Here, resource_id is a foreign key that points to resources.id. That means that each referral can be linked to an existing resource, like we setup last week.
Relationships
Foreign keys connect tables at the database level, but SQLAlchemy can also define relationships at the Python level. Relationships make it easier to move between related objects in code, such as going from a resource to all of its referrals
from sqlalchemy.orm import relationship

class Resource(Base):
    __tablename__ = "resources"

    id = Column(Integer, primary_key=True)
    name = Column(String, nullable=False)

    referrals = relationship("Referral", back_populates="resource")

class Referral(Base):
    __tablename__ = "referrals"

    id = Column(Integer, primary_key=True)
    resource_id = Column(Integer, ForeignKey("resources.id"))

    resource = relationship("Resource", back_populates="referrals")
Connecting to PostgreSQL
Before SQLAlchemy can do anything, we need to connect it to our database.
from sqlalchemy import create_engine

# If you are using a hosting provider, they will give you this
engine = create_engine("postgresql://user:password@localhost/dbname")
Sessions
After SQLAlchemy knows how to connect to PostgreSQL, it needs a way to actually interact with the database. That is the role of a session.
A session is the object that manages database operations like adding rows, querying data, and saving changes. You can think of it as your temporary conversation with the database while your Python code is running.
from datetime import date
from sqlalchemy.orm import Session

with Session(engine) as session:
    food_bank = Resource(
        name="City Food Bank",
        category="Food",
        address="123 Main St",
        contact_email="help@cityfoodbank.org",
    )

    tutoring_program = Resource(
        name="Bright Futures Tutoring",
        category="Education",
        address="45 College Ave",
        contact_email="info@brightfutures.org",
    )

    session.add_all([food_bank, tutoring_program])
    session.commit()

    referral_1 = Referral(
        family_name="name1",
        resource_id=food_bank.id,
        referral_date=date(2026, 4, 1),
        notes="note1",
    )

    referral_2 = Referral(
        family_name="name2",
        resource_id=tutoring_program.id,
        referral_date=date(2026, 4, 2),
        notes="note2",
    )

    session.add_all([referral_1, referral_2])
    session.commit()
In this example, we create the session using with Session(engine) as session:. Inside that, we create Resource and Referral objects in Python, add them to the session, and save them to PostgreSQL with Session.commit()
Creating Tables
After you define your models, SQLAlchemy can use the models you defined to create the tables in the database, using Base.metadata.create_all(engine). This is an example of why using an ORM is better. Instead of writing raw SQL, SQLAlchemy uses your Python models to create the matching tables
from sqlalchemy import Column, Integer, String, ForeignKey, Date, create_engine
from sqlalchemy.orm import declarative_base, relationship

Base = declarative_base()

class Resource(Base):
    __tablename__ = "resources"

    id = Column(Integer, primary_key=True)
    name = Column(String, nullable=False)
    category = Column(String, nullable=False)
    address = Column(String)
    contact_email = Column(String)

    referrals = relationship("Referral", back_populates="resource")

class Referral(Base):
    __tablename__ = "referrals"

    id = Column(Integer, primary_key=True)
    family_name = Column(String, nullable=False)
    resource_id = Column(Integer, ForeignKey("resources.id"))
    referral_date = Column(Date)
    notes = Column(String)

    resource = relationship("Resource", back_populates="referrals")

engine = create_engine("postgresql://postgres:postgres@localhost:5432/communitybridge")

Base.metadata.create_all(engine)
Querying Data
One of the main reasons to use an ORM is to query data using Python. SQLAlchemy sessions can retrieve all rows, filter rows, and follow relationships between models. For example
with Session(engine) as session:
    all_resources = session.query(Resource).all()
    food_resources = session.query(Resource).filter(Resource.category == "Food").all()
The first line gets every row in the resources table, and the second line gets only rows where the category is "Food". SQLAlchemy turns those Python expressions into SQL queries behind the scenes.
You can also create and save new rows:
new_resource = Resource(
    name="City Food Bank",
    category="Food",
    address="123 Main St",
    contact_email="help@cityfoodbank.org"
)

session.add(new_resource)
session.commit()
Here, we create a Python object, add it to the session, and commit the change so it is saved to PostgreSQL
Getting Started
Join the GitHub Classroom assignment with the following link: https://classroom.github.com/a/XIyvm9h_
Once you join, your repository will be created https://github.com/blueprint-learn/week4-techteam-sp26-{github-username}
Once you join, GitHub Classroom will automatically create your personal repository. You will receive an email confirming access.
After receiving access:
-
Clone your repository locally
-
Install dependencies
-
Run the starter FastAPI app
This repository contains the scaffolding you will extend during this week.
git clone https://github.com/blueprint-learn/week4-techteam-sp26-{github-username}.gitWeek 5?
need to see if we can make a project that they can work on
So far, we talked a lot about frontend and backend as seperate pieces. The frontend is what the user interacts with, and the backend is what handles logic, data, and communication behind the scenes.
This week, we are taking a step back from focusing on just one thing. Instead, we are going to look at the whole system and how all the pieces connect.
What is system design?
System design is just the process of thinking about how an application works as a whole. When we build an app, there are a bunch of questions beyond "How do I code this?"
You have to answer
- What parts does this app need?
- What does the data look like, and where will it go
- How will the frontend interact with the backend
- How do we deploy the app
- What happens when tons of people use it
Answering these questions is pretty much what system design is. It isn't just for big companies or complicated apps. You have probably "done" system design if you've ever worked on a project, because anytime you have a frontend, backend, database, auth, file storage, or deployment, you implemented a system.
Thinking in System Design
The best way to think about system design is to break an app into pieces (and break each piece into smaller pieces if you can)
For most web apps, you usually need
- Frontend
- Backend
- Database
- Storage
- Authentication
- Hosting / Deployment
Not every project needs all of these, but these are the most common things most projects have.
For example, with DuckLink, they have
- A frontend where students browse events
- A backend that handles the requests
- A database that stores the event info
- Authentication so students can log in
- Hosting so that the app exists somewhere people can access
Once you think about apps like this, it becomes much easier to understand what you need to build
Usually, projects go through three primary stages during development: the local development stage, the deployment stage, and the scaling stage.
Local Development
This is where everything runs on your computer. You typically have
- A frontend running locally (npm run dev)
- A backend running locally (npm run dev)
- A database running locally (Docker containers)
At this stage, you just want to make sure the app works properly
Deployment
Once your app runs properly locally, it needs to be hosted somewhere so people can access it (Either on the internet or an App Store). This means you need to think about
- Where does the frontend live
- Where does the backend live
- Where does the database live
- How can they all connect
Once a project gets deployed, system design matters a lot more because the app isn't just running in one place, its running like a system (system design).
Scaling
Let's say your app had tons of users showing up. Tons of problems will also start showing up. Things that were fine can become bottlenecks. Let's say
- The backend might get too many requests
- Your site gets so much slower, especially if you rely on the backend to get data.
- The database might slow down under load
- Similar to the backend getting too many requests, anything that requires retrieving information will take a while because your database is overloaded
- File uploads might become expensive
- This can be applicable to the frontend and backend too, but let's say you hit the limit on your free plan for your file server. You will no longer be able to upload anything without paying, which, if scaled up to tons of users, can get expensive.
- Users far away from the server have a slower experience
- Let's say you deployed everything to an American server. Users anywhere else in the world will have a slower time on your app because they have to interact with American servers to get everything. This takes a while, and while not as impactful as the other issues, it is still important to consider
This is where ideas like caching, CDNs, load balancing, and horizontal scaling matter. To further show this, let's take a look at an example
The YouTube Example
We asked this question during the Fall Semester recruitment cycle, and very few people could somewhat answer it, and only people who've had internships or tons of projects were able to somewhat answer it, so I figured this is one of the best examples we can do.
"How would you design YouTube?"
More specifically, though, we asked them, "What does your API look like?" How would you deploy this? How would you scale this?
However, for this, I'll walk you through the full thing so you guys can use this as an example if you build anything similar.
First, we need to define the APIs. You generally want to figure out your backend first, as it's harder to make changes to a backend if your frontend is already written. Let's say we are passing parameters from the frontend to the backend, and we need to change the backend; we also need to make changes to the frontend, which is annoying. Now, YouTube has a lot more than these four, but for the video streaming itself, we need a create video, delete video, update video, and get video. Create video takes the account that made the video, any metadata like title, description, thumbnail, and a UUID. A UUID stands for Universally Unique Identifier, and it's a 128-bit number that allows us to create the number before it touches the backend (reducing load) and makes it easier to merge databases as it's always unique (not stored as 1, 2, 3 in the db). Delete video takes the video UUID and the account to make sure whoever is trying to delete a video can actually delete the video. Update video would take similar parameters to create, but instead of creating a new video, you would just update the fields that need to be changed. The get video endpoint retrieves the video metadata that we stored before using the UUID that we provide. We can get the UUID from the frontend, which would request a list of videos from the backend and then map those results into React components. Get video would also return the video, either with a file or a playback URL, which I will explain later.
The frontend can look like whatever, so we don't need to focus on that in terms of system design, for now our working model in our heads can be three buttons, one for each api route, and a bunch of videos using the get video route. In a deployed app, we have our frontend connected to the backend, normally called a full-stack application. However, in this case, it isn't smart to store our video in our backend because the video needs to be streamed. Streaming a video from a database will slow down the database by a lot, and the streaming itself will be slow, so we need something else. For this, we need a file server to store our videos and our thumbnails. So in our mental model, the front end is connected to the backend, and the backend is connected to the file server.
When we store videos with the create video route, we store them in the file server and rename the video to the UUID we generated in the route. This allows us to identify which video corresponds to which entry in our database and retrieve it accordingly. One thing we can also do here to make uploads and downloads better is to have the backend create the UUID + db entry and return a presigned upload or download URL. Then the frontend can upload or download the video to/from your file storage instead of pushing the whole file through the backend.
Right now, the typical flow of this app is that the user goes to the frontend and interacts with the create video button. They upload the video and fill in whatever they need to, and submit the request. The frontend then gives all the information to the backend, and the backend creates the UUID and stores everything except the video. The backend will return the presigned upload URL so the frontend can upload directly. Whenever the file needs to be streamed, the frontend sends a request to the backend, and the backend gives a presigned download URL to the frontend so it can stream properly, and the backend isn't involved in the actual streaming portion.
Now this is the first development stage done, and everything theoretically works locally, but how would we actually get to deploying this project? For this, we need hosting providers for each thing: the frontend, backend, and file server. For our frontend, we can use Vercel, Cloudflare Pages, AWS Amplify, or an AWS S3 bucket with CloudFront (I think our dev team uses this). For our backend, we would typically use PostgreSQL to store the information, so we can use Supabase, Neon, AWS RDS, or, if you don't want to use PostgreSQL, you can use whatever you can store stuff with (I suggest Convex if you don't want to mess with SQL). For our file server, you can use Vercel Blob, AWS S3, Cloudflare Stream, or Cloudflare R2.
Technically, this config can work. However, a question you may be asked is how would you scale this to a million users in a hypothetical scenario? In our model right now, it is in a straight line. One frontend instance, one backend instance, and one file server instance. We need to scale these horizontally, essentially adding more instances and creating a distributed network. This is where things can get tricky, so I'll try to explain it as simply as possible.
We essentially need multiple instances of each thing, however it is important that the instances for the backend and file server are connected. The frontend is easier to scale because it is mostly static and can be pushed through a CDN, but the backend, database, and file storage need a shared consistent state, otherwise some people will have videos that other people don't have access to.
First, let's address the frontend. We typically want to use a CDN for our multiple frontend instances. A Content Delivery Network allows us to store our frontend on tons of servers instead of just one server. The users will access the server closest to them, making sure they always have the fastest connection.
For our backend and file server, we will use something called a load balancer to distribute the requests effectively. The load balancer is pretty self-explanatory. If a cluster is running slower, the load balancer will reroute the request to a different cluster that has less load. To properly explain everything with examples, we will use Vercel for our frontend, Supabase for our backend, and an S3 bucket + CloudFront for our file server. Vercel has a CDN already, and it is pretty decent, so we don't have to worry too much about that.
For our backend, there is one thing we need to specify. Our backend must be stateless. Pretty much, no user session data (like which account they are on, what video they're watching, etc) can be stored on the database and instead, stored in a session using Redis and Tanstack Query (used to be called React Query). More specifically, Redis would be our shared cache layer on the backend, and React Query would help cache and manage requests on the frontend side. Setting up our backend this way allows our load balancer to switch clusters without the user noticing, and using Redis + React Query allows us to use our cache (locally and from the db) instead of calling to the db all the time, making our performance as fast as possible.
Supabase has a load balancer built into it called the Supavisor that manages connections to different instances (called the Pool Size) so we can use that alongside the load balancer for our clusters. One trick you can do is have a couple of instances of the database, just for writing data, and a lot more for reading data. Supabase calls this Read Replicas. Most people on an app like YouTube don't really post and instead watch, so that's a way you can lessen the load on your system. Supavisor manages the database connections while the Read Replicas distribute read-heavy traffic.
We use S3 and CloudFront for the file server because it takes the load of streaming away from our backend and frontend. If we didn't use the presigned URLs, the frontend would still play a role in streaming. Also, CloudFront is an example of a CDN, so you could also use this method (S3 + CloudFront) to deploy the frontend.
One very minor thing, but usually on a bigger scale, we would also transcode the uploaded video into multiple resolutions so users with different internet speeds can stream smoothly. Other than that, with this setup, this is how you would design YouTube
Tradeoffs
Ok, I know that was a lot, but this is only one answer to this question. With system design, there are different answers to the same question, but as long as you have an answer, that is fine. Because there are multiple answers, every answer has certain tradeoffs. For instance
- Database Type (SQL vs NoSQL)
- Local file storage or cloud storage
- Monolith vs Seperate services
- Simpler setup now vs more scalable setup later
In our version of the YouTube answer. We are
- Locked into the Vercel Edge Network (Their CDN)
- Locked into Supabase and Supabase utils for our database
- If Supabase goes down, so does our app
- Setting up our file storage is more difficult to set up compared to our frontend and backend, but we have more control over it
A lot of system design is making reasonable choices based on the size and needs of a project. Maybe there is a service we can use to store our files (uploadThing), so for an early prototype, we can use that instead of using an S3 bucket + CloudFront. Similarly, if we need control over our CDNs and database, we would move away from Vercel and Supabase.
??? Example
Walk me through how you would build ???