Blueprint Developer Setup
Before you start contributing to any of our projects, you must follow the instructions in this setup to ensure you have all the software and dependencies necessary to start contributing.
Installing Git
Git is a distributed version control system that is widely used to track changes in source code during software development. It allows multiple developers to work together on a project, providing tools to manage and merge different versions of the code. Git is designed to handle projects of all sizes with speed and efficiency. It enables developers to keep a complete history of their work, revert to previous versions, and collaborate with others without overwriting each other's changes. Git is essential for coordinating work among programmers, but it's also useful for tracking changes in any set of files, like text documents or configuration files.
Here's a basic guide on how to install Git on both Mac and Windows:
For Mac:
If you have brew installed, you run
brew install gitTo verify your installation type git --version in the terminal.
For Windows:
- Download the latest Git for Windows installer. Visit the Git website at https://git-scm.com/downloads to download the installer.
- Run the installer. Execute the downloaded file and follow the steps in the setup wizard. During the installation, you can choose which components to install and whether to integrate Git into the Windows Command Prompt or use Git Bash (a bash emulator for Windows).
- Verify the installation. Open either Git Bash or the Windows Command Prompt and type
git --versionto ensure Git was installed correctly. This command will display the version of Git that is currently installed.
Post-Installation Steps:
After installing Git, you might want to configure your personal information, which Git will use when you commit changes. You can do this by running the following commands in your terminal or command prompt:
git config --global user.name "Your Name"
git config --global user.email "youremail@example.com"
These commands set up your user name and email address globally for all your Git repositories. This information is used in your commits and is important for collaborating with others.
Git is a powerful tool for version control and collaboration. With Git installed, you can start cloning repositories, committing changes, and contributing to projects. Remember, the Git website and documentation offer comprehensive guides and tutorials to help you get started with using Git effectively in your projects.
Installing Node.js and npm
Node.js is an open-source, cross-platform, JavaScript runtime environment that allows developers to run JavaScript on the server side. It is built on Chrome's V8 JavaScript engine, and it enables the execution of JavaScript code outside a web browser. This capability makes it possible to use JavaScript for server-side scripting and building fast and scalable network applications. Node.js comes with a rich library of various JavaScript modules, which simplifies the development of web applications.
npm stands for Node Package Manager. It is the default package manager for Node.js and is used for managing and sharing JavaScript packages. It comes bundled with Node.js, which means when you install Node.js, you automatically get npm installed on your system. npm makes it easy for JavaScript developers to share and reuse code, and it's a vital tool for managing project dependencies.
You can install specific versions of node individually, however we recommend making use of a tool called Node Version Manager (NVM). NVM allows you to change and install new versions of Node on your device easily. When working with multiple node projects that may rely on features from certain versions, NVM is extremely helpful.
For Mac:
If you have brew installed, you run
brew update
brew install nvm
mkdir ~/.nvm

# Using zsh
echo "export NVM_DIR=~/.nvm\nsource \$(brew --prefix nvm)/nvm.sh" >> .zshrc
source ~/.zshrc
For Windows
Credit: https://www.freecodecamp.org/news/node-version-manager-nvm-install-guide/
-
Click on Download now
In the nvm-windows repository Readme, click on "Download Now!":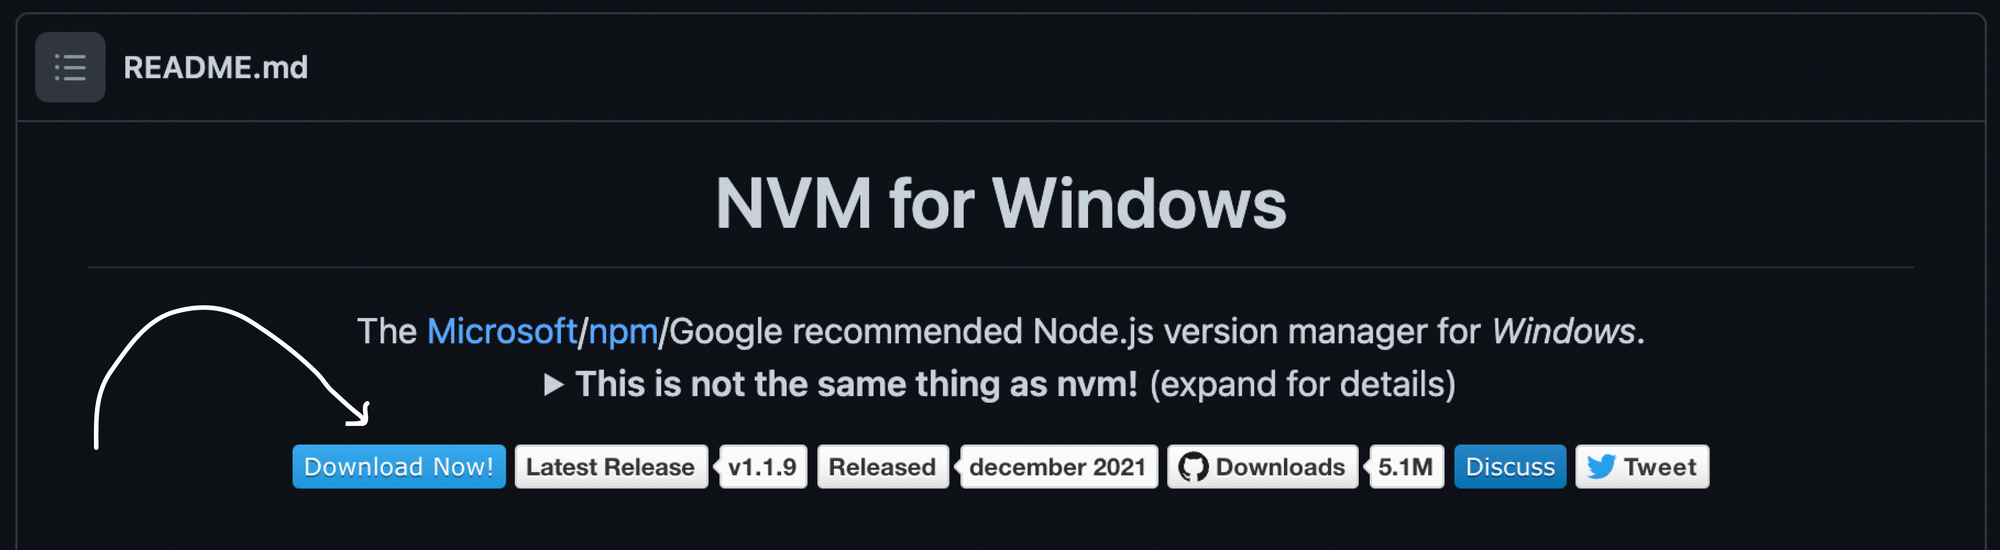
This will open a page showing different NVM releases.
-
Install the .exe file of the latest release
In the latest release you'll find different assets. Click on the nvm-setup.exe asset which is the installation file for the tool
-
Follow the Installation Wizard
Installing node and npm with nvm:
Verify your installation with nvm -v in the terminal. Once nvm is installed, you can install specific versions of node:
nvm install 20.0.0 # Installs a specific version nvm install --lts # Installs the latest Long Term Support Version nvm ls # Shows all the version of node-installed # Switch to a specific node version nvm use <VERSION_NUMBER> nvm use 20.11.1 # Sets devices default node version to the specific version nvm alias default <VERSION_NUMBER> nvm alias default 20.11.1
To verify your installation type node -v and npm -v in the terminal.
For Windows
Go to the Node.js website (https://nodejs.org/) and download the Windows Installer.Run the downloaded installer and follow the prompts to install Node.js and npm. Make sure to select the option to install npm and to add Node.js to your PATH.After installation, verify the installation by opening the Command Prompt and runningnode -vandnpm -v
Installing Docker
Docker is a platform and tool for developing, shipping, and running applications by using containerization technology. Containers allow a developer to package up an application with all of the parts it needs, such as libraries and other dependencies, and ship it all out as one package. This ensures that the application will run on any other Linux machine regardless of any customized settings that machine might have that could differ from the machine used for writing and testing the code.
In Blueprint we use Docker containers in several of our applications to manage different services and projects.